Launch Emoji Reaction Confetti in Your Twilio Video Chat with JavaScript
Time to read:
August 27, 2021
Written by
Reviewed by

Have you ever used social media apps where you can react to someone's video by launching emoji reaction confetti? Sometimes you don't necessarily have a comment you want to share, but you do want to respond with a smile, a thumbs up, or a heart to show how you feel about what your friend is saying.
In this tutorial, you'll build a video application where participants can react to each other by launching emoji confetti. Participants will be able to see the emoji reactions that other people on the call are sharing, as well as share their own emoji reaction. This application will use the Twilio Video DataTrack API to share which emoji a participant has selected.
Let's get started!
Prerequisites
- A free Twilio account. (If you register here, you'll receive $10 in Twilio credit when you upgrade to a paid account!)
- Node.js v14+ and npm installed on your machine.
- ngrok
Create the project directory and install dependencies
From your terminal or command prompt, navigate to where you would like to set up your project. Create a new directory called data-track-emoji and change into that directory by running the following commands in your terminal:
Next, set up a new Node.js project with a default package.json file by running the following command:
Once you have your package.json file, you're ready to install the needed dependencies.
For this project, you will need the following packages:
- Express, a Node.js framework
- Twilio Node Helper Library, to use the Twilio APIs
- dotenv, to load the environment variables from a .env file into your application
- node-dev, to automatically restart the Node process when you modify a file
Run the following command in your terminal to install these packages:
If you check your package.json file now, you'll notice that the packages above have been installed as dependencies.
Save your Twilio credentials safely as environment variables
Next, create a new file named .env at the root of your project and open it in your code editor. The .env file is where you will keep your Twilio account credentials. Add the following variables to your new file:
You’ll need to replace the placeholder text above with your actual Twilio credentials, which can be found in the Twilio Console. Log in to the Twilio Console and find your Account SID:
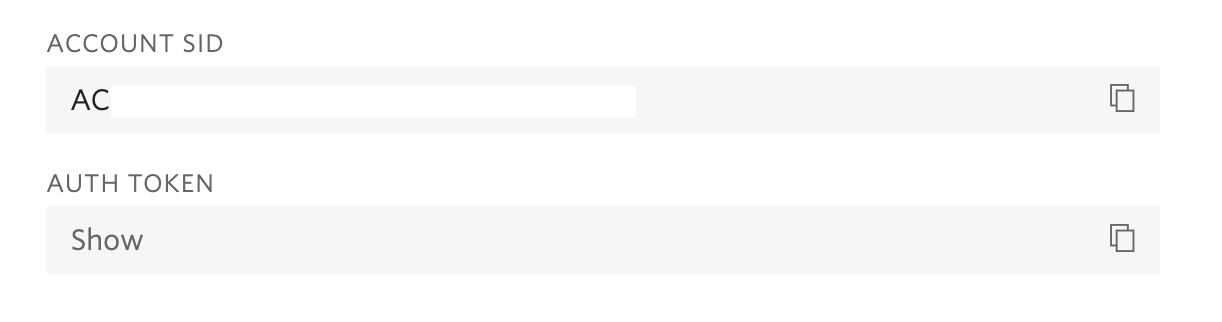
Copy and paste the value for Account SID to replace the placeholder text for TWILIO_ACCOUNT_SID.
Then, navigate to the API Keys section of the console and generate a new API Key. Copy the API Key's values for SID and Secret to replace the placeholder text for TWILIO_API_KEY_SID and TWILIO_API_KEY_SECRET.
It’s important to keep these private credentials secure and out of version control. If you’re using GitHub, create a .gitignore file at the root of your project. Here you can list the files and directories that you want git to ignore from being tracked or committed. Open .gitignore in your code editor and add the .env file. While you're in here, add the node_modules directory as well:
Now that you have your Twilio credentials set up, it's time to create your Express server.
Create a new Express server
Create a new file called server.js at the root of your project. This is the place where you will write your server-side code.
Open up server.js in your code editor. Add the following lines of code to server.js, which will load the environment variables from your .env file, create a new Express application, and set the application to run on port 5000:
Now, open package.json in your code editor. Inside the scripts section, add a start script as shown below. You can replace the placeholder test script that was automatically generated by npm init -y earlier. Then, in the main section, change the entry file listed there to server.js. When you are finished, your package.json file should look like the code below:
Now, to run the start script, return to your terminal window and run the following command:
Once you have done this, you should see the following log statement in your terminal window, letting you know that the Express server is running:
Now that your server is running, it's time to lay out the client side of your application.
Build the application layout and serve static files
Create a new directory called public at the root of your project. This directory will hold your static files:
Inside the public directory, create 3 new files: app.js, index.html, and styles.css.
Open up public/index.html in your code editor and add the following code to the file:
The HTML code above creates the layout for your video chat application. In the <head>, you have a link to the CSS styles, as well as three <script> tags: one for the Twilio Video library, one for the JS Confetti library, and one for the JavaScript code you'll write later in this tutorial.
The JS Confetti library lets you create confetti on an HTML canvas element. You can use regular confetti, emoji, or even letters of the alphabet. With this library, you'll create a <canvas> and can fill it with emoji at the press of a button! You can take a look at the JS Confetti demo here.
In the <body> of your HTML, there are four <section> elements:
gallery, which will include all participants' audio and videoreactions, which is where the emoji confetti will appearcontrols, containing the input for a participant's name, as well as the buttons for joining and leaving the chatemoji, with four buttons for selecting emoji reactions
Now that you have the HTML, open up public/styles.css and paste the following CSS styles into the file:
Now that you have some public files, you need to set up your server to serve these files when a user navigates to http://localhost:5000/ in their browser.
Return to server.js in your code editor. Add the following code to the file just below your constant definitions:
This code will add some Express middleware to your application, allowing it to parse JSON and to serve the static files you just created.
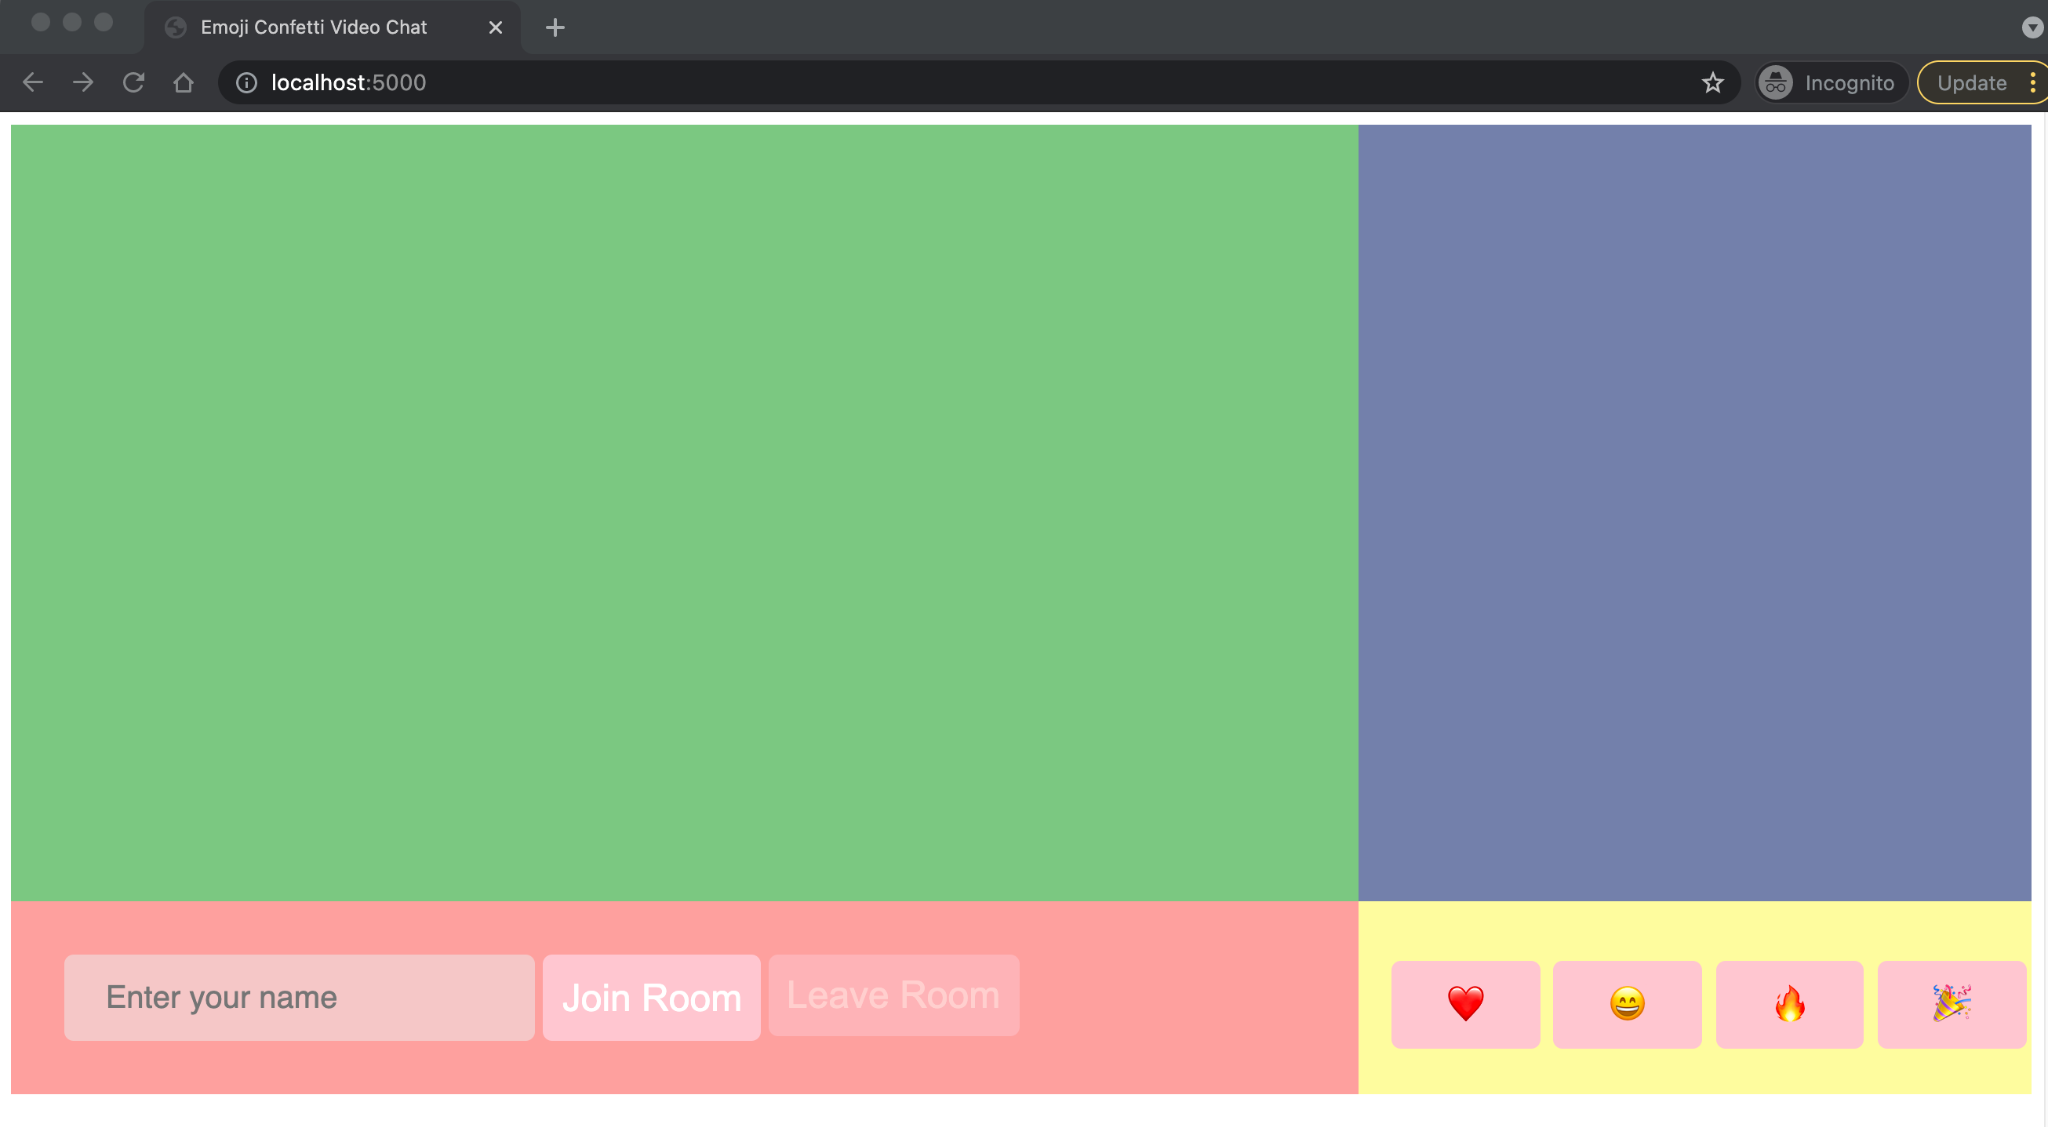
If you navigate to http://localhost:5000/ in your browser, you will see a colorful application that looks like the following:
Woohoo! Now that you have a layout set up, the next step is to add JavaScript on the client side to show the user a preview of their video feed.
Display a video preview for the local participant
Open public/index.js in your code editor. Add the following lines of code to set up the variables you will need for this part of the project:
The first set of variables refer to the HTML sections and buttons in your app. You then have a variable that creates a new instance of the JSConfetti class, with your layout's canvas element passed in as the place for the confetti to appear.
After that, you have a variable that creates a new Twilio Video LocalDataTrack, which will be used later on to share participants' selected emoji. Following that are the variables for the room name — in this case, emoji-party — and a variable for the actual Twilio videoRoom that the participant will join.
Next, paste the following code just below your list of variables. This is the function that will add a user's local video feed to the application:
In the addLocalVideo() function, you create a LocalVideoTrack, then attach it to a <div> and attach that <div> to the DOM. This is where the preview video will appear.
Just below where the addLocalVideo() function is declared, call the function:
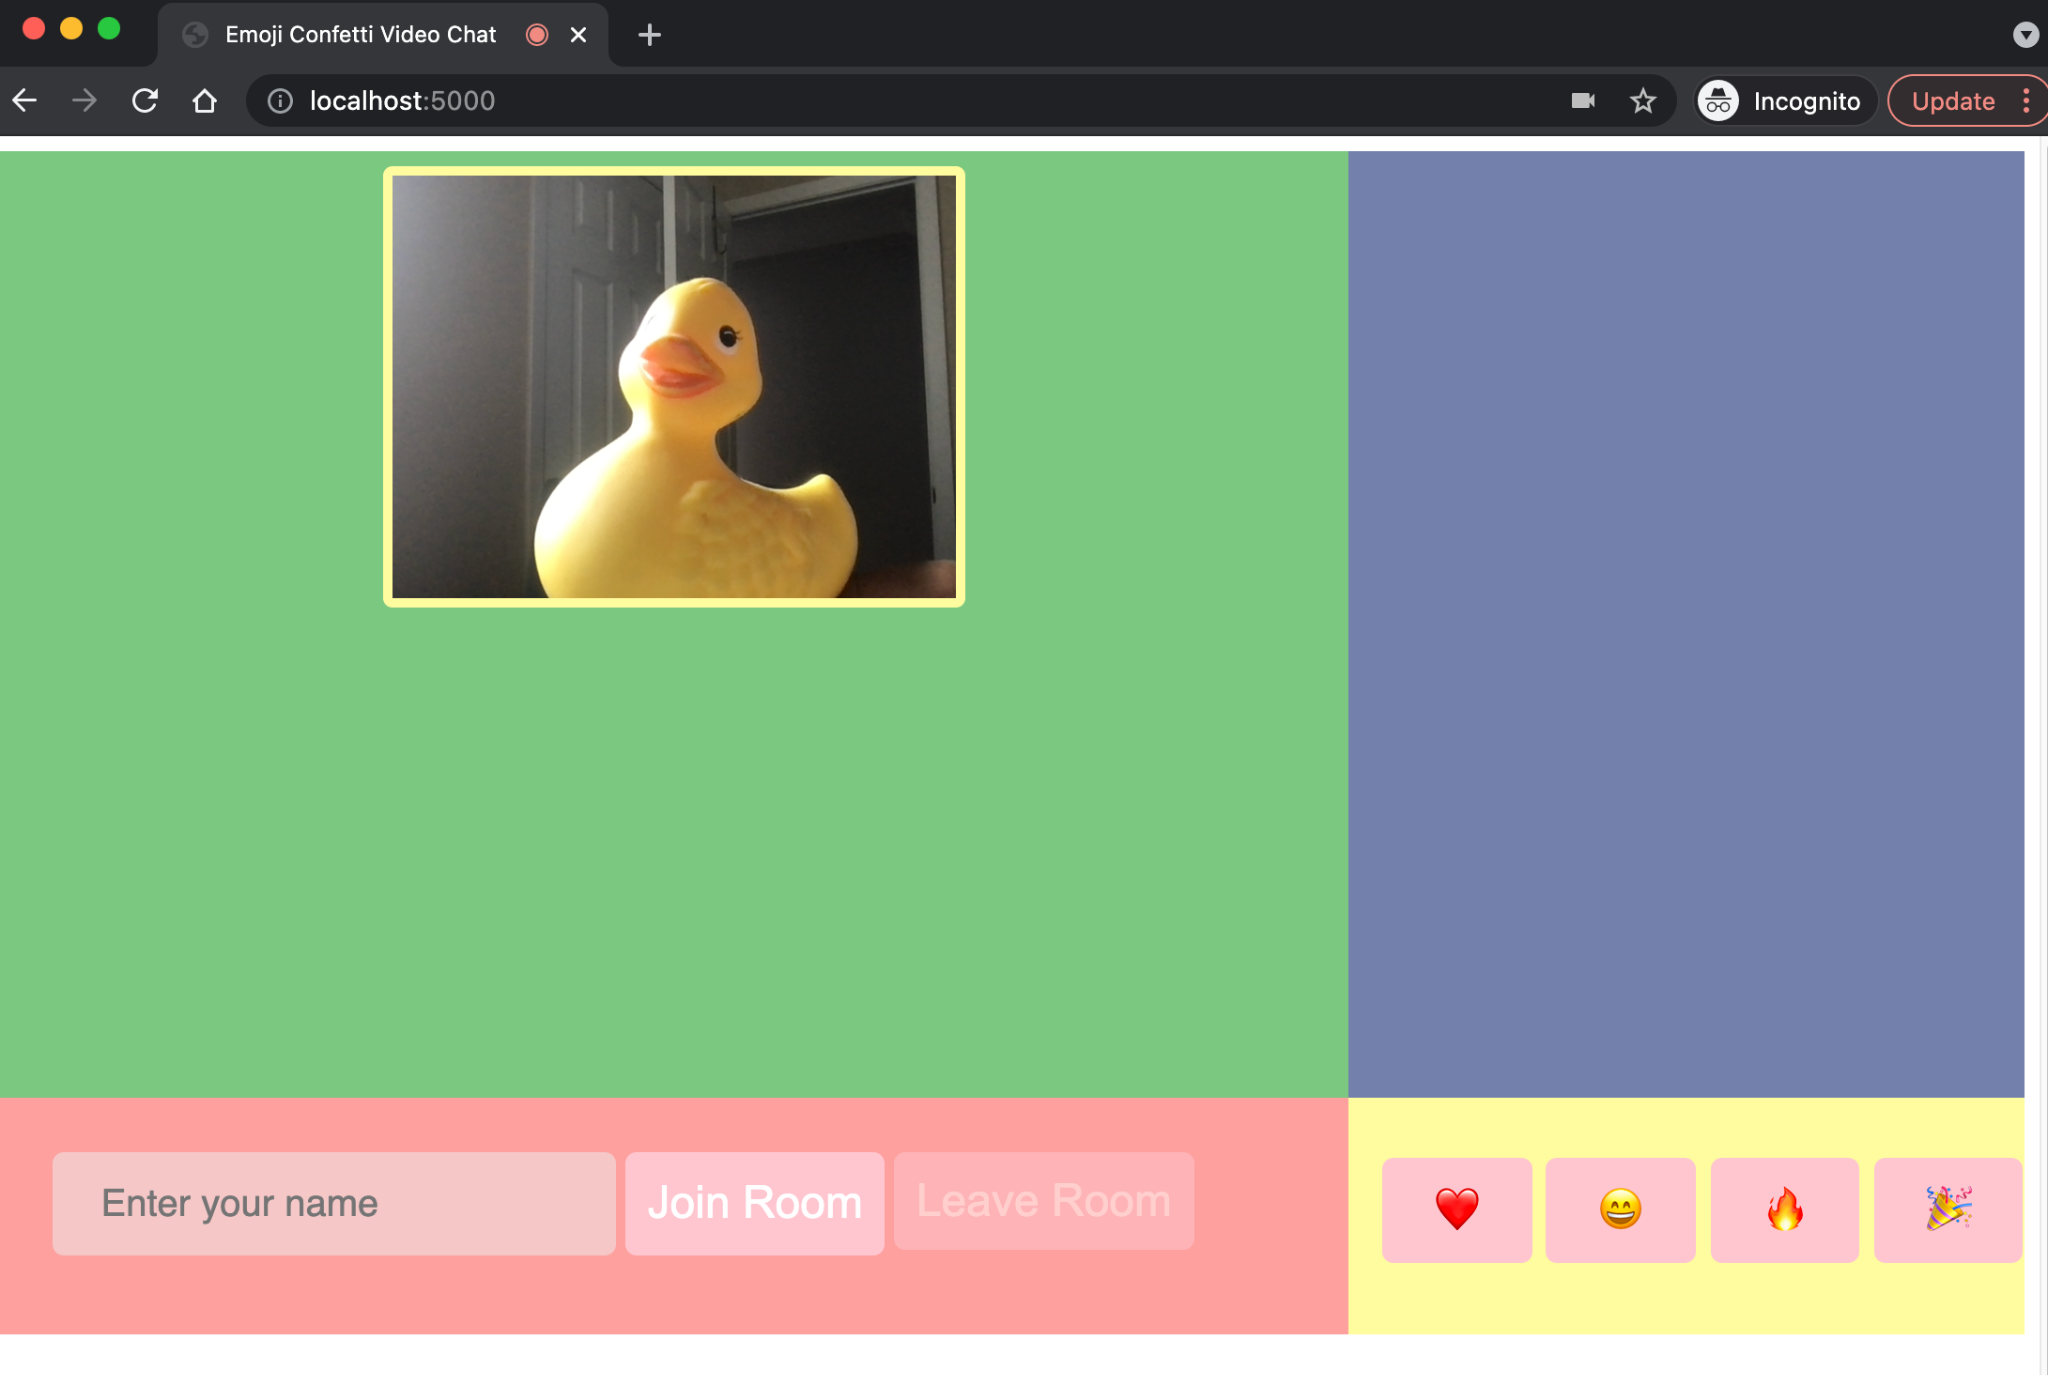
Try this out now by refreshing the page in your browser window. You should see your video feed appear in the gallery!
Generate an Access Token for joining video rooms
Now that you can see your own video preview, it's time to get ready to join an actual video call. In order to do that, you will need a short-lived credential called an Access Token.
In this step, you will add code to your Express server to generate this Access Token.
Open server.js in your code editor and add the following imports to the list at the top of the file:
Then, add the following /token route just below your route for serving static files but before the app.listen() line:
How will your application use this /token endpoint?
When a participant navigates to your application, enters their username in the input field, then clicks the Join Room button, their name and the name of the video room will be passed to this endpoint via a POST request.
The endpoint will then use your Twilio credentials and the Twilio Node Helper Library to create an access token specifically for this participant and this video room. Then, the endpoint will return the access token to the client side of your application. Your JavaScript code will then use this access token to connect to the video room.
Join the video room as a local participant
Now that you have the code for generating Access Tokens, it's time to write the code that will actually create the video room and let you join as a participant.
Return to public/index.js in your code editor. Just below your addLocalVideo() function definition and above its invocation, add the following new function called joinRoom():
This function will handle when a user clicks the Join Room button. It will get the user's identity from what they have entered in the <input> field, then make a POST request to the /token endpoint you added to your server in the previous section.
Once your application receives the access token from the server side, it creates local tracks for audio, video, and data, and connects to the video room using the token and these tracks. A new <div> is created with the participant's name (identity) and their media tracks. Then, the function sets up event listeners to listen for when other participants join the video call.
Now that the joinRoom() function is complete, it's time to create the function that will let users leave the video call. This function will disconnect a participant from the video room and remove all of the other participants' media from the UI.
Add the following leaveRoom() function just below the one for joinRoom():
Now, at the bottom of public/index.js, add click event listeners to the joinRoomButton and leaveRoomButton that will call joinRoom() and leaveRoom() respectively when users click on these buttons:
Now that you have a way for the local participant to join and leave the video room, it's time to add code to handle the other participants' connections.
Connect remote participants to the video room
You may have noticed, in the joinRoom() function you added before, that when a participantConnected event occurs in the video room, the function participantConnected() gets called. A similar thing occurs for the participantDisconnected event. It's time to add these two functions to the code in public/index.js.
Add the following participantConnected() function to the file, just below the disconnect() function:
The participantConnected() function creates a new <div> for each remote participant when they connect to the room, displays their username (identity), and attaches their video and audio tracks to the <div>.
The function also creates event listeners for when these remote participants publish or unpublish their tracks — if someone starts or stops sharing their media, your application can attach or detach these tracks from the UI as needed.
Additionally, this function also sets up a listener for when messages are received over the data track. In this application, when a participant's app receives data about which emoji someone has chosen, that emoji will be launched as confetti for everyone on the video call to see!
Now that you have code for participantConnected(), add the following participantDisconnected() function just below that:
This function logs a message to the console about which participant has left the call and removes their <div> from the UI.
At this point, the video chat part of your application is fully functional. If you want to test it out, navigate to http://localhost:5000/ in your browser. Enter your name in the input field and click the Join Call button. You will be connected to the video room emoji-party.
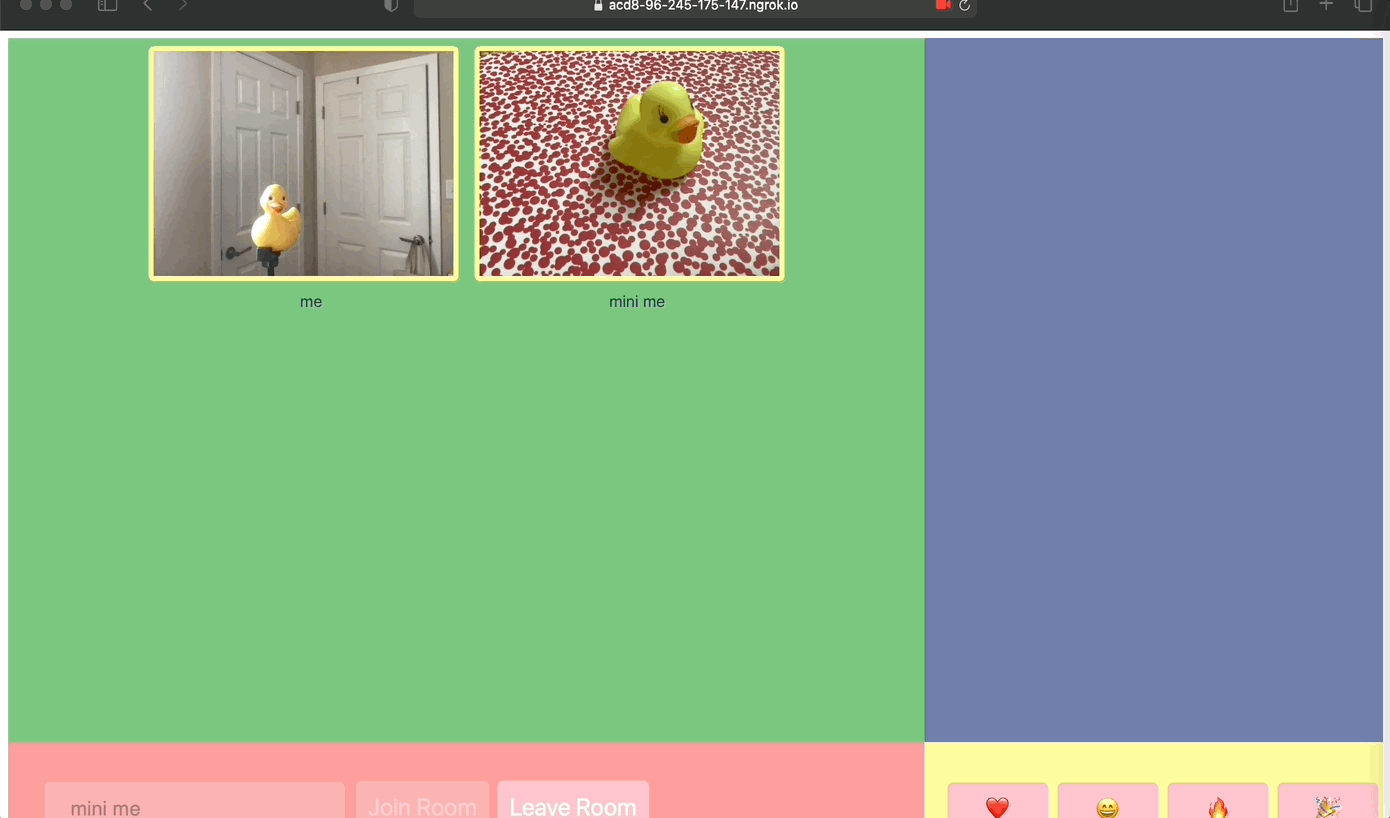
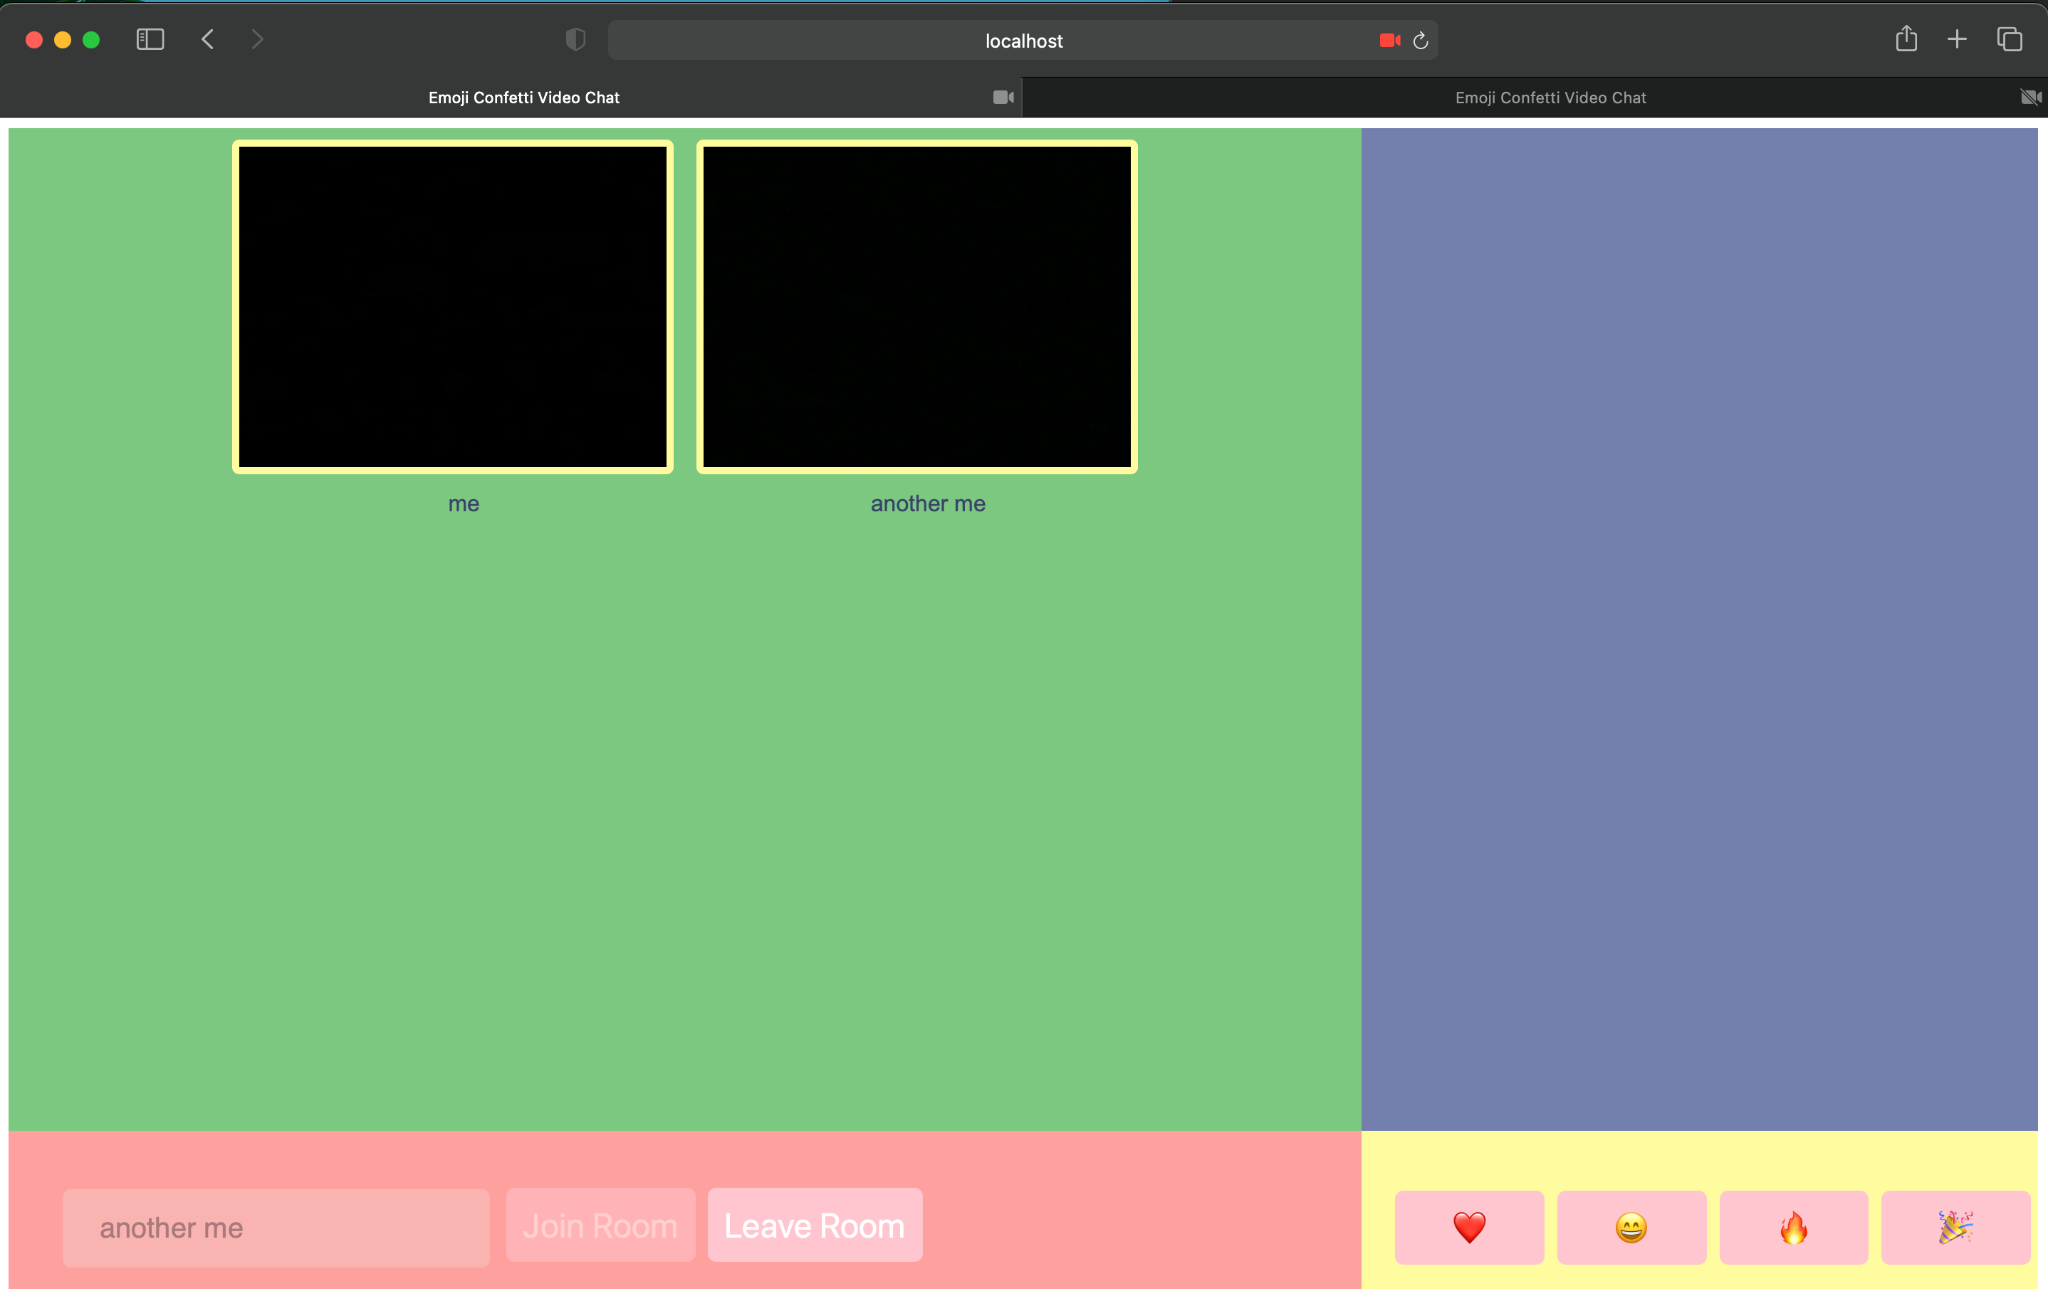
Open a second browser tab to the same location, then join the video chat with a different name. You will see a <div> for each participant appear in the video gallery section of your application:
Now that your application is able to handle all participants' connection and disconnection events, it's time to make those emoji buttons actually launch confetti!
Launch emoji confetti at the press of a button
To customize and launch confetti, you'll use the addConfetti() function from JS Confetti to select which emoji to use, its size, how many pieces of confetti to create, and the confetti radius. You can use a switch statement to handle the selected emoji.
Add the following launchConfetti function just below your participantDisconnected function:
In the function above, the switch statement evaluates the selected emoji, then calls addConfetti() for whichever one was chosen. If you are the person who clicked an emoji button, confetti of that emoji will appear on your canvas, and then the emoji will be sent to the data tracks of everyone else on the video call.
When the other participants' data tracks receive the message, their instance of the application will call launchConfetti() for the selected emoji, and the emoji confetti will appear in their UI as well!
At the bottom of public/index.js in the event listeners section, add event listeners to each of the emoji buttons so that launchConfetti will be called when a participant clicks the button:
The emoji are selected by their aria-labels, which you added to the HTML earlier in this tutorial. Not only does this provide a useful way to reference these elements — it will also help make your application more accessible!
Run your application on ngrok
The last step before testing your application is to use ngrok to connect the Express server running locally on your machine to a temporary public URL. Once you have this URL, you can share the link with a friend and test the video chat together!
Open up a new terminal window pointing to the root of your project. To start a new ngrok tunnel, run the following command:
Once ngrok is running, you will see text like the below in your terminal window:
Copy one of the URLs next to Forwarding. You now have a temporary link to your application that you can share with a friend or colleague!
Chat over video and launch some emoji!
Paste the forwarding URL into the browser. Your application will load and you will see your video preview like before. If you click on the emoji buttons now, you will see a confetti launch! However, since you're not yet connected to a video room, no one else will be able to see this but you.
Enter your name in the input field and click the Join Call button. You will be connected to the video room emoji-party.
If you are testing this application on your own, open the same URL in a second browser window and join the call again with a different name. If you are testing this application with a friend, wait for your friend to join the video call.
Once everyone has joined the call, try clicking one of the emoji buttons. When one of you clicks a button, everyone will see the shower of emoji. Now you have a fun way to react to your friends' awesome stories, jokes, and comments during the video call!

What's next for your emoji-launching video chat?
If you would like to see the code for this project in its entirety, you can find the repository on GitHub here.
Now that you know how to add confetti to your video chat, you can customize the application even more. Maybe you would like to add your own favorite emoji or color scheme. You could even add some new features to the application, like muting and unmuting or screen sharing. Maybe you have your own exciting idea — the sky's the limit! ⭐️ I can't wait to see what you build!
Mia Adjei is a Software Developer on the Developer Voices team. They love to help developers build out new project ideas and discover aha moments. Mia can be reached at madjei [at] twilio.com.

Related Resources
Twilio Docs
From APIs to SDKs to sample apps
API reference documentation, SDKs, helper libraries, quickstarts, and tutorials for your language and platform.
Resource Center
The latest ebooks, industry reports, and webinars
Learn from customer engagement experts to improve your own communication.
Ahoy
Twilio's developer community hub
Best practices, code samples, and inspiration to build communications and digital engagement experiences.