How to Send WhatsApp Messages from Google Sheets with JavaScript and Node.js
Time to read:
September 14, 2019
Written by

With Google Sheets (online spreadsheet app from Google) you can easily collaborate in real-time with coworkers, clients, or others. The structure and simplicity of keeping data in rows and columns brings many benefits.
WhatsApp is a popular app for smartphones that offers a replacement to traditional text messaging systems. It allows you to send messages to another person who is also using WhatsApp. You can send simple text messages and you can also send attachments containing pictures, audio clips or video recordings.
In this post, you will learn how to create a Node.js application which can be used to send WhatsApp messages to multiple recipients. It uses a Google Sheets spreadsheet as the data source for contacts and Twilio's API for WhatsApp to send the messages.
We'll take an iterative approach building this application. Let's start with a name and call it "A Message Sender".
What you'll need
- A Google Sheets account (comes free with a Google account)
- A Google Cloud Platform free tier account
- Node.js & npm installed (you can install it from https://nodejs.org/en/)
- A free Twilio account
- A text editor. I use the free Visual Studio Code with the integrated terminal
Google Sheets as a Data Source
Use a web browser and go to https://drive.google.com (log in if needed).
Once you’re logged into your Google account, create a new "Google Sheets" blank spreadsheet by clicking the "+ New" button in the upper left. You can name your spreadsheet whatever you want, because we will access the spreadsheet by its ID not by its name, but let’s rename it as "Appointments". The new spreadsheet comes with one default worksheet with the name of "Sheet1" (this name matters, we will use it later to refer to this specific worksheet).
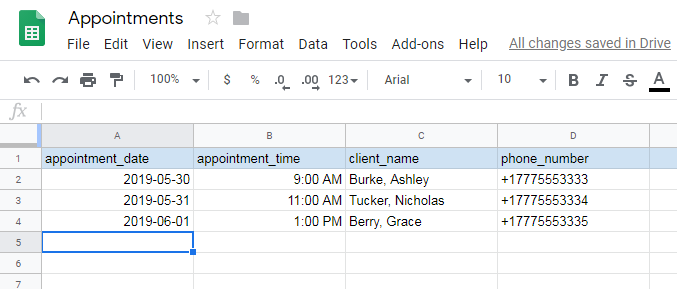
We'll use the first row as columns' header and name the first 4 columns as "appointment_date", "appointment_time", "client_name" and "phone_number".
Fill in the first 3 rows with data for appointment date and time, client name and client's WhatsApp phone number (for testing purposes one or all of the numbers can be your number).
When entering the phone number, to be able to enter the + you need to prepend it with an apostrophe (or single quote) like this: '+17775553333.
Here is a screen capture of the "Appointments" spreadsheet, "Sheet1" worksheet:
Another thing to do here is to find the spreadsheet ID. This ID will be used in our code and it is the value between the "/d/" and the "/edit" in the URL of your spreadsheet.
For example, if the URL is:
Then, the spreadsheet ID is:
The spreadsheet is now ready to use as our data source. Next, we’ll start writing the Node.js code for our application. You can use your favourite text editor or Visual Studio Code.
Reading Google Sheets data from Node.js
Our application will not work yet, we won't be able to connect with the spreadsheet, but bear with me, we'll fix this issue as we continue through the tutorial.
Create a new folder named a-message-sender for our application (you can do this with your favourite text editor or by running mkdir a-message-sender in a terminal window)
Create a new file index.js inside a-message-sender (you can do this with your favourite text editor or by running touch index.js in a terminal window. If you’re on Windows and touch is not available you can run echo > index.js in the terminal)
Add the following initial code for index.js:
The above code starts by including the “googleapis” module which is a Node.js client library for using Google APIs. It has support for authorization and authentication and you can read more about it here.
Next, create an instance of a client for Google APIs (in our case for access to Google Spreadsheets) and then we call the authorize method to gain access. If you’re wondering what the privatekey.json does, this is explained in the next section.
Time to run our code. Open a terminal window and change directory to a-message-sender. Run npm init --yes to create a default package.json file (initialize our Node.js application). Then run npm install googleapis --save to install Google's client library.
When we try to run our application with node index.js, we get an error:
This error occurs because we're missing the privatekey.json file. This file is something we need to get from the Google Cloud Platform console.
Accessing the spreadsheet via a Google service account
A service account is a special type of Google account intended to represent a non-human user that needs to authenticate and be authorized to access data in Google APIs.
Go to "Google Cloud Platform" https://console.cloud.google.com/getting-started?pli=1.
Create a "New Project" by clicking "Select a project" at the top of the page. Next, go to "APIs & Services" > "Library" and search for "sheets". Select "Google Sheets API" card, then "ENABLE". Next, go to "APIs & Services" > "Credentials". Click "Create credentials" > "Help me choose".
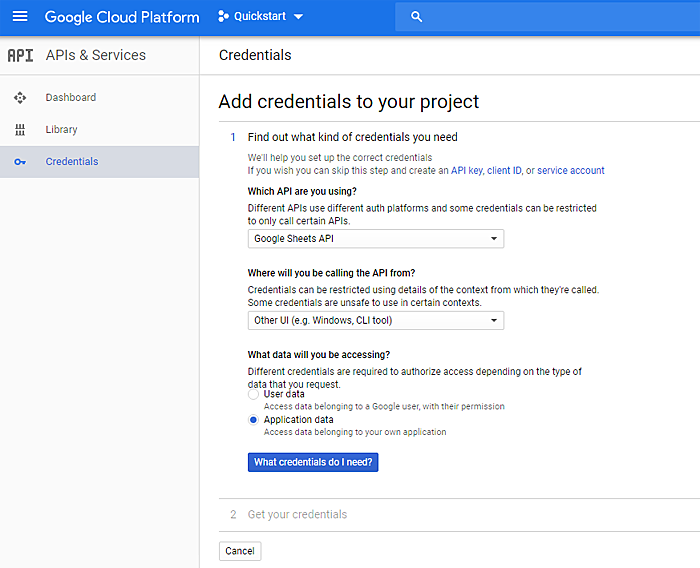
Add credentials for "Google Sheets API", "Other UI (e.g. Windows, CLI tool)", "Application data". Click on "What credentials do I need?".
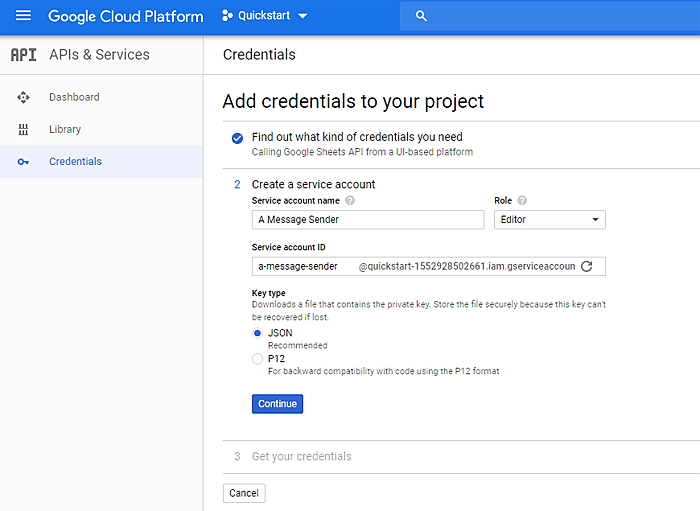
On the next screen, click on "Create a service account". Enter a "Service account name", either "A Message Sender" or the name of your own project.
Select a "Role" of "Project" > "Editor" and "Key type" as "JSON".
Click "Continue" to download the service account key as a .json file. Keep this file safe and don't ever make it public.
Move the .json file to our application directory and rename it to privatekey.json.
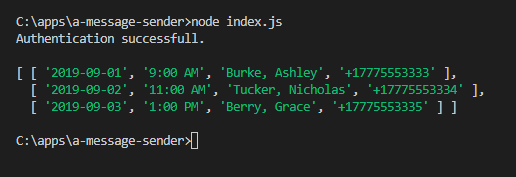
At this point, let's try and run our application again with node index.js. No error this time, instead we see "Authentication successful."
But authentication it's not enough, we also need authorization and I'll show you what I mean. Let's add more code to our application, this code actually tries to read data from our spreadsheet.
The new code we added here is going to try to read values from our Google spreadsheet using the get method of the spreadsheets.values collection and you can read more about this on Google’s documentation website.
Note that there are some things that we shouldn't share with our code and the spreadsheet ID is one of them, so we'll put it in a new file: secrets.json, located in the root of our application (keep this file safe and don't make it public). Here is the code format for secrets.json:
Another thing to note is the range reference for the data, defined from A2 to D range: 'Sheet1!A2:D'. "Sheet1" is the name of our worksheet, A2 is the beginning cell at column A row 2, and D is the end cell, but is not followed by a number for the row so we’ll get all the rows.
The get method returns a promise and once we have the response, the rows we’re asking for (response.data.values), we just log them to the console but later we’ll pass them to a “send message” function.
Run the application again using the node index.js command. We get "Authentication successful." but followed by an error "Error: The caller does not have permission" and this is because we have not shared yet our spreadsheet with the service account, as shown in the below screenshot:

Let's fix this problem. Open the privatekey.json file and copy the email address which is the value for the client_email key/value pair. Go back to our spreadsheet, click the "Share" button located at the top right.
In the "Share with others" modal window > "People" field, paste the email address and click the "Send" button.
If we run now with node index.js, we get no error and the data from our worksheet is printed on the console.
Configuring Twilio for WhatsApp Messages
You'll need your Twilio account and you'll need to activate "the Twilio Sandbox for WhatsApp" for this section.
Log into the Twilio Console and make a note of your Twilio account's "ACCOUNT SID" and "AUTH TOKEN", we need them for sending messages.
Activate the WhatsApp sandbox. Make a note of the phone number you choose in the Sandbox, it will be used when sending the messages. WhatsApp recipients need to opt-in by sending a "join [KEY-WORD]" WhatsApp message to the phone number you choose in the Sandbox.
You can find more details about "Twilio's API for WhatsApp" in the docs.
The values of ACCOUNT SID and AUTH TOKEN as well as the WHATSAPP SANDBOX NUMBER are also things we'll keep in secrets.json, add them to the file like so:
With our Twilio account configured for WhatsApp and with our Twilio credentials added to our Node.js application, we’re ready for the last part where we’re going to send the messages.
Sending WhatsApp Messages
Begin by installing Twilio's helper library for Node.js with:
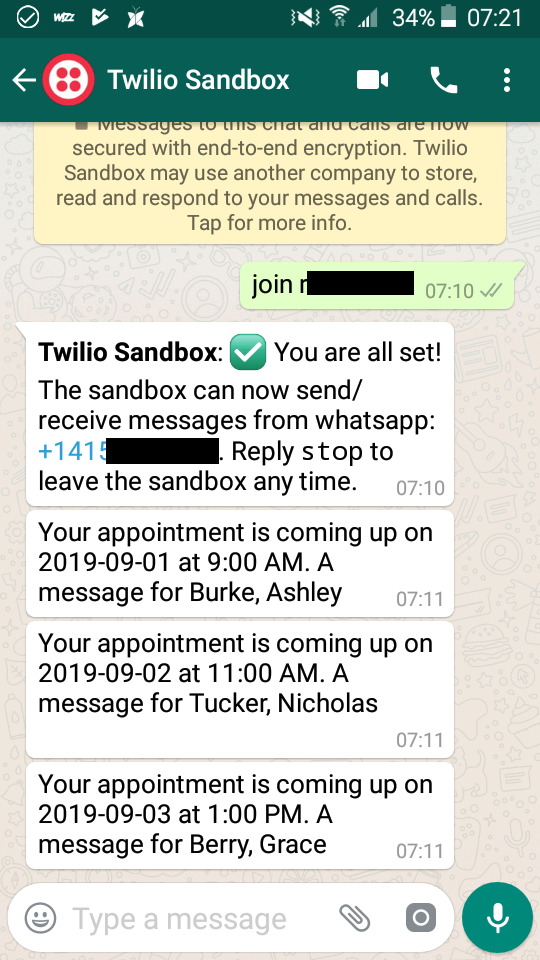
When developing with the WhatsApp sandbox, Twilio has pre-provisioned a few text templates and we'll have to use one of them unless we get an approved account. We'll use the "Your appointment is coming up on {{1}} at {{2}}" template.
You can read more about the template formats on the Twilio docs.
We're ready for the complete code:
In this section, we added the sendMessage function. This function is used to send the messages one by one.
First call of this function takes place once we receive the data from our Google spreadsheet and sendMessage(rows) takes one argument, an array of rows with our spreadsheet data.
Then, sendMessage(rows) is called recursively when we get the response from Twilio after each message is sent and this continues as long as the “rows” argument is not empty.
For each call of this function, we use rows.shift() to take the first element of the array, extract the phone number, client name and appointment information and then call Twilio’s library messages.create method to send the message.
Run the application again with node index.js.
As the messages are sent, the console shows the SIDs and if you’re testing with your WhatsApp number, you will receive a WhatsApp message.
Conclusion
Using the Twilio API for WhatsApp together with contacts data stored in a Google Sheets spreadsheet and a few lines of Node.js code, we sent personalized WhatsApp messages to multiple recipients.
Thanks for your interest in this post. I hope you’ve gotten a lot out of it – I certainly have learned a lot creating it. If you have any questions, please reach out - I can’t wait to see your builds.
Alex Baban is a Canadian web and mobile developer and is a Twilio Champion. Alex has been working on web sites in various capacities for over 15 years. In addition to development, Alex has a background in electronics, with a Bachelor of Science in Electrical Engineering from the Technical University of Cluj-Napoca, Romania. Alex can be reached on Twitter @alexbaban.
Twilio.org helps social impact organizations expand their reach and scale their missions. Build your first application with Twilio and start engaging your audience at no cost with product credits from the Impact Access Program. Learn more about eligibility and how to start your benefits today.

Related Resources
Twilio Docs
From APIs to SDKs to sample apps
API reference documentation, SDKs, helper libraries, quickstarts, and tutorials for your language and platform.
Resource Center
The latest ebooks, industry reports, and webinars
Learn from customer engagement experts to improve your own communication.
Ahoy
Twilio's developer community hub
Best practices, code samples, and inspiration to build communications and digital engagement experiences.