Generating Twilio Access Tokens in Python
Time to read:
January 13, 2021
Written by
Reviewed by

Several Twilio services can be accessed from a web application running on the browser, but given that this is an inherently insecure platform, the authentication flow is different than for server-based applications.
An application running on the browser needs to obtain an Access Token from your server, and then use this token to authenticate. This is more secure because it prevents you from having to expose your Twilio account credentials in the browser, and also because access tokens have a short lifespan. In this tutorial you are going to learn how this authentication flow works and how to generate access tokens for Twilio services using Python and the Flask framework.
Tutorial requirements
To follow this tutorial you will need:
- Python 3.6 or newer. If your operating system does not provide a Python interpreter, you can go to python.org to download an installer.
- A free or paid Twilio account. If you are new to Twilio get your free account now! This link will give you $10 when you upgrade.
Using Twilio on the Browser
Before we begin, I thought it would be a good idea to review the list of Twilio services that have JavaScript SDKs for the browser. At the time I’m writing this, this is the complete list:
- Programmable Voice: twilio.js Documentation
- Programmable Video: twilio-video.js Documentation
- Conversations: twilio-conversations.js Documentation
- Sync: twilio-sync.js Documentation
- Programmable Chat: twilio-chat.js Documentation
Authentication for these services from the browser requires your application to implement a server-side component that generates access tokens. At a high level, the process works as follows:
- The application running on the browser sends a request to your server for an access token. The request must include any information that your server needs to verify the identity of the user making the request, such as a username and a password.
- The access token endpoint in your server receives the request and verifies that the user credentials are valid.
- Using the Twilio Python Helper Library, it then generates an access token for the user, and provisions it with one or more grants, which give granular access to Twilio API features. The token is also given a validity period, which can be no longer than 24 hours.
- The generated access token, which is a string, is returned to the browser in the response of the endpoint. The client can then use it with any of the JavaScript SDKs listed above.
In this tutorial we will concentrate on the server-side component that generates tokens.
Project structure
Let’s begin by creating the directory where we will store our server files. Open a terminal window, find a suitable parent directory, and then enter the following commands:
Following best practices, we are going to create a Python virtual environment where we will install our Python dependencies.
If you are using a Unix/Linux or macOS system, open a terminal and enter the following commands to do the tasks described above:
For those of you following the tutorial on Windows, enter the following commands in a command prompt window:
The pip command installs the four Python packages that we are going to use in this project, which are:
- The Twilio Python Helper library, to generate access tokens for Twilio services
- The Flask framework, to create the web application
- Python-dotenv, to import environment variables with configuration information
- httpie, to send test requests to the server from the command line
For your reference, at the time this tutorial was released these were the versions of the above packages and their dependencies:
Setting up your Twilio account
Log in to your Twilio account to access the Console. In the main dashboard page you can see the Account SID assigned to your account. This is important, as it identifies your account.
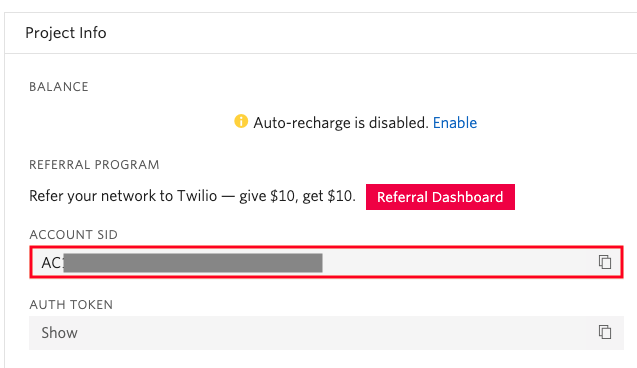
Because we are going to need the Account SID later, click the Copy to Clipboard button on the right side. Then create a new file named .env in your text editor (note the leading dot) and write the following contents to it, carefully pasting the SID where indicated:
To generate access tokens you also need to have a Twilio API Key, so the next step is to add one to your Twilio account. Navigate to the API Keys section of the Twilio Console. There, click the Create API key button.
Give the key a name that represents the use you intend to give to your access tokens, leave the region set to its current value and key type as "Standard". Then, click the Create button.
Now you will be presented with the details of your newly created API Key. The SID and Secret values for your key are used when generating access tokens along with the Account SID value that we saved earlier.
Open the .env file you created earlier in your text editor, and add two more lines to it to record the details of your API key:
Now, copy the new API key's SID value in place of <your-twilio-api-key-sid> and the Secret value in place of <your-twilio-api-key-secret> in .env.
Once you have your API key safely written to the .env file, you can leave the API Keys page. Note that if you ever lose your API Key secret you will need to generate a new key, as Twilio does not keep this value for security reasons.
Creating the web server
As mentioned in the requirements section, we will be using the Flask framework to implement the logic in our web server. Since this is going to be a simple project we will code the entire server in a single file named app.py.
Below you can see the implementation of our web server. Copy the code into a new file named app.py file in the twilio-access-tokens directory.
The first thing that we do in this application is to call the load_dotenv() function from the python-dotenv package. This function will read the contents of the .env file and incorporate all the variables to the environment. Once the environment is populated, we can retrieve our three authentication variables, twilio_account_sid, twilio_api_key_sid, and twilio_api_key_secret.
The app variable is called the "Flask application instance". Its purpose is to provide the support functions we need to implement our web server using the Flask framework. The @app.route decorator is used to define a mapping between URLs and Python functions. In this application we are associating the /token URL with the token() function, so whenever a client sends a POST request this URL, Flask will run the function and return its response to the client.
The implementation of the token() function begins by extracting the username and password sent by the client from the request payload, which would allow your application to know which user is making the request.
There are several ways in which the client can submit user credentials, so keep in mind that this is just one of many available options. Another common way to do this is according to the HTTP Basic Authentication specification, via theAuthorization header.
The application server is now in a position to validate that the user credentials are valid. This needs to be done according to the requirements of your application, by accessing your user database. For this simplified example, validation only checks that both the username and password fields were sent by the client and if one or both are missing a 401 status code is returned to tell the client that the user could not be authenticated. In a real application the password has to be checked as well.
Once the user has been validated, an access token can be generated. The AccessToken class from the Twilio helper library for Python is used for this. The first three arguments to this class are the three secrets that we retrieved from the environment.
The identity argument sets a unique name for the user, which will be included in the token. If your application does not use unique usernames, then you can use the user IDs stored in the user database.
The final argument is ttl or time-to-live, which specifies for how long the token is going to be valid, in seconds. If ttl is omitted, the token will be generated with a validity of one hour, or 3600 seconds. You can increase or decrease this time according to your application needs. The maximum value for ttl is 24 hours, which must be given as 86400 seconds.
The generated token needs to be given grants for the services we are allowing this client to access. In the example above, a grant to a Programmable Video room called "My Room" is added to the token, which means that the client will only be able to access this video room with the token. There are different grant classes for the different Twilio services, as follows:
- VoiceGrant for Programmable Voice
- VideoGrant for Programmable Video
- ConversationsGrant for Conversations
- SyncGrant for Twilio Sync
- ChatGrant for Programmable Chat
Note that a single token can include multiple grants by invoking the add_grant() method as many times as needed.
Once the token has the desired grants it is ready to be returned to the client. The to_jwt() method renders it as a JSON Web Token to be returned to the client. The token is returned in a JSON payload in the format:
Running the web server
We are now ready to run our web server. If you are using a UNIX/Linux or macOS computer, use the following command:
If you use a Windows computer, use the following commands instead:
You should see something like the following output once the server starts:
At this point you have the web server running and ready to receive requests. We have also enabled Flask’s debug mode, which will trigger the web server to restart itself whenever changes are made to the application, so you can now leave this terminal window alone and when/if you make changes to the server the application will restart on its own.
Generating Access Tokens
To ensure that you have the server running properly, we can test the access token generation by sending a request, in a way similar to how a real client would do it.
To send requests to our server we are going to use the httpie Python package. Open a second terminal window (leave the first running the Flask server as shown in the previous section), cd into the project directory, and activate the virtual environment. On a macOS or Linux computer that would be done as follows:
On Windows, the commands are these:
You can send a token request to the server with the following command:
The command sends a POST request to the /token URL of our server, passing the username and password fields that the server expects. The response contains a single entry under the key token, which is the generated Twilio access token. Depending on the JavaScript SDK that you are using, there will be a function that connects to Twilio that accepts this token as an argument.
Now try to send a request with missing information to confirm that the server rejects the request with a 401 error. For example, do not send a password:
Conclusion
Congratulations, you now have a secure access token generation server that you can use with your browser-based Twilio applications!
I hope this tutorial gave you the tools that you need to implement good security practices. I can’t wait to see what you build with Twilio!
Miguel Grinberg is a Python Developer for Technical Content at Twilio. Reach out to him at mgrinberg [at] twilio [dot] com if you have a cool Python project you’d like to share on the Twilio blog!

Related Resources
Twilio Docs
From APIs to SDKs to sample apps
API reference documentation, SDKs, helper libraries, quickstarts, and tutorials for your language and platform.
Resource Center
The latest ebooks, industry reports, and webinars
Learn from customer engagement experts to improve your own communication.
Ahoy
Twilio's developer community hub
Best practices, code samples, and inspiration to build communications and digital engagement experiences.