Create a mailing list using Twilio's SendGrid Email API, Laravel, and Vue.js
Time to read:
March 30, 2021
Written by
Create a mailing list using Twilio's SendGrid Email API, Laravel, and Vue.js
This tutorial originally appeared on the Twilio blog.
Email marketing is key to the success of your communications strategy. Offering a stellar ROI and conversion rate, the importance of an effective email program cannot be over-emphasized. This tutorial will teach you how to send bulk emails to lists of over 100 email addresses using Twilio SendGrid's Email API, Laravel, and Vue.js.
Before we begin
In order to complete this tutorial, you will need the following:
- Composer installed and ready to use
- Basic knowledge of the Laravel framework
- A locally-installed database server ready to use
- Basic knowledge of Vue.js
- Twilio SendGrid account
- npm
- Node.js (with a minimum version of 12.14, but ideally the latest stable or LTS version)
Why Twilio SendGrid's Email API?
The Twilio SendGrid Library simplifies the process of sending emails. It is available in multiple programming languages and frameworks, including PHP, Java, Ruby, and Go. Let's get started creating our mailing list application.
How to create your mailing list
Create a new Laravel project using the following Composer command below.
Alternatively, you can use the following command, if you have the Laravel installer installed globally on your system:
Regardless of how you create the new Laravel project, once created, switch to the newly created directory using the command below:
cd twilioSendGrid
Configuration and .env setup
Your application will have a small form to collect emails for your mailing list. To store them, create a new model, controller, and migration file for the application using the command below.
You should see output similar to the example below printed to the terminal.
Now, modify the new migration file, database/migrations/2021_02_16_192153_create_email_listings_table.php, so that it matches the code below. When run, it will add an email field to the email_listings table.
Next, add the configuration details for your local database server to .env in the root directory of the project. Here is a copy of the DB section of my .env database configuration for this project.
Then, run a database migration using the following command to update the email_listings table.
Serve the project
To ensure that the code is working as required, start the Laravel application using the command below.
The application should start quite quickly, and you should see the following printed to the terminal:
Laravel development server started: http://127.0.0.1:8000
Refactor the Vue.js front-end
Vue.js has risen significantly in popularity in recent months, so much so that it is now shipped together with the Laravel framework as the default front-end framework. As a result, we will use Vue.js together with our Laravel API. To get started setting up Vue.js in our application, run the following command:
composer require laravel/ui php artisan ui vue npm install && npm run development && npm run dev
Then, modify the body of the default view template, resources/views/welcome.blade.php, to contain the following code:
The script tag at the end of the body tag imports js/app.js into our Blade template so that we can use Vue.js in our application. However, we need to make some modifications to it so that it will work as expected. To do that, modify resources/js/app.js so that it looks like the following example.
The code imports Vue.js, a required Bootstrap.js, and our App.vue file. App.vue holds everything that shows up in the browser. Create a new file named App.vue in the component directory (resources/js/components).
Then, add the following code to App.vue:
With the file updated, use the following command to compile our JavaScript code and watch for any future changes.
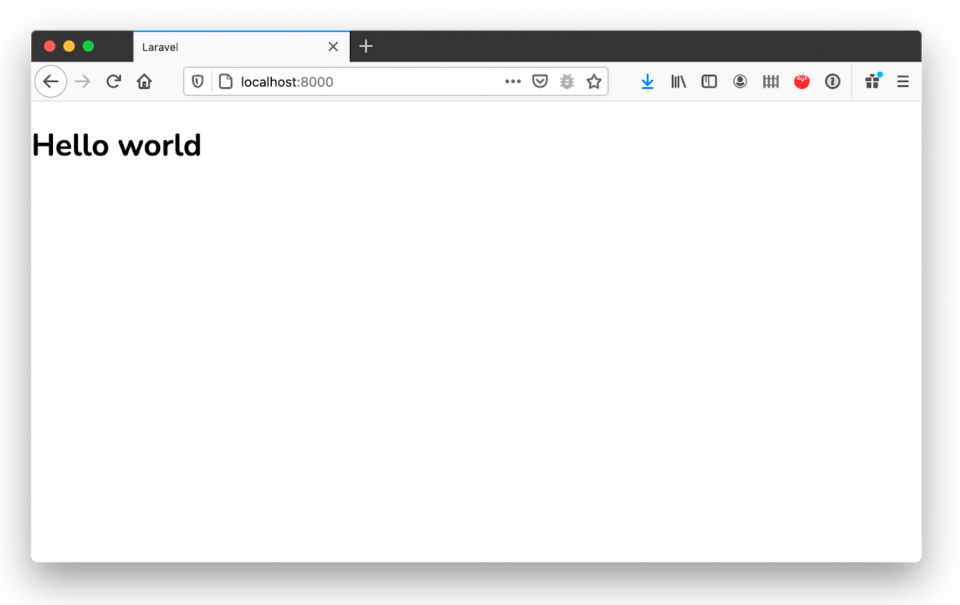
With the code recompiled, if we reload the browser, it should now look like the image below.
Next, we need to install the Twilio SendGrid SDK for Laravel using the command below.
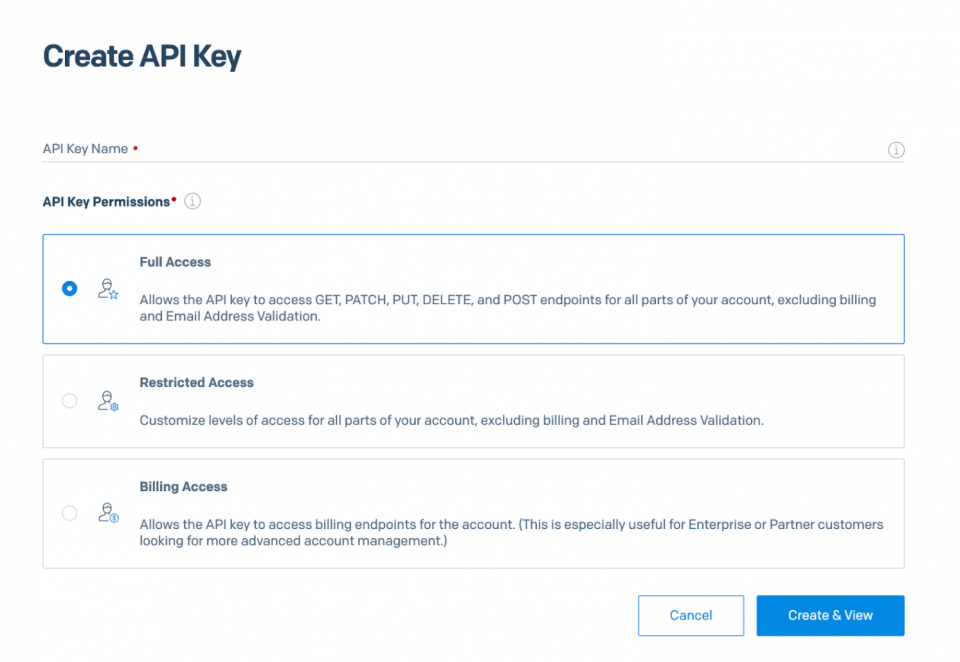
After installing the SDK, head over to the Twilio SendGrid dashboard. Then, click “Settings -> API Keys.” On the API Keys page, click “Create API Key'' in'' in the upper-right-hand corner. Enter a name for your new API key, leave "API Key Permissions" set to "Full Access," and click “Create & View” in the lower-right-hand corner to create the key.
Doing so creates a new API key. Copy your API key, as you will need it for the SDK to send emails.
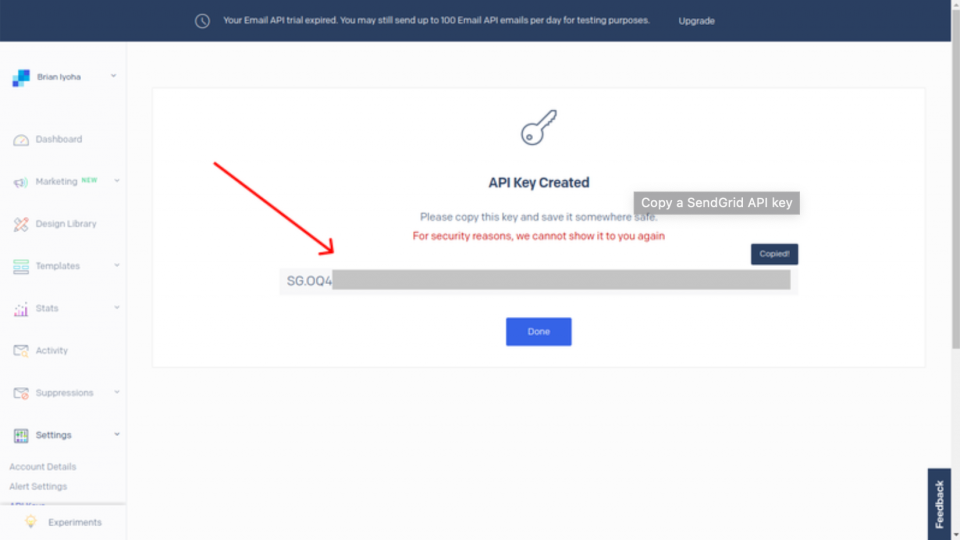
Note: Make sure you have copied it, as once you click “Done,” for security reasons, you will not be able to view it again.
Then, in .env, add the configuration below, replacing {YOUR API KEY} with the Twilio SendGrid API key that you just copied.
Before we continue, it is important to know that Twilio SendGrid has different levels of verifications for different accounts. If you just created a new Twilio SendGrid account or your account is less than 6 months old, Twilio SendGrid requires that you verify your sending address. This is the address that your receivers will see as the sender of the email.
If you have not verified your Twilio SendGrid sender email address and your account is less than 6 months old, you might encounter a server error asking you to do so when you are trying to send out emails.
Note: To see detailed instructions on how to complete the process, refer to the Single Sender Verification documentation.
With that said, let us continue building our mailing list application.
Seed emails
Our application will store recipient email addresses in a database table called email_listing. To save us some time, we will seed our email_listing table with email addresses using a Seeder.
Create a new Seeder using the following command:
Open the new Seeder, located in database/seeders/EmailListingSeeder.php, and modify it, replacing the existing code with the code below.
Note: Our Seeder class above uses Faker to generate emails. Sending emails to these randomly generated email addresses using Twilio SendGrid will not work. I would suggest you ensure that you use legitimate email addresses that can receive emails from the internet.
Then, run the following command to seed our data.
Send bulk emails
Now that we have emails in the email_listings table of our database, let's add the functionality to send bulk emails. Earlier, we created a controller called EmailListingController. Now we will refactor the controller’s code to send out emails to email addresses in our database. To do so, replace EmailListingController’s existing code with the code below.
Before we continue, let me take a moment to explain the code above. The first method, array_push_assoc(), simply adds values to an array in key/value pairs. This is because Twilio SendGrid requires all recipient email addresses to be in a key/value pair. There are many ways you can append values to arrays in PHP but when it comes to key/value pairs, it becomes tricky. So this method will come in handy later. Let us continue.
The second method, sendEmail, handles form validation and sending emails using Twilio SendGrid. Twilio SendGrid has a couple of different ways to send out emails from an application. We also have extensive documentation on how to send emails.
Take a closer look at the code below, which is just a section of the code snippet above. This section is solely responsible for interaction with the Twilio SendGrid API.
Here is where we initialize a new variable, $email as a SendGridMailMail() object. This variable holds a lot of useful information and data about the email sending process.
Now, I want us to pay attention to the snippet above. This is where Twilio SendGrid receives the instructions to send emails out to all the email recipients provided. It receives an argument, $receiver, which is an array of all the recipients' email addresses.
Here, we initialized a new variable, $addresses, with the result of fetching all the recipients' email addresses from our database. Since Twilio SendGrid requires these addresses to be in a key/value pair to pass, we had to loop through the values of $address to get the email of each receiver. We then added these addresses to the $receivers array using the method we covered earlier, $this->array_push_assoc().
Now we should be able to send our emails out. However, we need a route to call the method. To do that, add the following API code to routes/api.php:
With that done, we can modify resources/js/components/App.vue, which we created earlier for our email testing. Replace the file’s existing code with the code below.
In the code above, we created a basic HTML form. Nothing too fancy. On submitting the form, the send() method is called. This is a Vue.js method. We use it to validate the submitted form fields and make an API call to our email route.
Now, there's one thing left to do: give the form a bit of style. To do that, we're going to add the Bootstrap style sheet, as the form elements already make use of the Bootstrap classes. Here is the code to add below at the end of the head section of resources/views/welcome.blade.php
Then, run the mix again to rebuild the UI, using the command below.
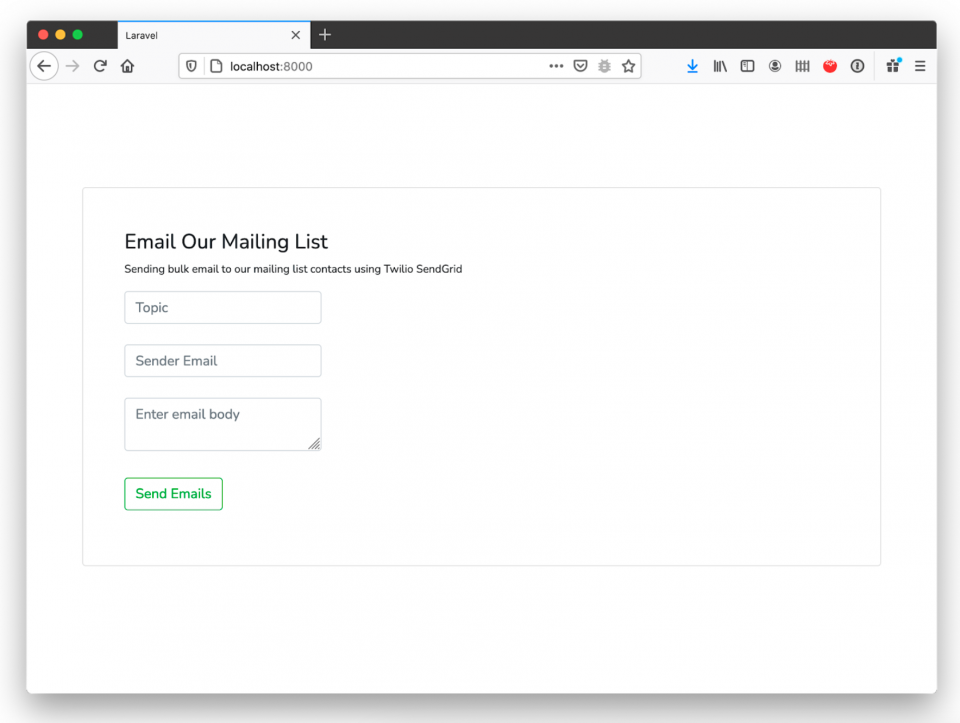
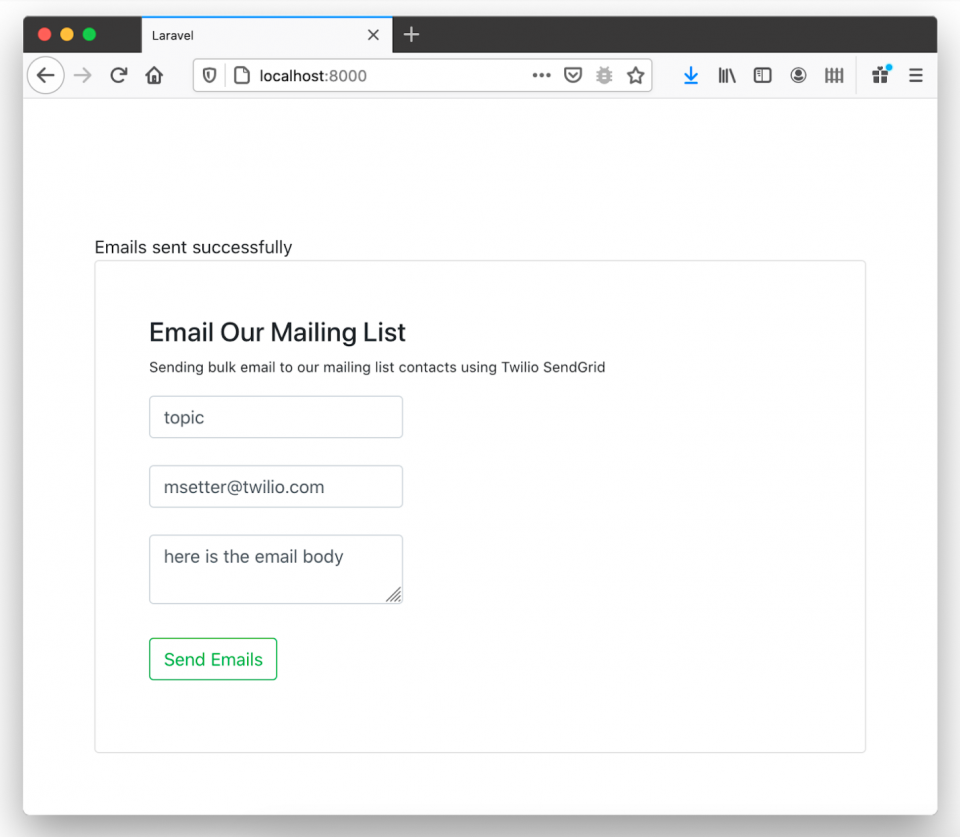
Reload the page. All things being equal, your screen should look like the screenshot above. If so, you are ready to send out bulk emails. To do so, enter a topic, recipient email address, and message body, then click "Send Emails." Shortly after that, you should see "Email sent successfully" appear above the form, as in the screenshot below.
Twilio SendGrid uses an email queue. This means that your emails might not be delivered instantly. All things being equal, it should return a 202 response, telling you that your email has been queued for sending out at a later time. In most cases, these emails are sent once a day.
Review
Congratulations! You have successfully created a mailing list with the Twilio SendGrid Email API, Laravel, and Vue.js.
Now that you have completed this tutorial, you know how to:
- Create and configure a Laravel project with Vue.js as your front-end framework
- Create a mailing list using Twilio SendGrid Email API in Laravel
You can also ensure the delivery of your emails to the correct email address. Find a link to the code for this article on GitHub here.
Want help putting this plan into action? Use a mailing list to make your next event the best yet. Check out our Virtual Event Planning Guide to learn how to make it happen.
My name is Anumadu Udodiri Moses. I am a software developer and a technical content creator in the PHP and JavaScript ecosystem. I run an online community of tech lovers called Tekiii. You can reach out to me on LinkedIn.
Related Resources
Twilio Docs
From APIs to SDKs to sample apps
API reference documentation, SDKs, helper libraries, quickstarts, and tutorials for your language and platform.
Resource Center
The latest ebooks, industry reports, and webinars
Learn from customer engagement experts to improve your own communication.
Ahoy
Twilio's developer community hub
Best practices, code samples, and inspiration to build communications and digital engagement experiences.