How to Send Email With PHP Using Twilio SendGrid
Time to read:
March 23, 2021
Written by
How to Send Email With PHP Using Twilio SendGrid and Mezzio
Email is as important a communication tool as ever. To help you better leverage email, I’m going to show you how to send email using PHP’s Mezzio framework and Twilio SendGrid’s API.
Specifically, you’re going to learn how to send emails with both plaintext and HTML bodies, and that includes a PDF attachment. You’re also going to learn how to use Twilio SendGrid’s transactional templates functionality to make creating email bodies simpler both by the development team as well as any other team within your organization.
Sounds good? Let’s begin.
Quick application overview
As a way of making this tutorial more meaningful, pretend that the code that we’ll write is part of a fictitious, online ecommerce shop built with Mezzio, named The Little PHP Shop — specifically, the part immediately after a customer makes a purchase. At that point in the user flow, the customer receives an email, thanking them for their purchase, and includes a PDF invoice for their records.
We’re going to create a Handler class to send the post-purchase email, which will receive purchase details from an order completed by the customer. With that purchase information, the Handler class will then use several classes in the SendGrid PHP API to build and send the purchase confirmation email.
Of these, the most important are SendGrid\Mail\Mail and \SendGrid. SendGrid\Mail\Mail is the object that stores all of the properties for an email message that we’ll send through Twilio SendGrid. The SendGrid object forms the transport layer, facilitating the sending of emails through Twilio SendGrid.
Prerequisites
To complete this tutorial, you'll need the following 4 things in your local development environment:
- Twilio SendGrid account
- PHP 8.3 (or later) with the cURL, mbstring, and OpenSSL extensions installed and enabled
- Composer globally installed
- cURL
Scaffold the base application
We first need to create the base application. To do that, we’re going to use the Mezzio Skeleton to do it for us. Once we scaffold the base application, we’ll switch to the newly created project directory. Then run the following commands in your terminal, following the prompts for the first one:
Install the required dependencies
With the project scaffolded, we need to add 3 additional dependencies to complete the project. These are:
- Twilio SendGrid’s PHP API library for interacting with the Twilio SendGrid API
- PHP HTTP client for sending HTTP requests
- PHP Dotenv for storing and retrieving environment variables
To install them, run the following command in your terminal:
Initialize PHP Dotenv
With the dependencies installed, we load PHP Dotenv so that it’ll read the variables set in .env and make them available to PHP as environment variables. To do that, insert the following code in public/index.php, right after require vendor/autoload.php.
Add your Twilio SendGrid account details
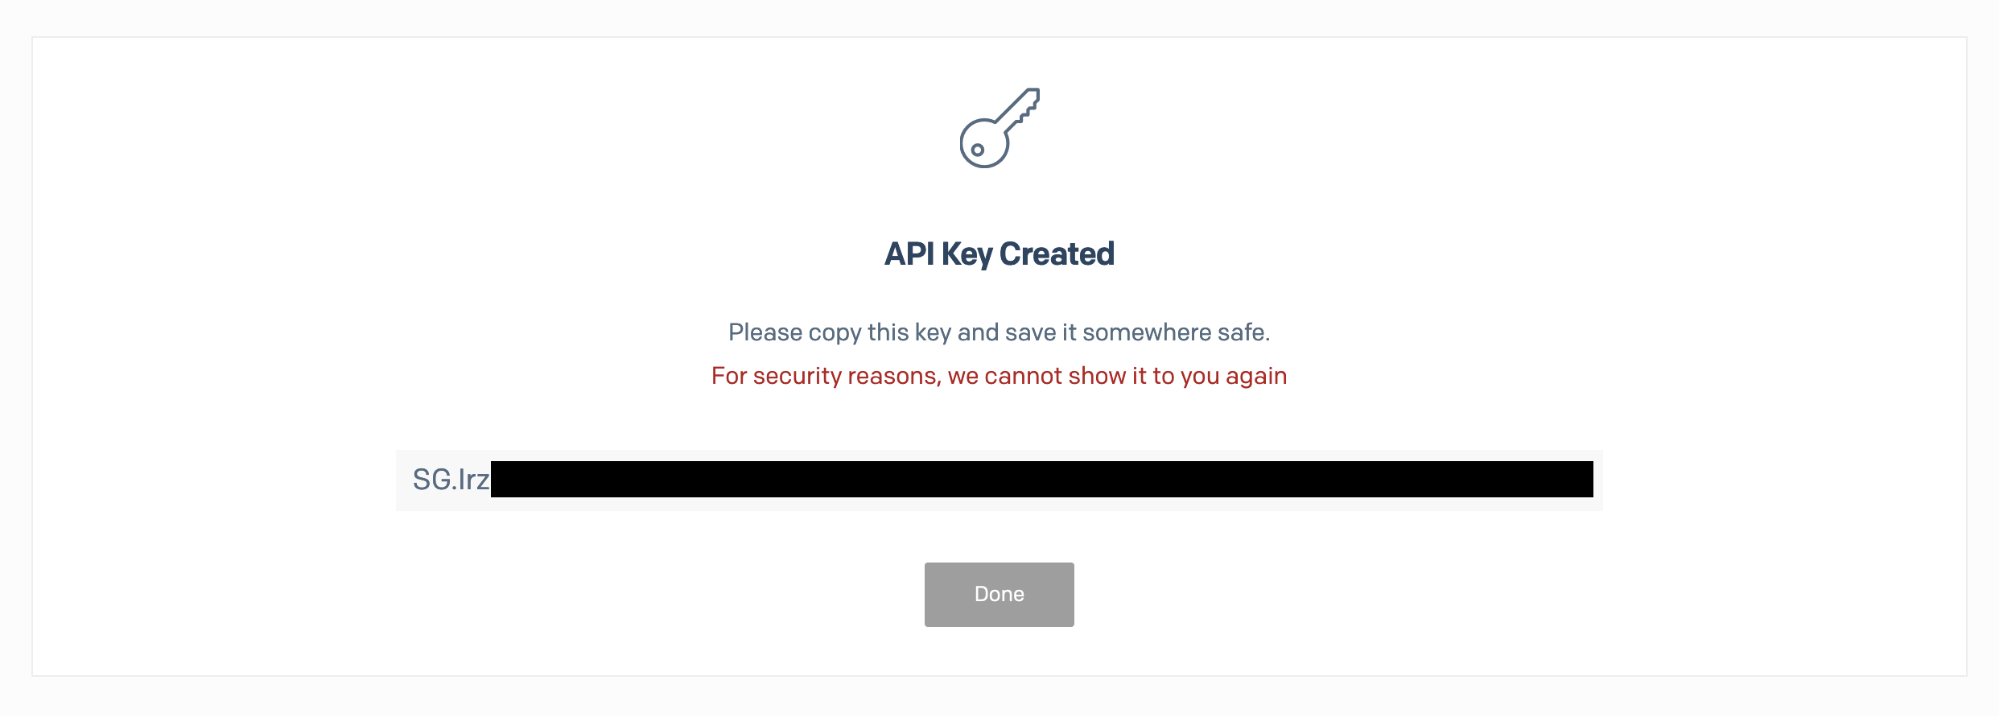
Now you need to supply the application with your SendGrid API key. To do that, after logging into Twilio SendGrid, navigate to Settings -> API Keys. Once there:
- Click Create API Key to create an API key
- Give the new API key a name, accept the default API key permission of Full Access, and click Create and View
With the API key created, click and copy the key, then click Done.
After that, add two more keys to the file: SENDGRID_DEFAULT_SENDER_ADDRESS and SENDGRID_DEFAULT_SENDER_NAME. As the names indicate, these are the email address and name that we’ll use for any emails sent from our application unless overridden.
Set application mail configuration details
In addition to the Twilio SendGrid API key, we’re going to store a few other global mail configuration settings. Specifically, we’re going to set a from and reply to email address and name that we’ll use in every email message. That way, we don’t have to set them each time.
We’re also going to create two email body templates: one for plaintext emails and one for HTML emails. To do that, in config/autoload create a new file named mail.global.php, and in it, add the following code.
Create a class to instantiate a mail object
With the key application configuration details set, let’s now create a class that will instantiate a basic mail object with the default properties set. To do that, in a new directory, src/App/src/Mailer, create a new file called SendGridMailMessageFactory.php, and in it, add the code below.
When we invoke the class, it has access to the application’s dependency injection (DI) container, from which it’ll retrieve the configuration details that we stored in config/autoload/mail.global.php.
After that, it’ll instantiate a new SendGrid\Mail\Mail object and set the from and reply to details by passing the respective configuration details to calls to Mail, setFrom(), and setReplyTo() methods, respectively. After that, it’ll return the instantiated Mail object.
To use it, though, you have to register it with the DI container. To do that, in src/App/src/ConfigProvider, add the following entry to the factories element in the array returned from the getDependencies() method.
Create a Handler to send email
We next need to create a Handler class for composing and sending emails. To do that, we’ll use Mezzio’s CLI tooling, available via Composer, by running the command below.
Running the command above does four things for us:
- Creates a new Handler class, src/App/Handler/EmailSenderHandler.php
- Creates a factory class to instantiate the Handler class, src/App/Handler/EmailSenderHandlerFactory.php
- Creates a template file (src/App/templates/app/email-sender.html.<ext>), which we won’t need. The file name
<ext>is determined by the template engine that you chose during the “create-project” stage. - Registers the new Handler class as a service in the DI container by adding an entry to config/autoload/mezzio-tooling-factories.global.php
Refactor the Handler to send emails
With EmailSenderHandler.php created, we now need to refactor it so that it can send emails. To do that, we’ll first refactor EmailSenderHandler’s” constructor, replacing the TemplateRendererInterface parameter with three new parameters.
These will initialize 3 new class member variables:
- A
\SendGrid\Mail\Mailobject - A
\SendGridobject - An array containing the required configuration details
You can see the revised constructor in the example below, along with the related class member variables. Replace the existing class member variable and the constructor with this code.
Next, we need to refactor the handle() method. Replace the existing contents of the EmailSenderHandler::handle() method with the code below, then let’s step through what it does.
It starts by using $request->getParsedBody() to retrieve any parameters provided in the request body, which will return an associative array, initializing $details. With the parameters available, it calls the SendGridMailMail object’s addTo() method to set the email’s recipient, passing in the recipient’s email address and name in the first two arguments and an array of substitutions in the third argument.
Substitutions allow you to customize email messages for each recipient. In plaintext emails, any string immediately surrounded by hyphens, e.g., “-first_name-” is a substitution. In HTML emails, it uses the Handlebars syntax, which surrounds strings with double parenthesis, e.g., {{ first_name }}.
Next, we set the message’s subject and add a plaintext and HTML message body. With that, our email is ready to send. So we use the SendGrid object, $this->mailer, to send it, initializing a new variable, $response, with the response from attempting to send the message. Finally, we return a JsonResponse object, containing the status code and body from the response.
Refactor EmailSenderHandlerFactory’s __invoke method
Now that we’ve completed refactoring EmailSenderHandler, we need to refactor EmailSenderHandlerFactory. This will instantiate EmailSenderHandler correctly. To do that, replace the existing definition of its __invoke() method with the following code.
This retrieves a \SendGrid\Mail\Mail object from the DI container, preinitialized with the sender and reply to email details, and initializes a new object named $message. It then instantiates a new SendGrid object, named $mailer for sending the mail message. Finally, it retrieves the mail configuration from the application’s configuration. Then, it uses these to initialize and return the EmailSenderHandler object.
Update the routing table
With all of those changes, there’s one last change to make before we can test the code and send an email. We have to update the routing table so that the default route uses our new Handler class as the route’s handler, instead of HomePageHandler. To do that, replace the default route’s definition in config/routes.php with the following example.
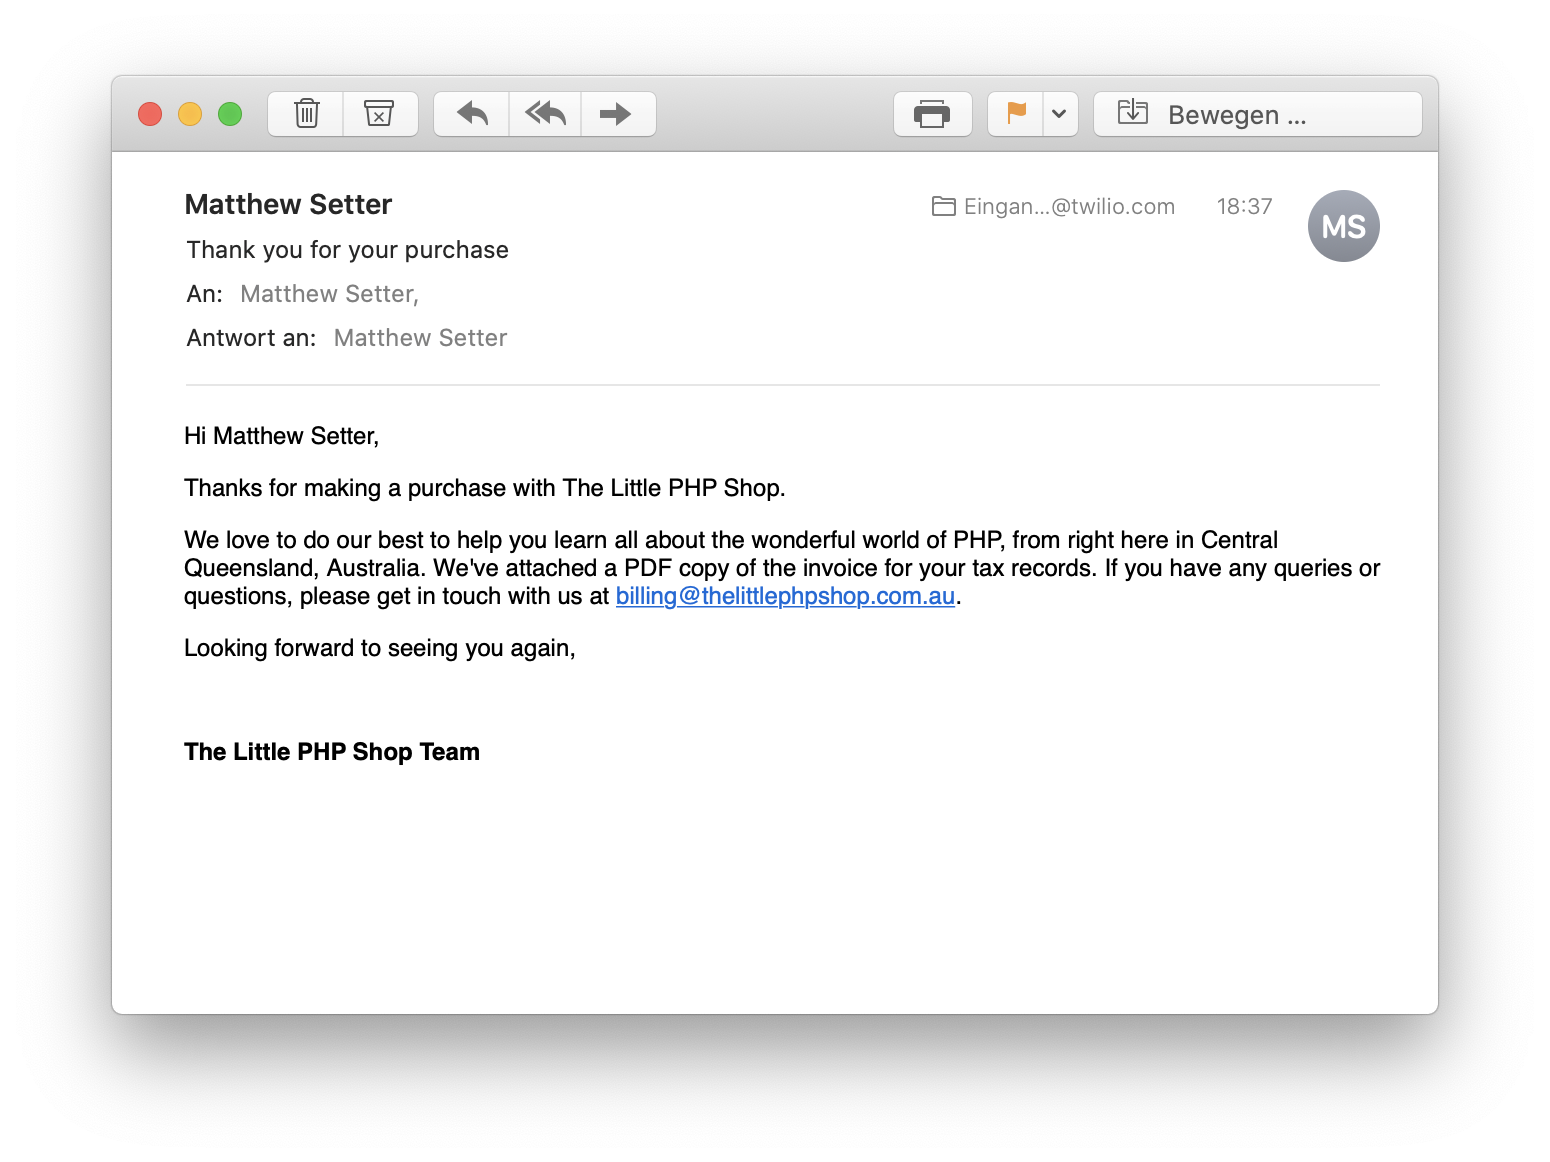
Send the first email
Now it’s time to send the first email. To do that, first, start the application by running the command below in the terminal.
Then, using cURL, make a GET request to http://localhost:8080, as in the example below, replacing the values in angle brackets with relevant details for your email.
You should see {“status”:202,“message”:””} output to the terminal, and you should receive an email that looks like the image below.
Use transactional email templates instead of template strings
While we’ve been able to send an email with both a plaintext and HTML body, how we’ve done it, however, is less than ideal. For each email that we send—and our application may end up sending quite a few — we’ll need to add a plaintext and HTML body for them.
But storing the email body definitions in code places the majority of the effort on the development team. However, at least in my experience, it’s often the case that other teams, often marketing, create and maintain email templates.
So for that reason, and because it would speed up development and share the load across multiple teams, we’re going to refactor the application to use transactional email templates. You can create and maintain these through the Twilio SendGrid UI by team members who may have little or no technical experience, instead of in code.
If you’ve not heard of them, the Twilio SendGrid glossary defines them as follows:
Transactional email templates are precoded email layouts that marketers, designers, and developers can use to quickly and easily create transactional email campaigns. Twilio SendGrid’s transactional email templates allow nontechnical and technical people alike to make real-time changes to the email their recipients receive.
For this article, we only need a fairly basic one. To do that, follow the details in the Twilio SendGrid documentation and create one that has as its content only in a single-text module. Then, for the body text, use the text below.
Note that there are 6 substitutions in the email:
- “first_name”: The customer’s first name
- “last_name”: The customer’s last name
- “sender_name”: The e-commerce shop’s name (The Little PHP Shop)
- “sender_state”: The e-commerce shop’s state
- “sender_country”: The e-commerce shop’s country
- “support_email”: The support email that customers can use to get after-sales support
Given that, we need to make that information available to our application. The customer’s first and last names we already have. The remaining four substitutions will be global, so as we did earlier, we’ll add the configuration below to config/autoload/mail.global.php, after the templates element.
With the new configuration file created, in the EmailSenderHandler::handle() method, replace the two calls to $this->mail->addContent(), with the following code.
The two method calls add the sender details and support email address as global substitutions. These substitutions apply to the email body before any other substitutions but are overridden if there are substitutions with the same key for an email recipient.
Next, you need to retrieve the transactional email template’s ID. You can find it by clicking the template’s name in the templates list, as you can see in the screenshot below.
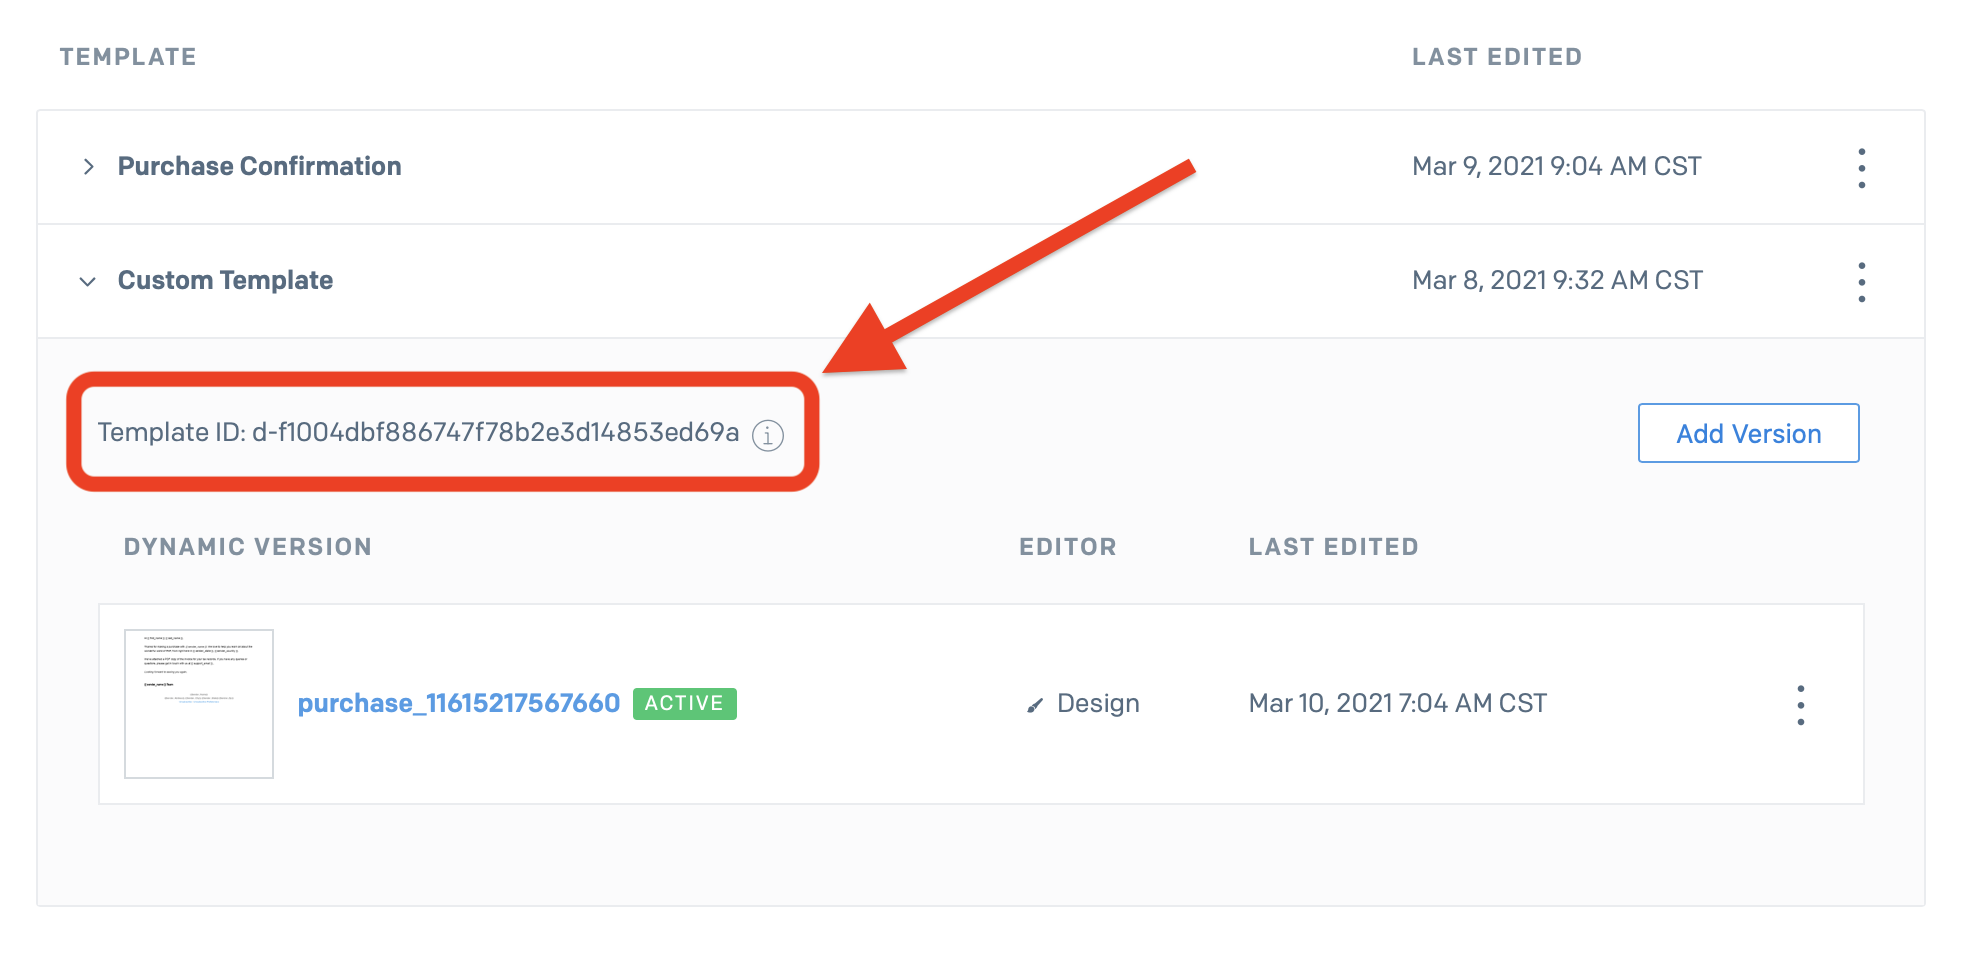
Copy it and store it in config/autoload/mail.global.php in a new element with the key template_id and then remove plain and HTML. When finished, the mail/templates element of the returned array will look like the code below, where <the template’s id> replaces your template’s ID.
With the configuration updated, we now need to add a call to the Mail::setTemplateId() method in the EmailSenderHandler::handle() method, passing in the template ID that we just added to config/autoload/mail.global.php. You can see an example in the code below.
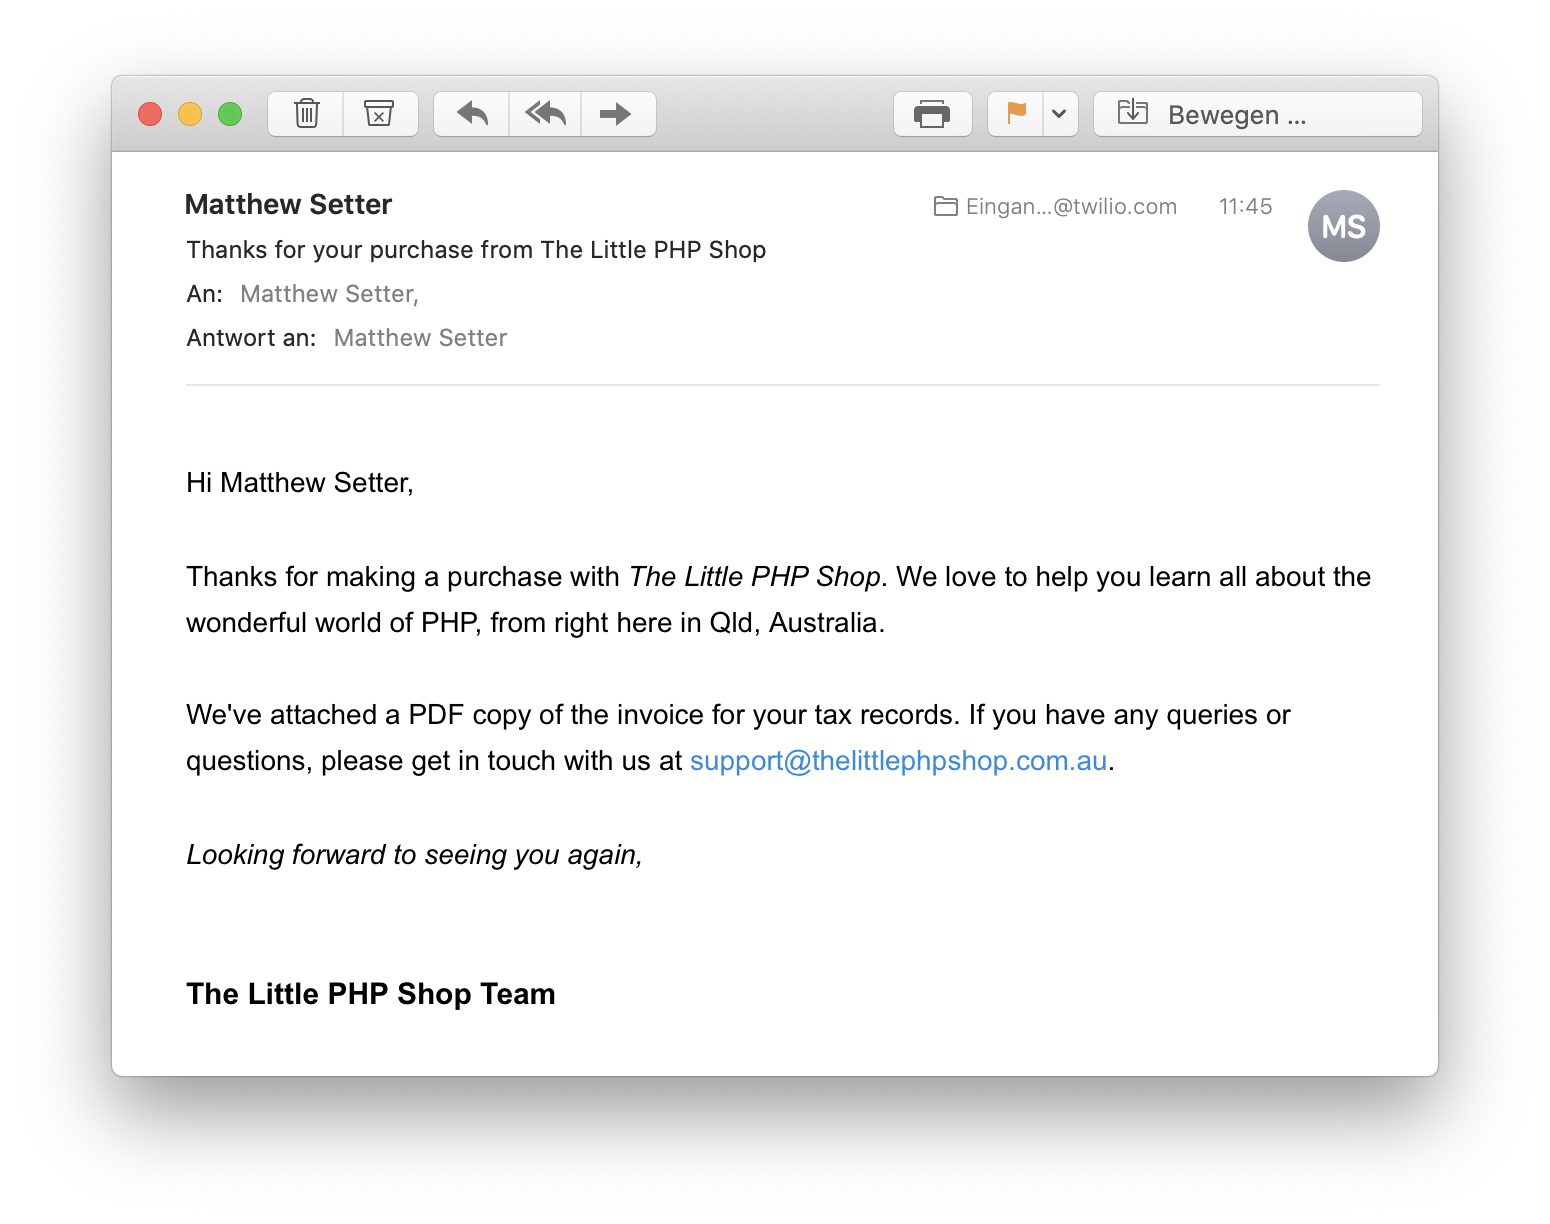
Let’s test the changes
As before, using cURL, make a GET request to “http://localhost:8080” to test if the changes work as expected. You should see {“status”:202,“message”:””} output to the terminal, as in the previous example. In your email inbox, you should see a lovely email, with the substitutions replaced, as in the screenshot below.
Attach a PDF invoice
Now that we’re using dynamic templates, let’s attach the PDF invoice that we talked about at the top of the article. To save you the time and effort of looking for or creating one yourself, I’ve created a sample PDF invoice that you can use for this article. Save it in the application’s data directory.
To attach an invoice, we need to make use of the Mail::addAttachment() method, which you can see in the next code example. The method takes five arguments, but we’re only supplying the first 4. These are:
- An
Attachmentobject or Base64 encoded string. If the value of this parameter is not base64 encoded, the method will do that for us. - The attachment’s mime type (now known as media type).
- The attachment’s file name. This is the name that the file will save as, by default, unless the user changes it.
- The attachment’s content disposition. If you’re not familiar with content-disposition, inline content-disposition means that the attachment should automatically display when the message displays, and attachment content-disposition means that the attachment does not display automatically and requires some form of action from the user to open it.
In the code example below, PHP’s file_get_contents method reads the contents of the file into a new variable named $invoice. Then, the PDF attaches to the message by calling the addAttachment() method.
Here, we:
- Pass in the contents of the invoice, which will be Base64-encoded
- Set the MIME type to "application/pdf" as we’re attaching a PDF file
- Set the invoice’s file name to a fictitious name that a customer might reasonably expect
- Set the content disposition to "attachment"
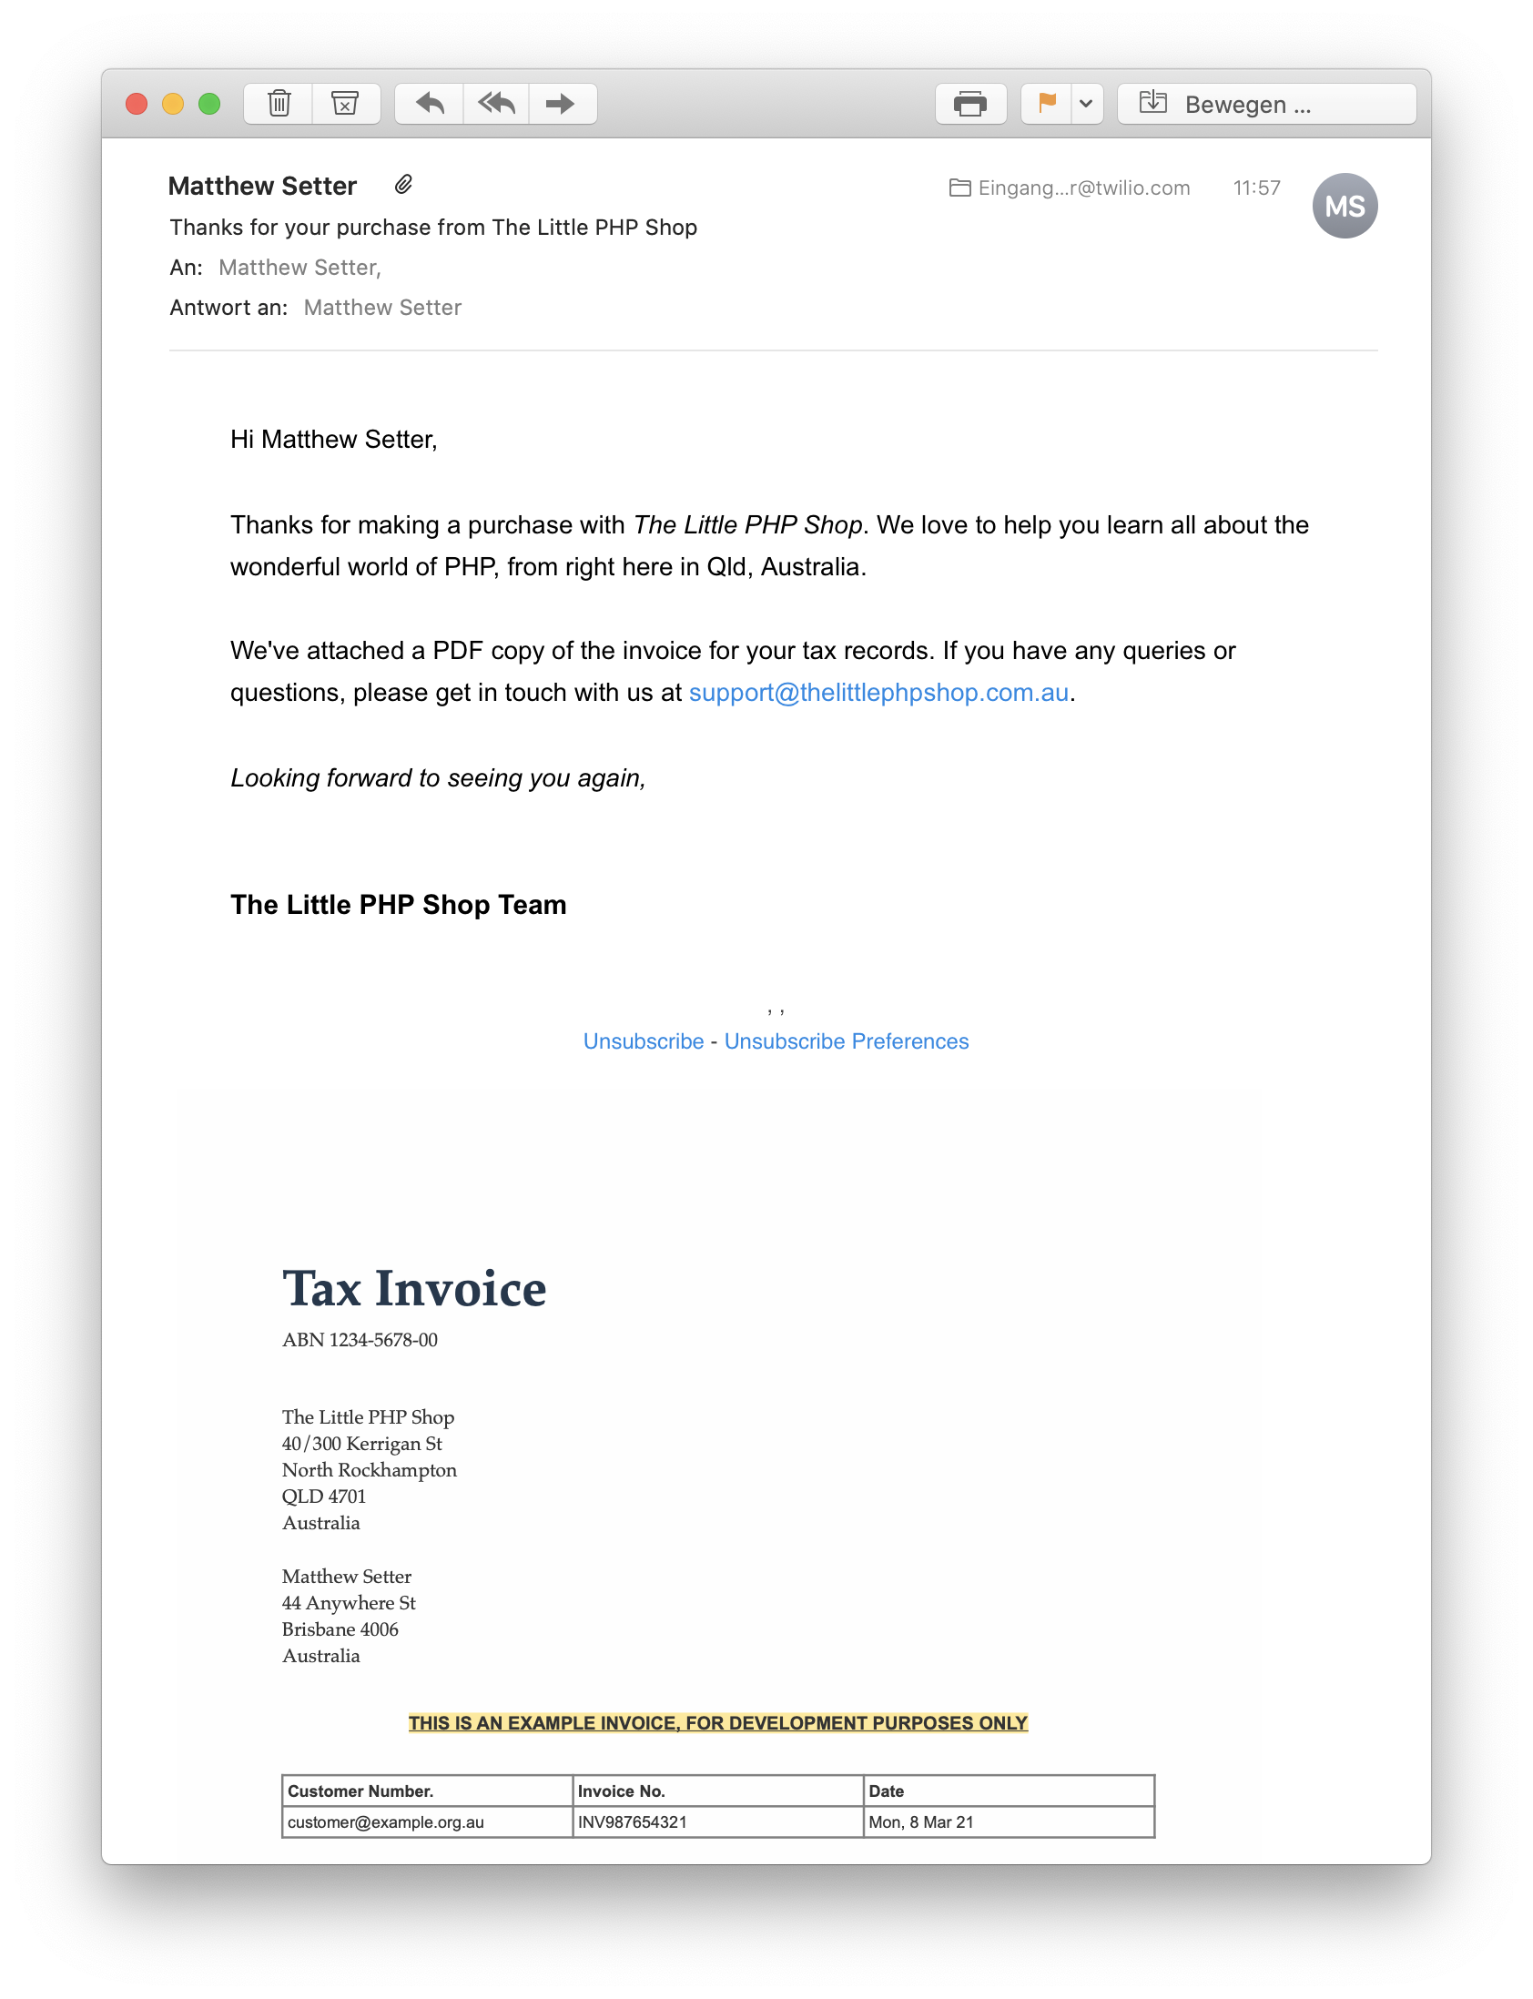
Now that we’ve finished those changes, let’s test that they work. Run the same cURL request that we ran the previous two times. Then, in your email inbox, you should see a lovely email with the example PDF invoice visible when viewing the email.
That’s how to send email with PHP using Twilio SendGrid
While we only scratched the surface of what’s possible when sending emails with Twilio SendGrid and Mezzio, you can now send an email with a plaintext and HTML body, as well as with an attachment. You’ve also learned how to use transactional templates and substitutions that you can set globally and on a per-recipient basis.
I strongly encourage you to have a look at the PHP library’s documentation to see what else is available, such as scheduling email sends, attaching a file from Amazon S3, adding headers, and adding sections and categories.
Matthew Setter is a PHP Editor in the Twilio Voices team and—naturally—a PHP developer. He’s also the author of Mezzio Essentials. When he’s not writing PHP code, he’s editing great PHP articles here at Twilio. He can be reached via:
- Email: matthew@matthewsetter.com
- Web: http://matthewsetter.com
- GitHub: https://github.com/settermjd
Related Resources
Twilio Docs
From APIs to SDKs to sample apps
API reference documentation, SDKs, helper libraries, quickstarts, and tutorials for your language and platform.
Resource Center
The latest ebooks, industry reports, and webinars
Learn from customer engagement experts to improve your own communication.
Ahoy
Twilio's developer community hub
Best practices, code samples, and inspiration to build communications and digital engagement experiences.