Installable Web Apps: A Practical Introduction To PWAs with JavaScript and Node.js
Time to read:
June 26, 2018
Written by
This post is part of Twilio’s archive and may contain outdated information. We’re always building something new, so be sure to check out our latest posts for the most up-to-date insights.

Progressive web applications (PWAs) can be built to make inconsistent internet connections much easier for users to handle. For example, offline-first web apps like this one that store shopping items locally. That example PWA was built with Hoodie and added a service worker script that enabled the app to load when it was offline. We can add more functionality to that PWA to make it even better for users.
In this post, we’re going to clone our progressive web app and make it installable. Being installable means it’ll be added to the device’s home screen and launched like a native app. To make it installable, we’re going to add a web app manifest and add Workbox to the build step to automatically generate a service worker.
Getting ready to code
To code along with me, you’ll need the following:
- NodeJS version 6.6.0 (or higher)
- npm version 3.6.3 (or higher)
- Source code from the previous post
If you downloaded the source code, install the dependencies by running npm install in the command line.The app already has a service worker enabled and uses the Cache API to store some assets for the web app.
A service worker is a programmable network proxy that runs on a separate browser thread and allows you to intercept network requests and process them as you so choose.
The service worker file at public/sw.js already has the following content:
In this code, when we have new assets or modify existing ones, we have to change the value of CACHE_NAME to invalidate the old cache and install the service worker script with updated resources. This process isn’t efficient. Instead, let’s look at how to generate a worker script through some configuration and automatically update the cache if assets changed. We’re going to use Workbox for that.
Generate a service worker script using Workbox
Precached resources are resources stored before they’re actually required. Our existing service worker precaches resources, but when something is changed it deletes the old cache and re-downloads the entire resources again. Workbox makes it easy to automatically generate a service worker that only downloads the changed resource and leaves the rest of the cache untouched. This is a smarter way of invalidating resources makes our app run faster and saves bandwidth.
Install Workbox
Because our build process is simple, we’re going to allow Workbox to generate the entire service worker script for us. Run the following command to install workbox-cli:
Add workbox-cli to the build process
Add a new file in the root directory of the project named workbox-cli-config.js. This file will be used automatically by the Workbox cli to generate the final service worker. Add the below content to this file:
Let’s get into more detail on a few of the parameters:
globDirectorytells it which directory it should pick files from and watch for changesglobPatternstells it what kind of files to precache. The wildcard pattern we used tells it to cache every file with the specified extensions inglobDirectory, or any of its subdirectoriesswDestis where it outputs the script it generatesskipWaitingtells the service worker installed to activate as soon as it enters the waiting phase. If we hadn’t chosen to use Workbox, we would addself.skipWaiting();in the function that handles the install eventclientsClaiminstructs the latest service worker to take control of all clients as soon as it’s activatedtemplatedUrlsis used for URLs generated based on some server-side logic. The file served when you request/hoodie/client.jscan be found in your project at.hoodie/client.js. If this file changes, when we run our build process and refresh the app, the service worker will update that cache for this entry.
Now update package.json to call workbox as the last step in your build process by adding && workbox generate:sw to the “build” line of package.json:
Build this by running this command in the command line:
This will update the existing sw.js file. You should get something similar to this:
The first line of the file, importScripts('workbox-sw.prod.v2.1.2.js'), imports Workbox’s service worker library. You’ll notice a new file with that name in your directory. Both files are generated whenever you run workbox generate:sw in the command line. So if you accidentally delete them, no worries.
With this new setup, run npm start in the command line and open localhost:8080 in your browser. Open the browser’s developer console to see how the service worker is updated, allowing it to skip waiting as soon as it enters the waiting phase.
Add the app manifest
A web app manifest is a JSON file that provides information about an application (for example, the app’s name and icon) and controls its appearance in areas like a mobile device’s home screen or Windows 10 start screen. The manifest also directs which page or URL is shown when the app is launched and defines the splash screen displayed at launch.
We need to add a manifest.json file to provide metadata about the application to the user. In the public directory add a new file called manifest.json with the following content:
nameis the name of the app that will appear on installation pop upshort_nameappears under the app’s icon once installedtheme_coloris the colour of the bar on top of the web app once it is openedbackground_coloris the background colour of the splash screen as it transitions between launching and loading the app’s contentdisplaydefines the display mode of the application. Standalone means it’ll display like a standalone applicationorientationdefines the screen orientationstart_urlindicates the start page of your applicationscopedefines the navigation scope of the application. If the applications navigates outside this scope, it returns to being a normal web pageiconsdefines an array different icon sizes for varying devices
Notice that we left icons as null. We’ll need icons for the pin icons, push notifications, install banner, and splash screen. Download the icon at this url, which is an image with 512 x 512 as its size. Open https://app-manifest.firebaseapp.com in the browser and upload this icon so it generates the remaining file sizes we’ll need for the app.
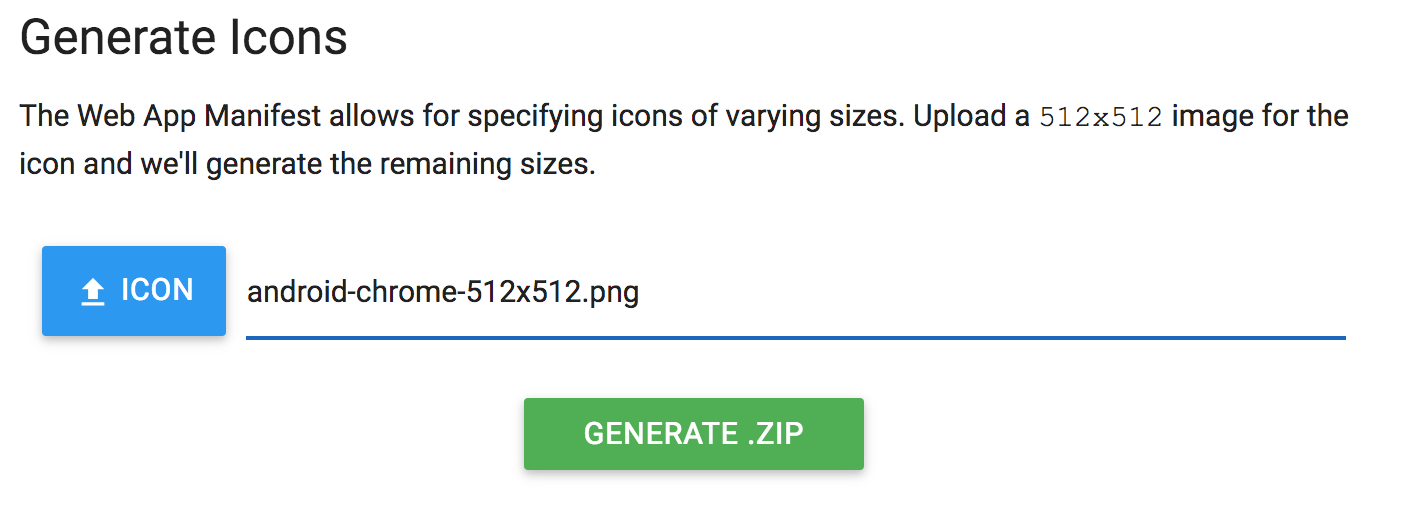
Click “Generate .ZIP” to download a zip file which contains icons and a manifest file. We already have a manifest file, so all we need from the downloaded zip file are the icons. Unzip the file, copy the
icons folder, and place it in the public folder that contains your application code. Replace the value of the icons property in our manifest.json with the following:
Installing our progressive web app
We now need to add a link to the manifest.json file we created in the previous section. Open index.html and history.html and add in the . Now your application is installable! You can build and start it by running npm run build && npm start again. Then open your app in a browser, it will install the latest service worker. Try adding it to your homescreen if you’re testing on mobile or adding to your desktop if you’re running from a PC.
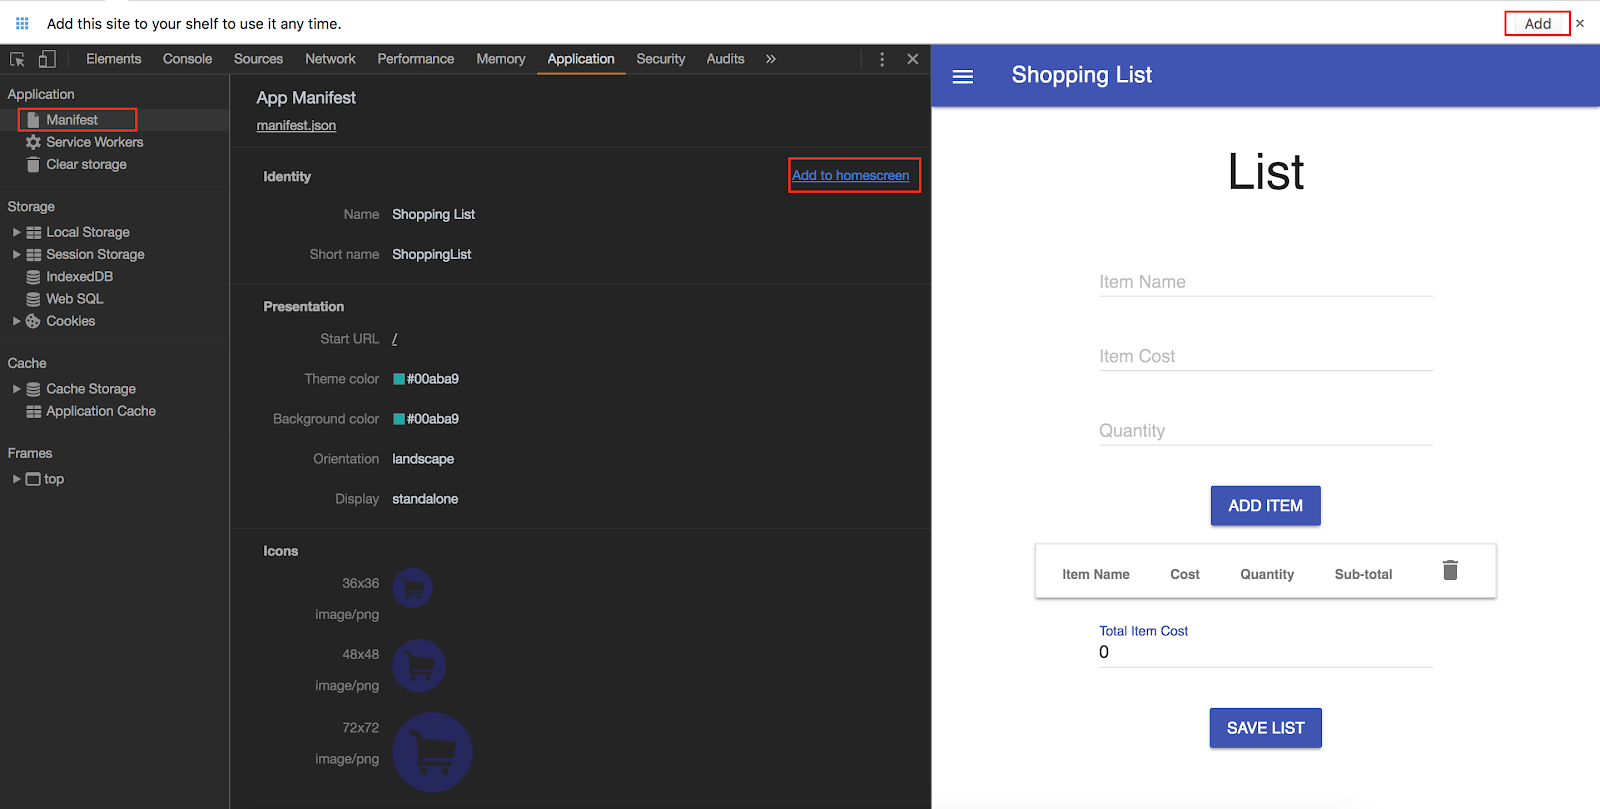
To do this on a desktop using Chrome:
- Open the Applications tab in Chrome DevTools
- Select “Manifest” from the side menu
- Click “Add to homescreen”. You’ll see a popup below the URL bar. Click “Add” and watch it added to your desktop apps.
Wrap Up
We covered how to use Workbox to generate a service worker script, what a web app manifest is, and how it provides information that’ll be used when installing your app. We used https://app-manifest.firebaseapp.com to generate an icon set, but you can also add other information about your application so you can generate a manifest.json and icon files at once.
Now that your application is installable, you can deploy your to your preferred hosting service to make it available to the world. You can find the complete source code for the app on GitHub.
The following resources are also great for reference:
- Web App Manifest
- Web App Manifest Generator
- Workbox
- Offline-First with Node.js and Hoodie: A Practical Introduction to Progressive Web Apps
About the Author
Peter Mbanugo is interested in offline-first and constantly seeking to learn better ways to build fast, light, and performant web apps and services. Reach him anytime at p.mbanugo@yahoo.com or @p_mbanugo on Twitter.
Related Resources
Twilio Docs
From APIs to SDKs to sample apps
API reference documentation, SDKs, helper libraries, quickstarts, and tutorials for your language and platform.
Resource Center
The latest ebooks, industry reports, and webinars
Learn from customer engagement experts to improve your own communication.
Ahoy
Twilio's developer community hub
Best practices, code samples, and inspiration to build communications and digital engagement experiences.