How to Build a WhatsApp Translator with Twilio, Python, Flask and Microsoft Azure
Time to read:
October 26, 2020
Written by
Reviewed by

WhatsApp is a growing social media platform that's available on web browsers (like Chrome), iPhone, and Android devices. If you use WhatsApp daily, you've likely encountered difficulties while chatting with a person who doesn’t speak your language. And you may be tired of having to quit WhatsApp to open a translator app like the Google Translate app to translate your text messages in real-time! If you want to translate directly from within your Android device or iOS device, you’re in the right place!
I will guide you through the following steps in order to get your WhatsApp translator up and running!
Tutorial Requirements
- Python 3.7 or newer.
- Flask. We will create a web application that responds to incoming WhatsApp messages with it.
- ngrok. We will use this localhost tunneling tool to connect the Flask application running on your system to a public URL that Twilio can connect to. If you don’t have ngrok installed, you can download a copy for Windows, MacOS or Linux.
- A smartphone with an active phone number and WhatsApp installed.
- A Twilio account. If you are new to Twilio create a free account now. You can review the features and limitations of a free Twilio account.
- A Microsoft Azure account. If you don’t have it, create a free account now.
Configure the Twilio WhatsApp Sandbox
Twilio provides a WhatsApp sandbox where you can easily develop and test your application. Once your application is complete you can request production access for your Twilio phone number. This step requires approval by WhatsApp.
Now, we’ll connect your smartphone to the sandbox. From your Twilio Console, select Programmable Messaging, then click on "Try it Out" and finally click on Try WhatsApp. The WhatsApp sandbox page will show you the sandbox number assigned to your account, and a join code.
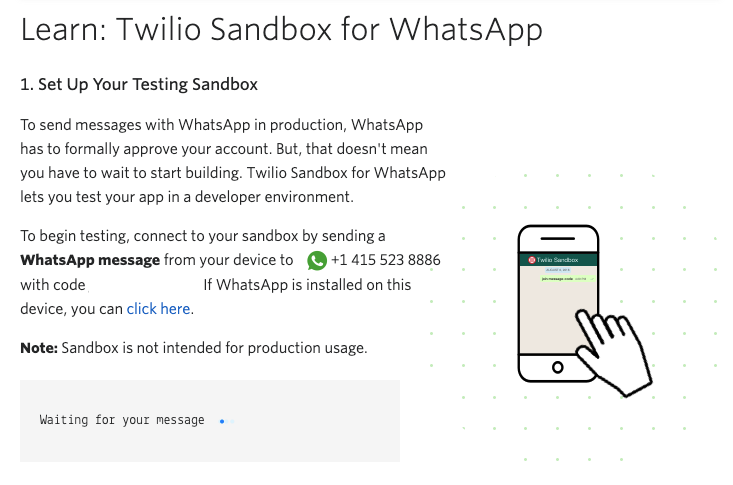
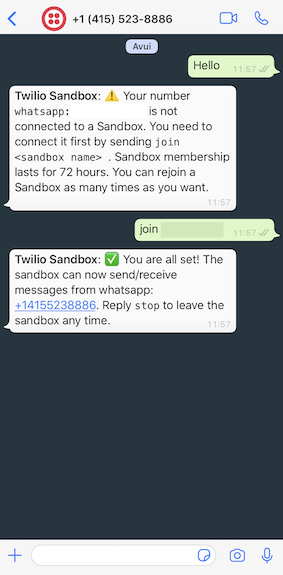
To enable the WhatsApp sandbox for your smartphone send a WhatsApp message with the given code to the number assigned to your account. The code is going to begin with the word join, followed by a randomly generated two-word phrase. Shortly after you send the message you should receive a reply from Twilio indicating that your mobile number is connected to the sandbox and can start sending and receiving messages.
Note that this step needs to be repeated for any additional phones you’d like to have connected to your sandbox.
Set up your Python application
We are going to create a virtual environment. We will create it inside of our translator project directory. Then we are going to install the Python packages that we need for our chatbot on it.
For Unix or Mac OS systems, open a terminal and enter the following commands to do the tasks described above:
For those of you following the tutorial on Windows, enter the following commands in a command prompt window:
Create a cognitive service resource in Azure
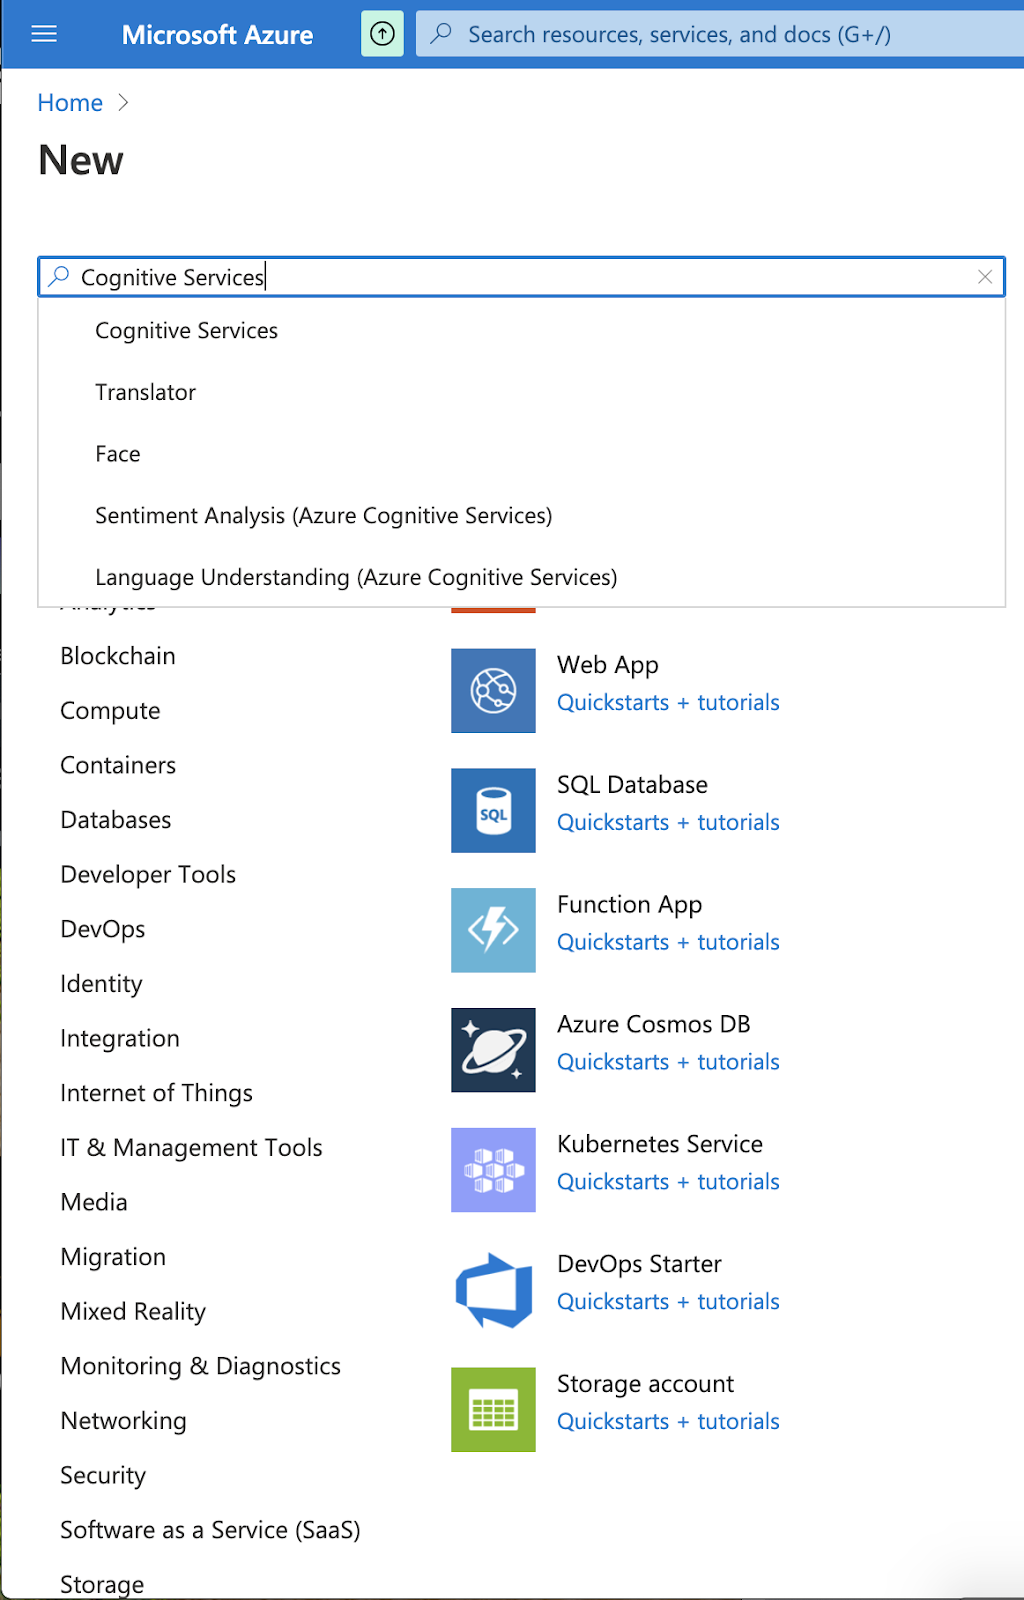
First, you’ll need to Create a Cognitive Services resource in the Azure portal. We need to do it because this will be the API that we will be using to get the texts translated. As a reference, feel free to loom at the official documentation of the Microsoft Cognitive Services.
Navigate to the Microsoft Azure Portal and click on Create a resource. Search for “Cognitive Services” as seen in the picture.
Next, you will be prompted to a page to create the cognitive service. What you need to do is:
- Select your subscription.
- Select a resource group or create one. If you have to create it, just click on Create new and enter a suitable name such as "Translator". The resource groups are containers that hold services that you have on your Azure account. The main purpose of the resource groups is to keep everything organized and easy to manage.
- Select a region. In the image below, you will see that I have put “France Central”. Choose the closest region to your physical location.
- Select a name for your resource. It can be something like “WhatsappTranslator” or “Translator”.
- Select a pricing tier. Note that you will have 2M free chars of any combination of standard translation per month. If you have a free account, you will select "Standard S0" for the Pricing tier.
- Check the boxes to ensure that you understand Microsoft's terms and conditions for the usage of Microsoft's Cognitive Services.
- Click on “Next: Tags”.
- Click on “Next: Review + create”.

One you have done all that, you should be prompted to the following page:
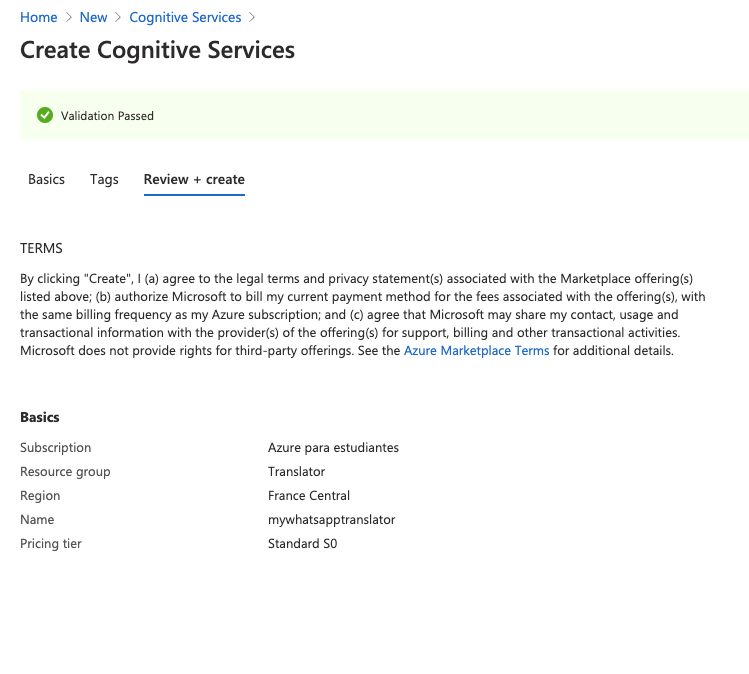
This means that you have correctly done all the steps and you are ready to create the service! Click on the Create button.
Click on the blue Go to your resource button. In the left pane, click on Keys and Endpoint. Here you will find the two variables that you will need to set as environmental variables - the key and the endpoint. It doesn’t matter which key you pick, either will work.
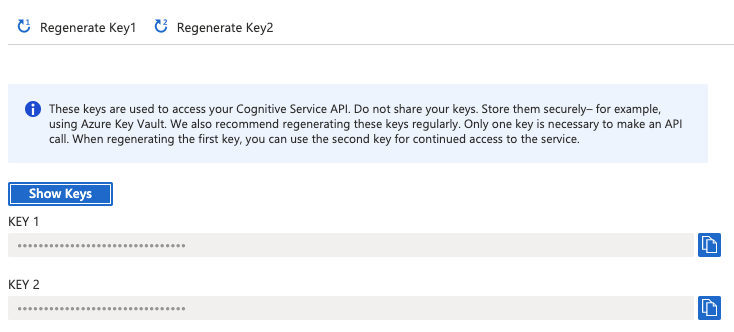
Make sure you set as environmental variables your key and endpoint as TRANSLATOR_TEXT_SUBSCRIPTION_KEY and TRANSLATOR_TEXT_ENDPOINT, respectively. The first one will serve to authenticate your HTTP requests to the Microsoft Cognitive Services API, and the second one will be the URL to which you’ll send them.
If you are using Unix or MacOS systems, type the following commands in your terminal and replace the keys with the ones given in your Azure portal. Otherwise, replace "export" with "set" if you are a Windows developer:
Create a Flask WhatsApp translator
Now, we will start building the WhatsApp translator!
The main functionalities of our translator will be:
- Detect the language of a text
- Translate a text into a given language
- Detect and translate at the same time
- Get the list of the available languages
Set up the server
The Twilio API for WhatsApp uses a webhook to notify an application when there is an incoming message. Our application needs to define an endpoint that is going to be configured as this webhook so that Twilio can communicate with it.
We’ll do that using Flask, it is pretty straight forward. First, you have to define a base application with a webhook definition. Grab your favorite IDE, (mine is Visual Studio Code) create a file named bot.py inside the whatranslator directory and paste in the following code. If you are new to Flask, this is the first step to build our application, don’t worry if you don’t understand it at first. Have a look at the Flask documentation and you’ll be fast tracked.
The important thing to keep in mind about the code above is that the application defines a /bot endpoint that listens (only) to POST requests. Each time an incoming message from a user is received by Twilio, they will in turn invoke this endpoint. The body of the function bot() is going to use regular expressions to see what functionality the user requires and provide the appropriate response.
Another interesting point of this application is that we are starting it with the debug mode enabled. This means that whenever we change something on the code and we save it, the server will automatically reload for us. Therefore, we won’t need to restart the server for every change that we do in our code. This feature is very useful for local development.
Prepare your testing environment
Before we start building the desired functionalities in our application, we’ll need to ensure that we’ll be able to test them.
First of all, we’ll need to tell Flask that we are developing the application. If you are using Unix or MacOS systems, type the following command in your terminal. Otherwise, replace "export" with "set" if you are a Windows developer:
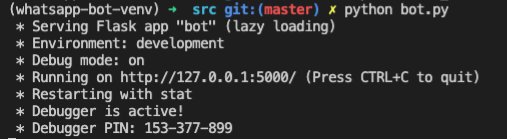
Start the translator bot by running python bot.py, making sure you do this while the Python virtual environment is activated. The output should be something like this:
The server is now running on port 5000 inside our computer, but we need to make it reachable from Twilio. To achieve this, we will need to use ngrok.
Open another terminal window and run ngrok http 5000. On a Unix or Mac OS computer you may need to use ./ngrok http 5000 if you have the ngrok executable in your current directory. The output of ngrok should be something like this:
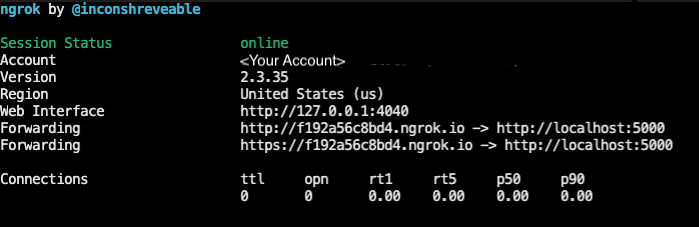
Note the lines beginning with “Forwarding”. These show the public URL that ngrok uses to redirect requests into our service. What we need to do now is tell Twilio to use this URL to send incoming message notifications.
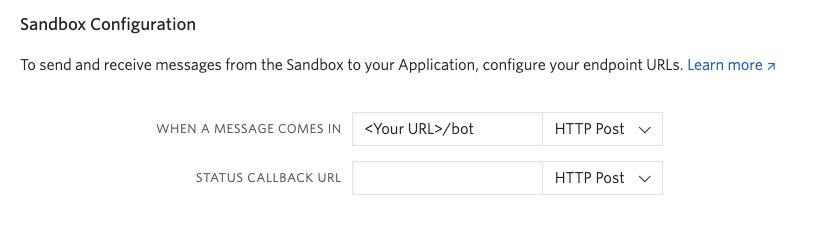
Go back to the Twilio Console, click on Programmable Messaging, then locate the WhatsApp Sandbox Settings at the top of the page. Copy the https:// Forwarding URL from the ngrok output and then paste it on the “When a message comes in” field. Since our translator is exposed under the /bot URL, append that at the end of the root ngrok URL. Make sure the request method is set to HTTP Post. Don’t forget to click the blue Save button at the bottom of the page to record these changes.
Note that whenever you restart ngrok, you’ll also have to update the new url to the WhatsApp Sandbox Settings.
Now, whenever you send a message to the WhatsApp sandbox, Twilio will send an HTTP request to the URL that you have just provided in the Twilio console. What follows now is the fun part, writing code for the actual translator!
Configure the Twilio WhatsApp API
Let’s recap on what we have done up until now. First, we have created a Python virtual environment to handle all the required dependencies. Second, we have created a base Flask application to receive incoming HTTP Post requests to the endpoint /bot but we haven’t added any logic to the response yet.
In order to write the logic of the app, we need to know how to obtain the message sent by the user. This message comes in the payload of the POST request with a key of ’Body’. We can access it through the Flask request object. Replace the code in bot.py with the following lines:
The response that Twilio expects from the webhook needs to be given in TwiML or Twilio Markup Language, which is an XML-based language. The Twilio helper library for Python comes with classes that make it easy to create this response without having to create XML directly. In the code above, you can see how to create a response that includes the output of the showHelp function from ther translator app.
If you haven't done so already, run python bot.py in a separate tab of the terminal. Take your WhatsApp enabled device, join the sandbox, and send a message. You should receive the help menu.
Define our important constants
We have to ensure that we can communicate with the Translator API and make requests to it. Create a file named consts.py in the same whatranslator directory of your bot.py file and paste the list of Translator supported languages from this gist file on it.
The format of the languages.txt file looks like this:
For more information, see the translator languages documentation.
Next, we need to authenticate to the Translator API. For that, we’ll need to get our translator authentication credentials from our code. Paste the following code at the top of the file consts.py.
Now let’s define the headers that we’ll be using to make calls to the Translator API. Add the following Python code to the consts.py file. It doesn’t matter in which part of the file you add it. Don’t forget to add import uuid at the top of the file.
And last but not least, we’ll have another constant named “TAGS”. This constant will have the format languageTag: languageName displayed in a column, and will be displayed in the WhatsApp screen when the user asks for the list of the available languages:
The definition of the constant is as follows. Add this line below the LANGUAGES variable definition in the consts.py file.
Deal with the languages
Now that we have defined our list of languages, it’s time to build a couple of handlers to get relevant info from them. Create a file named get_languages.py and add the following functions.
We’ll be using them in our application.
The Detect functionality
The next step in our application is to create the detect functionality. Create a file named detect.py where we will create the detect_language(text) function. The steps to detect a language from a given text are:
- Make an HTTP POST request to our Translator endpoint and with the path
/detect?api-version=3.0, with the already defined headers and the text from which we want to detect the language as the body. - Get the response in the json format.
- Grab the language and the score from the response, and the name from the language.
- Return the name of the language and the score.
The score is a number between 0 and 1. This number indicates how likely the new translation of the text is accurate. If it’s closer to 1, it is more likely that it is.
Copy and paste the following code to the detect.py file:
The Translate and DetectTranslate functionalities
Create a file named translate_text.py. We will need to import the following modules inside translate_text.py:
As you see, we will be using some constants that we have previously defined in other files.
Next, define the translator function. The steps are:
- Check if the language is supported.
- Make an HTTP POST request to our Translator endpoint and with the path
/translate?api-version=3.0, with the already defined headers and the text from which we want to operate as the body. - Return the response.
Paste the definition for the translator function under the import statements in the translate_text.py file:
The translate function will be defined as follows. What this is doing is calling the translator function and getting the translation from the response. The response needs to be processed because the translator function returns even more information. It also returns the detection of the language, which is why we'll also be using the translate function in the following functionality.
Define the definition for the translate function below the translator function:
Now we will define the detect_translate(text, language) function. Paste it below the translate(text, language) function The idea of the functionality is the same as the translate one above. We retrieve the relevant information from the translator's response and we return it. In this case, the information is the name of the language, the score and the translated text.
Finish the WhatsApp Translator application
Lastly, we will add a very important thing calling the actual functionalities from our bot! To achieve that, we will be using regular expressions to parse the messages and see what functionality we need to call.
At the top of the bot.py file, include the following lines to import functions from the other files:
Replace the response = showHelp() line from the bot function with the following logic: .
All together
The bot.py file should look like this at this point:
Test out your WhatsApp Translator bot
At this point, you should be able to talk to your WhatsApp Sandbox and get your text translated! Check out the completed GitHub repo in case you need to reference any part of the project. If you haven't already, make sure that ngrok is running on one tab, and your Flask app is running on another tab of your terminal. You should run the command python bot.py to start the Flask app.
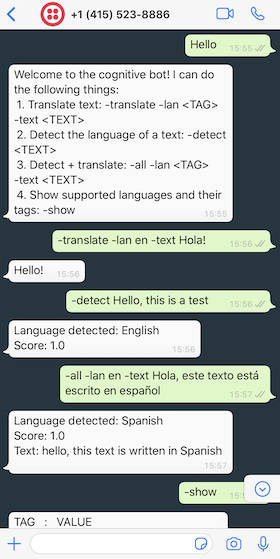
Take your WhatsApp enabled device and join the sandbox. Text "-translate -lan en -text Hola!" to try translating a Spanish phrase to English! Play around and see what you can translate.
Here is a little sample :)
Conclusion
Congratulations! You have done a great job on completing this application—no more foreign language issues! You can now translate messages from your new custom-made translation app.
Now, what you could do is to try to train this translator model. This would be a strong step forward, because by doing this the translator would perform much better. Find the relevant documentation here.
Carla Morral Martín is a Software Engineer Intern at the Media Recordings team. She is also a Computer Science and Mathematics student at Universitat de Barcelona, Spain. You can find her on LinkedIn.


Related Resources
Twilio Docs
From APIs to SDKs to sample apps
API reference documentation, SDKs, helper libraries, quickstarts, and tutorials for your language and platform.
Resource Center
The latest ebooks, industry reports, and webinars
Learn from customer engagement experts to improve your own communication.
Ahoy
Twilio's developer community hub
Best practices, code samples, and inspiration to build communications and digital engagement experiences.