Recognizing and Validating Phone Numbers Using Azure Computer Vision, Twilio Lookup, and .NET Core
Time to read:
July 13, 2020
Written by
Reviewed by
This post is part of Twilio’s archive and may contain outdated information. We’re always building something new, so be sure to check out our latest posts for the most up-to-date insights.

Developers who work with images often face the problem of extracting and verifying phone numbers that appear in images. There are billions of pages of documents that exist only as image files. Getting usable data out of them is a challenge — especially when the data needs to conform to specific rules to be reliable.
Optical character recognition (OCR) applications are great, but they can’t always take the step of identifying the type of information represented by the characters they’re recognizing. And in many cases, OCR applications are large, standalone applications requiring significant computing resources to run at scale.
Microsoft Azure Computer Vision solves these problems by providing cloud-based intelligent image processing. Developers can upload images to the cloud through an API and have Computer Vision perform the work of converting images to data.
When the data includes phone numbers, developers can use the Twilio Lookup API to verify the number is valid and get additional information about it. This is particularly useful in applications that rely on specific capabilities of phone numbers, such as their ability to receive SMS text messages.
This post will show you how to use Computer Vision and Twilio Lookup to extract phone numbers from images and verify that they’re valid numbers. You’ll build a working example using code you can implement in your own .NET Core projects.
Understanding Computer Vision
Computer Vision is an artificial intelligence (AI) service that’s part of Microsoft Azure Cognitive Services, a collection of machine-learning tools that enable developers to apply AI capabilities to applications just by making an API call — no machine-learning expertise or on-premise server farms required.
The focus of Computer Vision (CV) is to extract information from images. This post will use CV’s ability to extract printed and handwritten text to recognize phone numbers, a capability called Object Detection. CV also has the ability to recognize familiar subjects, like brands and landmarks, and label image content, a capability known as Image Classification that’s helpful in content moderation.
For example, image classification would be used to identify the subject of a photograph as a business card and identify the brand on the card as “IBM”. Object detection would be used to extract the name, email address, and phone number from the card.
Azure Cognitive Services has other image processing capabilities, including face detection, video indexing, forms processing, and handwriting recognition. It also includes a Custom Vision solution for tailoring computer vision to specific domains.
Understanding phone numbers
The key to having a genuine understanding of phone numbers is to understand E.164, the international telephone numbering plan for the public switched telephone network (PSTN). It’s also helpful to be familiar with Falsehoods Programmers Believe About Phone Numbers.
Phone numbers on the PSTN are only unique when they include a country code. In E.164 format they’re expressed as [+] [country code] [subscriber number including area code] and can have a maximum of fifteen digits.
Most of the time phone numbers aren’t written (or printed) in E.164 format, they’re written in a national format without a country code. For example, Twilio’s main phone number in E.164 format is +18448144627, but the number in national format is (844) 814-4627.
Phone numbers in other countries are different lengths and are formatted in different ways. Without the country code, a phone number in one country may be the same as one in a different country, even if it is formatted differently. It’s also worth noting that the formats for different types of numbers, such as mobile and landline numbers, are different in some countries.
You can determine if a phone number is “phone number-ish” with a regular expression like ^\+[1-9]\d{1,14}$, or HTML datatype attributes, or the .NET Core DataType.PhoneNumber enumeration. But you can’t tell if it’s a valid number without using a service like Twilio Lookup.
Understanding the case study project
In this tutorial you’ll build a .NET Core Console application that uses Azure Computer Vision to recognize a phone number from an image of a business card, then you’ll validate that number with Twilio Lookup. You’ll access Twilio Lookup using the credentials from your Twilio account and the Twilio NuGet for .NET.
For the sake of simplicity in this introductory demonstration, the application will assume that all the phone numbers on business cards are US numbers.
Prerequisites
To build the solution in this post, you’ll need the following:
.NET Core 3.1 SDK – The SDK includes the runtime, CLI, and API
Visual Studio 2019 with the following workloads and individual components:
Azure development
.NET desktop development
NuGet package manager
GitHub Extension for Visual Studio
Microsoft account – Required to create an Azure account
Azure account – Trial accounts include 12 months of free services
Twilio account – Sign up with this link and get an additional $10 credit on your account
You should have a basic understanding of C# and .NET Core. Familiarity with the Visual Studio 2019 user interface will also be helpful. No prior experience with Azure or Twilio is required.
There is a companion repository for this post available on GitHub.
Setting up Azure Computer Vision
Before using Azure Custom Vision you must log into Azure and set up access keys. After logging into your Azure account, browse to the portal.
Azure resource groups are containers which hold related resources for an Azure solution. You’ll need one for this project.
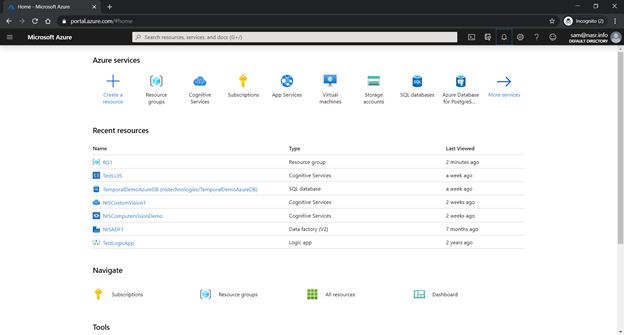
On the Azure portal home, in the Azure services section, click Resource groups.
On the Resource groups page, click + Add and you’ll see the Create a resource group page, like the one shown below. To create a resource group, specify three parameters:
- Subscription: the list of subscription options available will depend on whether you are using a free trial, pay-as-you-go, or enterprise subscription. Any subscription level will work for this tutorial.
- Resource group: the name can be anything but it’s good practice to follow a standard naming convention, such as “CustomVisionRG”.
- Region: specifies the Azure data center location that will host these resources. Pick one closest to your end user for fastest service in production applications.
When you’re finished, click Review + create at the bottom.
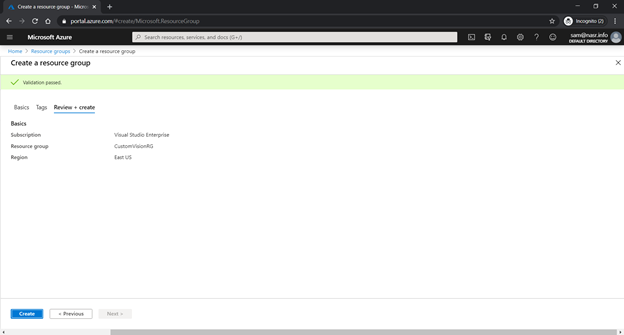
Once Validation has passed, click Create to create the resource group. Afterwards, you should see a message indicating it has been created. You’ll be returned to the Resource groups page. You may have to click Refresh to see the new resource group on the list, but be sure it appears before proceeding.
The next step is to add Custom Vision to the newly created resource group CustomVisionRG (or the name you’ve given it).
Return to the portal homepage by clicking Home in the breadcrumbs in the upper left corner of the Resource groups page.
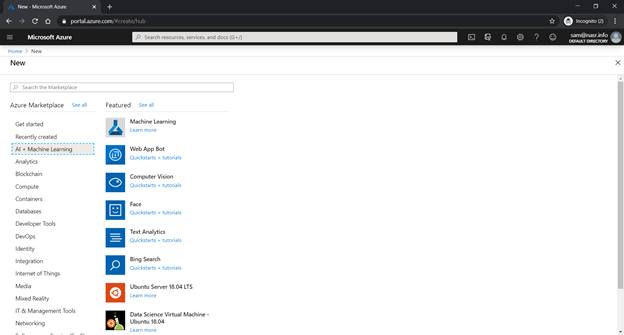
Under Azure services, click Create a resource.
On the New page, select AI + Machine Learning and click Computer Vision.
On the Create page, enter the following information.
Name: PhoneNumberReader
Subscription: [Use the default selection]
Location: [Choose a location that’s close to you.]
Pricing tier: [If you’re using an Azure free trial account the F0 (Free) tier should be available.]
Resource group: [Select the name of the resource group you just created.]
The following screenshot shows and example of the completed form:

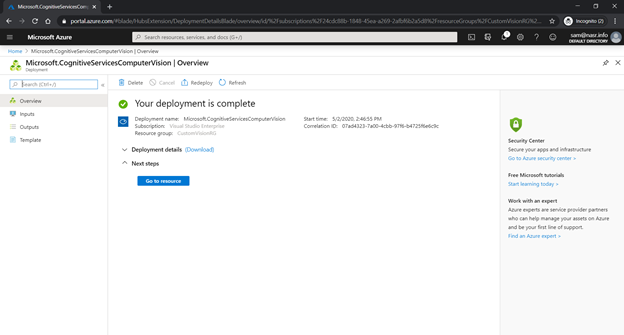
Click Create at the bottom to the service and make it available for use. You will see a number of status messages as the resource is created and deployed. When the process is complete you’ll see the Microsoft.CognitiveServicesComputerVision | Overview page. An example is shown below:
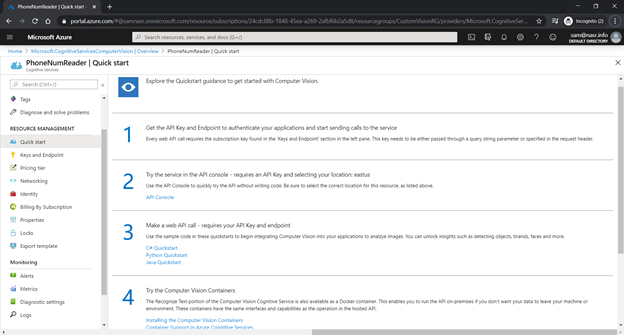
Click Go to resource to go to the Quick start page for the resource. If the Go to resource button is inactive, go to the portal Home in the breadcrumbs and select the resource group, then the resource. The Quick start page has many useful shortcuts for using the API Console, language APIs, containers, and reference information.
In this project you’ll use Computer Vision programmatically in a .NET Core project using C#, To do so you’ll need API keys and an endpoint.
Select Keys and endpoint under Resource Management. You’ll see a Keys and Endpoint page like the one shown below.
Click Show Keys and copy the values for KEY 1, KEY 2, ENDPOINT, and LOCATION to a safe place.
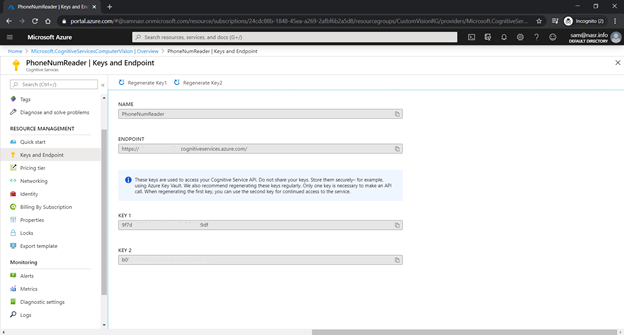
These values will be used directly in the demo application.
Obtaining your Twilio credentials
If you don’t already have a Twilio account, use the link above to create one. Your free trial account will come with credit that will enable you to use the Lookup service without charge.
Go to the Twilio console dashboard and get the Account SID and Auth Token for the ExplorationOne project (or the project of your choice, if you’ve created additional projects). You can find these credentials on the upper right-hand side of the dashboard. These are user secrets, so copy them someplace safe and handle them securely.
Setting up the .NET Core Console App project
Using Visual Studio 2019, create a new Console App (.NET Core) using C#. Give it the name PhoneNumDemo.
After the project has been created, add the following NuGet packages using the NuGet Package Manager or the Package Manager Console window:
- Microsoft.Azure.CognitiveServices.Vision.ComputerVision
- Microsoft.Extensions.Configuration
- Microsoft.Extensions.Configuration.Json
- Twilio
These APIs will enable the console app to call the Custom Vision resource and Twilio Lookup.
Under the PhoneNumDemo project, create an Images folder to contain the test image used in the demo.
Working with images in Computer Vision
Any image file used with Computer Vision API must adhere to a number of requirements. It must:
- Be a raw image binary in the form of an application/octet-stream, or an image URL
- Be one of the supported image file formats: JPEG, PNG, BMP, PDF, and TIFF
- Have a file size of 50 MB or less
- Have image dimensions between 50 × 50 pixels and 10000 x 10000 pixels.
- For images in PDF files, dimensions must be at most 17 x 17 inches, corresponding to Legal or A3 paper sizes and smaller
- For PDF and TIFF, up to 2000 pages are processed (For Free tier subscribers, only the first 2 pages are processed.)
You can find these constraints, and additional API documentation, at Microsoft Cognitive Services – Computer Vision API v3.0. Note that as of the publication date of this post, the API documentation hasn’t been integrated into docs.microsoft.com.
The sample image being used in this tutorial is an image of a business card called Card.jpg. You can get the file from the companion repository on GitHub at: https://github.com/SamNasr/PhoneNumberRecognition/blob/master/PhoneNumDemo/Images/Card.jpg
Add Card.jpg to the Images folder.
Right-click on the Card.jpg file and click Properties. In the Advanced section of the File Properties panel, change the value of the Copy to Output Directory to Copy always.
Coding the application
Open the Program.cs file in the project root and replace the existing using directives with the following namespaces:
Create an appSettings.json file in the project root and insert the following JSON code:
Replace the placeholder for the subscriptionKey element with one of the keys you obtained from Azure and replace the placeholder for the endpoint element with the endpoint URL. Replace the accountSid and authToken placeholders with your Twilio credentials.
Right-click on the appSettings.json file and click Properties. In the Advanced section of the File Properties panel, change the value of the Copy to Output Directory to Copy always.
The values in the appSettings.json file are all user secrets, so be sure to add this filename to your .gitignore file or otherwise exclude it from being checked into source code control.
In the Program.cs file, replace the contents of Main(string[] args) method with the following C# code:
You’ll see some lint because there are calls to methods you haven’t built yet. Don’t worry.
The Main method gets the subscription key and endpoint values for the Azure service from the appSetttings.json file using the Configuration API, then passes these values to a method that creates an instance of ComputerVisionClient.
Add the following code below the Main method:
Once the instance of ComputerVisionClient is successfully instantiated the GetTextFromImage method uses the client object to call the Custom Vision service and send it the image, in Stream object form, as an argument to the RecognizePrintedTextInStreamAsync method, which returns an OcrResult.
The OcrResult object localFileOcrResult has a number of standard properties:
Language – The IETF BCP-47 language code of the text in the image (For example, “en” for English.)
TextAngle – The angle, in degrees, of the detected text with respect to the closest horizontal or vertical direction. After rotating the input image clockwise by this angle, the recognized text will be either horizontal or vertical.
Orientation – Orientation of the text in the image (“up”, “down”, “left”, “right”)
Regions – An array of OcrRegion objects representing region(s) of recognized text.
Each OcrRegion object contains two properties:
BoundingBox – A recognized box region, identified by four integers representing the x-coordinate of the left edge, the y-coordinate of the top edge, width, and height of the box.
Lines – An array of OcrLine object(s) representing a line of text. Each object contains information about each recognized word and its bounding box.
Add the following C# code below the InstantiateClient method:
Once the GetTextFromImage method has an OcrResult it iterates through each of the Regions in localFileOcrResult.Regions, writing information about the Region to the console.
Next it iterates through each Word in each Line, looking to see if the word matches a regular expression that describes a US phone number using the regular expression ^[2-9]\d{2}-\d{3}-\d{4}$, which matches the string for the format “000-000-0000” (“0” represents any digit). Note that while this is the official NANPA US phone number format, the US national format returned by the Lookup API is: (000) 000-0000.
When a phone number is found, an asynchronous call is made to the IsTwilioVerified method to validate the phone number.
Insert the following code below the GetTextFromImage method:
Testing the completed application
Run the application in Visual Studio. You should see a console window open and, after a brief pause, output similar to the following:
Note the following lines, where the phone number recognition and validation take place:
The Text found matches the pattern supplied in the regular expression in the GetTextFromImage method, so it’s identified as a phone number. Then it’s validated with Twilio Lookup as a genuine phone number in the US and returned in E.164 format.
Advantages of using Azure Computer Vision
Azure Computer Vision can be easily integrated with any type of application. It can process an image provided as a sequence of bytes, as was done in this application with the Stream object, or it can process an image provided as the target of a URL.
The following methods process byte streams:
RecognizeTextInStreamAsync – Performs OCR on either printed or handwritten text (In preview release as of the date of publication.)
RecognizePrintedTextInStreamAsync – Extracts the recognized characters into a machine-usable character stream and returns OCR results
RecognizePrintedTextInStreamWithHttpMessagesAsync – Returns the results in HTTP Messages
These methods process images provided by URL:
RecognizeTextAsync
RecognizePrintedTextAsync
RecognizePrintedTextWithHttpMessagesAsync
Computer Vision can process skewed or otherwise suboptimal images, and it’s capable of reading handwriting as well as printed text, so it can handle documents that are typically found in business situations.
Advantages of using Twilio Lookup to validate a phone number
Twilio Lookup is the best option for taking “phone number-ish” data that passes a simple test by regular expression or DataType enumeration and validating it as a genuine phone number for a specific country. It can also provide you with information about the carrier, and the type of line and its capabilities. For applications that send SMS messages, knowing that the number can receive them is a plus.
Twilio Lookup can also tell you about the caller for US phone numbers. While the caller ID information depends on what’s available through the carrier, this information can help your application provide a more personalized experience and assist with fraud protection.
Summary
In this post you learned about some of the challenges associated with working with phone numbers and with recognizing them in printed documents. You saw how to integrate Azure Computer Vision into a .NET Core 3.1 console application to recognize a US-based phone number in an image file. You also saw how to validate a phone number with Twilio Lookup.
Additional resources
There are a number of canonical references for Azure Computer Vision and Twilio products:
Computer Vision documentation – The top-level page for Computer Vision. It gives you access to a video introduction and quickstarts for various languages and applications.
Call the Computer Vision API – An essential read for getting up to speed on using the Computer Vision REST API.
Cognitive Services – Computer Vision API – v3.0 – The reference documentation for the version of the API that’s current as of the date of this post.
Lookup API – Reference documentation for the API, and links to tutorials and pricing.
TwilioQuest – Learn to use Twilio products with Twilio’s very own quest game inspired by the classics of the 16-bit era! There’s even a soundtrack!
Sam Nasr has been a software developer since 1995, focusing mostly on Microsoft technologies, and currently works as a Sr. Software Engineer and instructor at NIS Technologies, where he consults and teaches classes about the latest .NET technologies. He has achieved multiple certifications from Microsoft, including MCSA, MCAD, MCTS, MCT. He’s served as the leader of the Cleveland C#/VB.NET User Group since 2003, and is the leader of the .NET Study Group. He’s written multiple articles for Visual Studio Magazine and is a 5x Microsoft MVP. When not coding, he loves spending time with family and friends or volunteering at his church. Contact Sam at Twitter or LinkedIn.


Related Resources
Twilio Docs
From APIs to SDKs to sample apps
API reference documentation, SDKs, helper libraries, quickstarts, and tutorials for your language and platform.
Resource Center
The latest ebooks, industry reports, and webinars
Learn from customer engagement experts to improve your own communication.
Ahoy
Twilio's developer community hub
Best practices, code samples, and inspiration to build communications and digital engagement experiences.