How to Build an RCS Business Messaging Campaign with Twilio in PHP
Time to read:
September 28, 2026
Written by
Rich Communication Services (RCS) is the upgrade to SMS that turns everyday text messages into branded conversations with images, carousels, verified sender logos, suggested replies, and read receipts all delivered natively through the default messaging app on the recipient’s phone.
Twilio Programmable Messaging supports RCS Business Messaging as a first-class channel, which means you can reuse the same API you already use for SMS to deliver rich and interactive messages at scale.
In this tutorial, you’ll learn how to build an RCS Business Messaging campaign in PHP. You’ll register an RCS Sender, design a rich card template in the Twilio Content Template Builder, broadcast the campaign to a list of recipients, track delivery status with a webhook, and capture replies when users tap a suggested reply button.
Prerequisites
- A Twilio account - Sign up with Twilio for free here
- Set up Messaging Services with a phone number for SMS or MMS.
- An RCS Sender registered in Twilio; Check out our docs on enabling RCS or follow our Getting Started with RCS tutorial.
- PHP 8.5 or higher installed on your machine
- ngrok installed on your machine for exposing your local server to the internet
- A code editor of your choice
How RCS campaigns work with Twilio
Before writing any code, it helps to understand how the pieces fit together:
- RCS Sender: Your verified brand identity on the RCS network. This is what recipients see at the top of the conversation (your logo, business name, and verified checkmark).
- Messaging Service: A Twilio resource that groups senders (RCS, SMS, WhatsApp, etc.) together. You send from the Messaging Service and Twilio picks the right sender based on the recipient’s capabilities.
- Content Template: A reusable message layout with dynamic variables. RCS supports rich cards, carousels, quick replies, and call-to-action buttons.
- Campaign script: Your PHP code that loops over a recipient list and sends each person a personalized message using the Content Template.
- Status callback: A webhook that Twilio calls every time a message changes state (queued, sent, delivered, read, failed) so you can measure the campaign in real time.
- Inbound webhook: A webhook that Twilio calls when a recipient taps a suggested reply or sends a message back, so you can capture responses.
Register an RCS Sender and add it to a Messaging Service
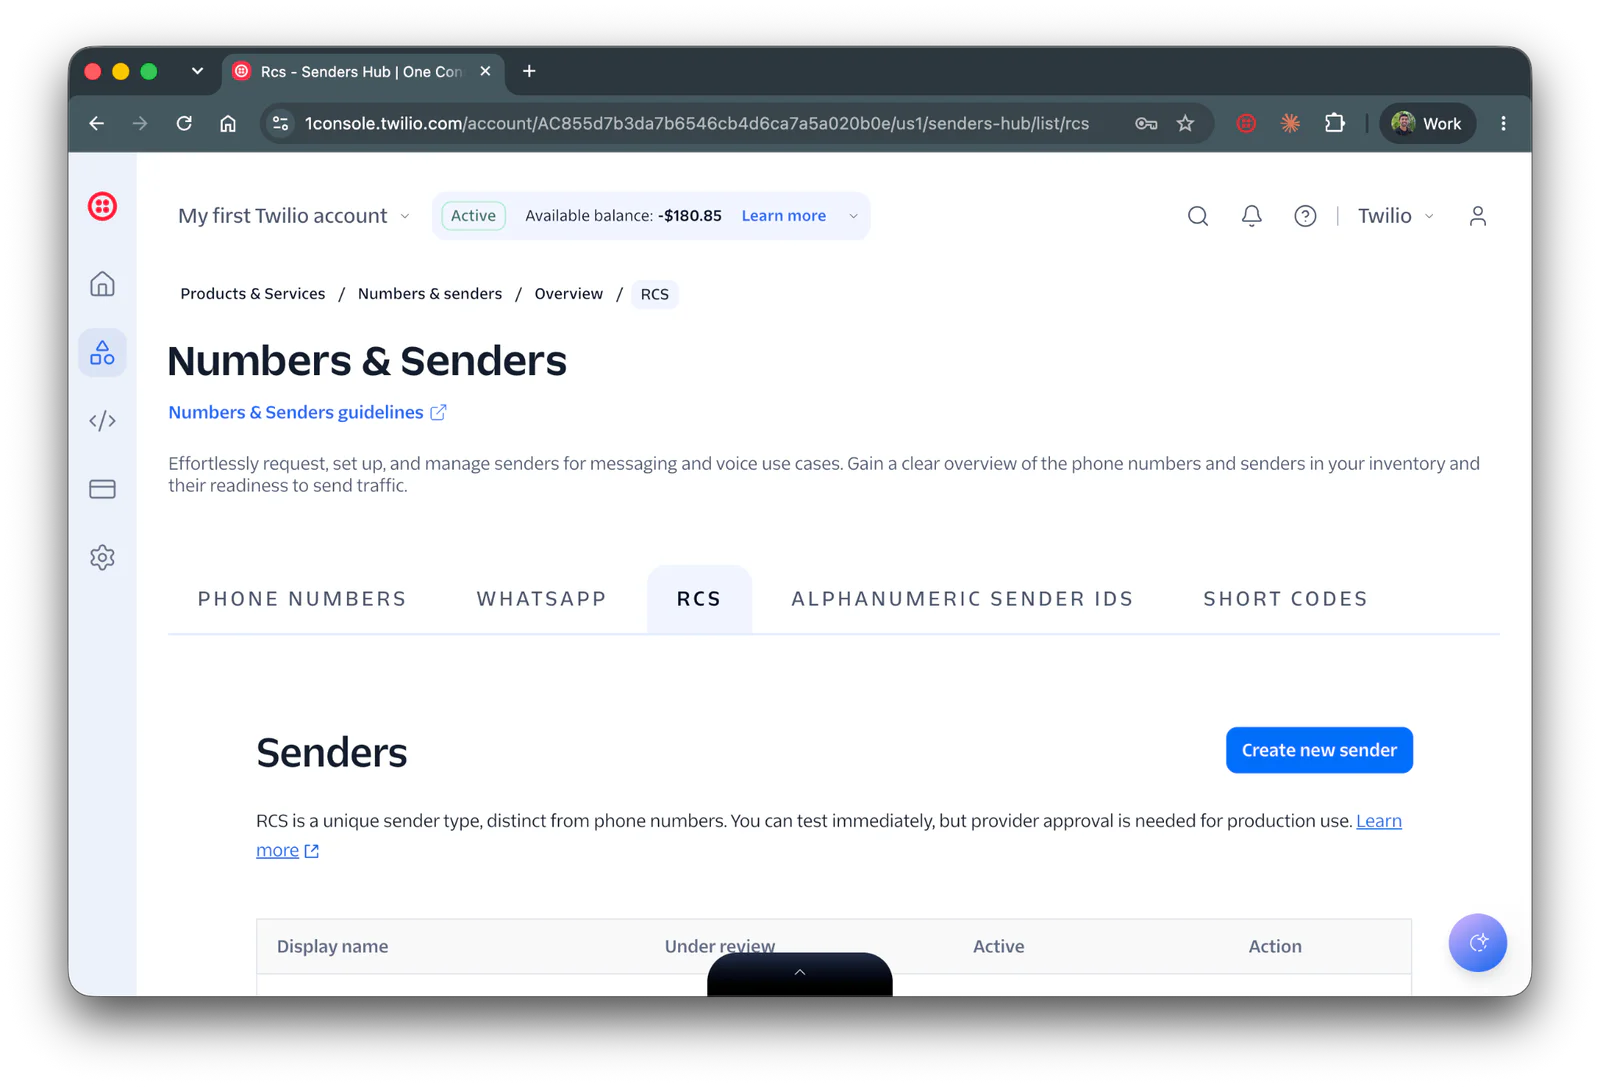
If you haven’t already registered an RCS Sender, do that first. Log in to your Twilio Console and navigate to Products & Services > Numbers & Senders > Overview > RCS. Click Create new Sender and follow the prompts to submit your brand information.
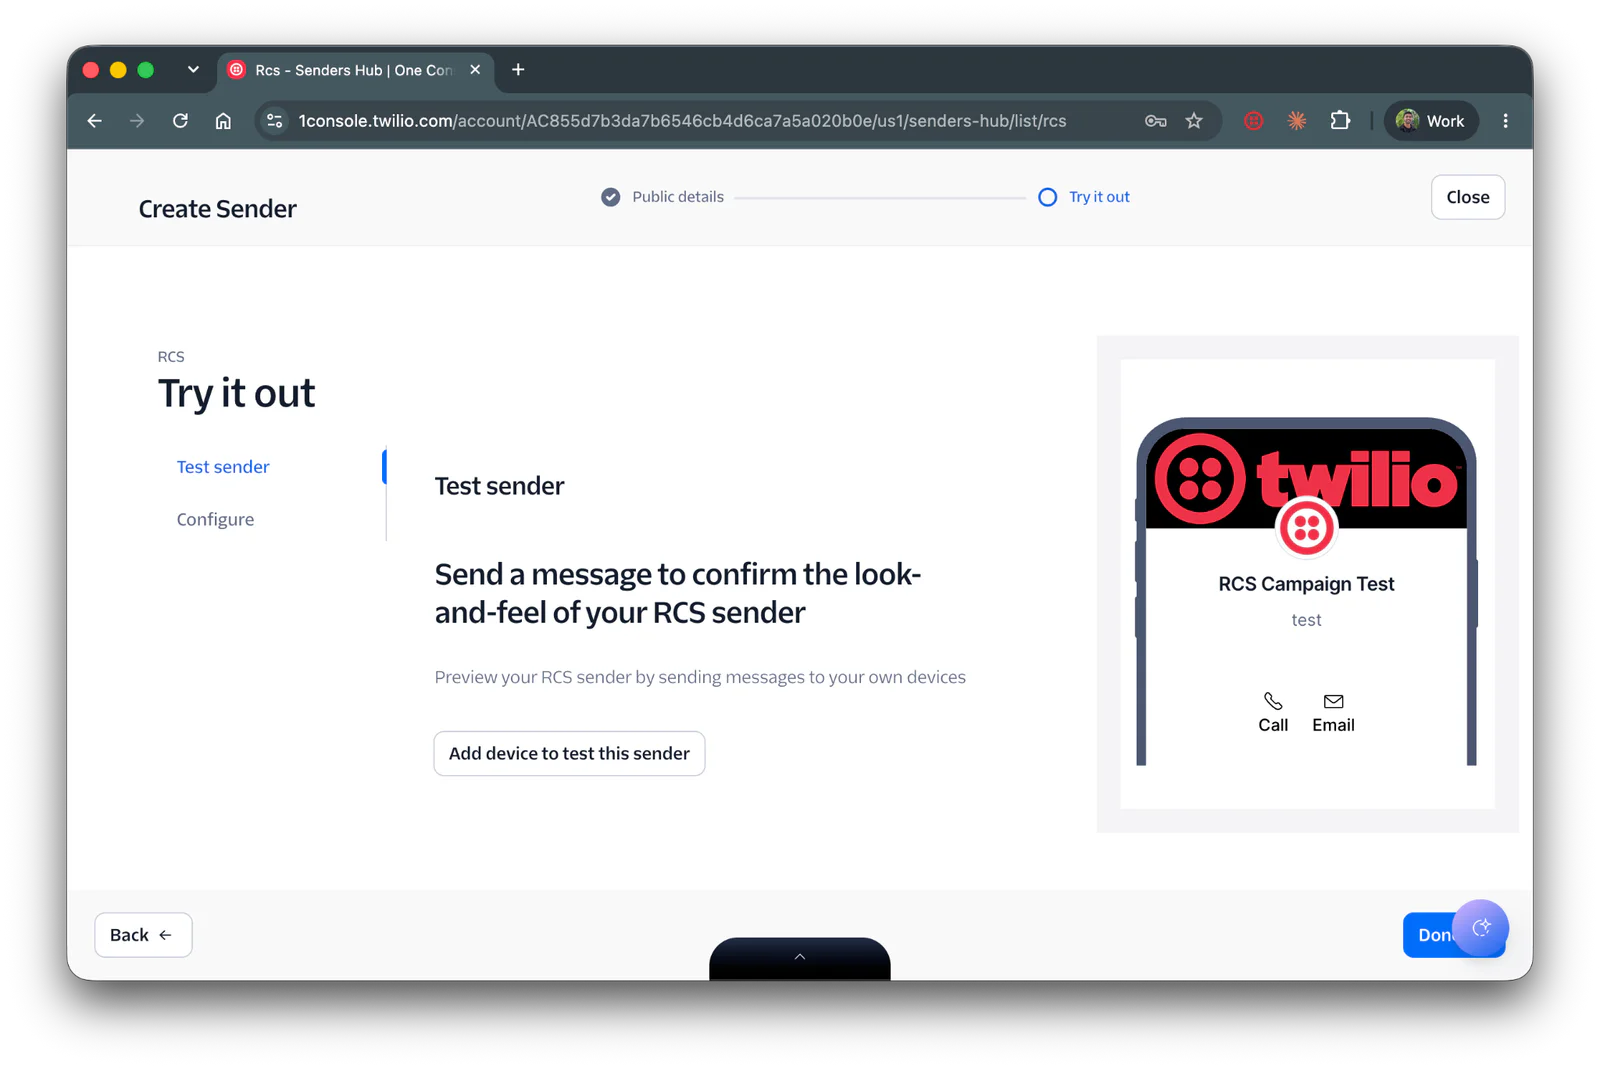
After adding in the public details, add your test device to the Tester sender section on the Try it out page so you can start sending immediately.
Next, add the RCS Sender to a Messaging Service:
- Navigate to Configure and scroll down to the Add to a Messaging Service section
- Click an existing Messaging Service and click Save
Make note of the Messaging Service SID (starts with MG) from the service overview page of your messaging service. You’ll use it in your PHP application.
Step 1: Set up a PHP application
You’ll start setting up your application by initializing a PHP project and installing the dependencies you’ll need.
Initialize a PHP project
Open up your terminal, navigate to your preferred directory for PHP projects, and enter the following commands to create a folder, change into it, and initialize a PHP project:
Install the required dependencies
Next, run the following command to install the dependencies you’ll need for this project:
Copy code
- monolog: You’ll use it to log information in the application.
Import environment variables
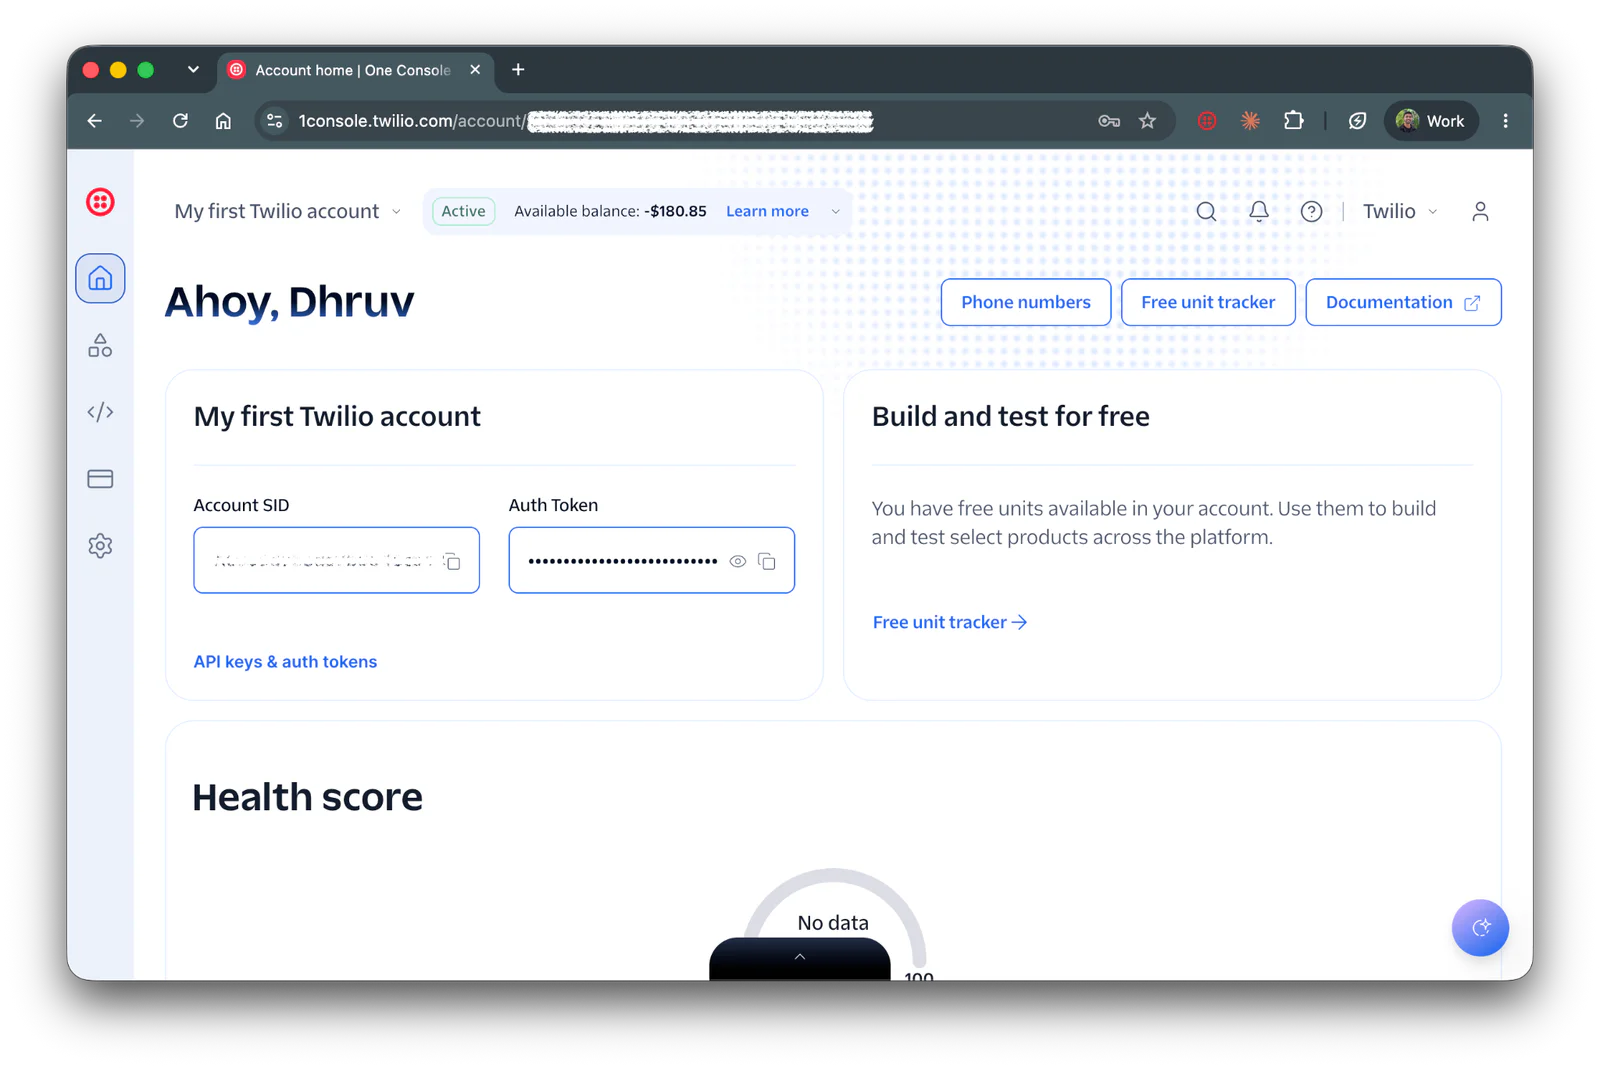
You’ll need your Twilio Account SID, Auth Token, and Messaging Service SID to send messages. Log in to your Twilio Console and locate the Account SID and Auth Token on the homepage.
Head back to your IDE and open .env in the root of the project. Copy the following into your .env file:
Replace each XXXXXX placeholder with the corresponding value:
MESSAGING_SERVICE_SID: The SID of the Messaging Service that you connected with your RCS Sender.STATUS_CALLBACK_URL: Leave this blank for now. You’ll fill it in once you start ngrok in a later step.
Then, update the following:
TWILIO_ACCOUNT_SID: Your Account SID from the Twilio Console.TWILIO_AUTH_TOKEN: Your Auth Token from the Twilio Console.
Save this file.
Step 2: Create a rich RCS Content Template
RCS is at its best when the message includes a hero image, a headline, a body, and suggested reply buttons. You’ll create the template programmatically using the Content API so that your campaign setup is fully reproducible in code.
Create a file called create-template.php in the root of your project and add the following code:
Copy code
This script authenticates with Twilio using your credentials, then creates a Content Template using the twilio/card type. The title, subtitle, and body fields make up the visible copy on the card, media is the hero image at the top, and each entry in actions becomes a button underneath. The {{1}} placeholder in the title is a dynamic variable you’ll fill in when you send the campaign, so the greeting is personalized for every recipient.
Save the file and run the script from your terminal:
Copy code
You should see output similar to:
Copy the Content SID and add it to your .env file:
Step 3: Build the campaign recipient list
For this tutorial, you’ll store recipients in a simple JSON file. In a production system, this list would come from your CRM, database, or customer data platform.
Create a file called recipients.json in the root of your project and add the following:
Replace the phone numbers with the E.164-formatted phone numbers of the test devices you registered on your RCS Sender. Any number that isn’t registered as a tester will fail to receive the message.
Step 4: Send the campaign
With your template and recipient list in place, you’re ready to send the campaign. Create a file called send-campaign.php in the root of your project and add the following code:
What this code does:
- The script reads recipients.json into memory and iterates over each entry.
messagingServiceSidtells Twilio to send from the Messaging Service you configured, which contains your RCS Sender. Twilio automatically falls back to SMS if a recipient’s device does not support RCS.contentSidreferences the Content Template you created in Step 1.contentVariablesis a JSON string that fills in the{{1}}placeholder with the recipient’s name for personalization.statusCallbackis the URL Twilio will hit whenever the message status changes. You’ll build that endpoint in the next step.
Next, you'll need to spin up the webhook server that will receive delivery updates.
Step 5: Track delivery with a status callback webhook
A campaign without measurement is a guess. Twilio can call your server every time a message moves from queued to sent to delivered to read (RCS supports read receipts) so you can build a live picture of how the campaign is performing.
Update the file src/Application.php and add the following code at the top of the class:
Then, update the setupRoutes() function to match the following version:
After that, replace the handleDefaultRoute() function with the following function:
This code sets up a server that listens for POST requests at /status. Twilio sends status callbacks to this route and will capture message statuses. Of course, in a production setting you should store or send this data off to a database or a CRM for in-depth metric tracking for customers. Message statuses you can expect for RCS include:
queued— Twilio has accepted the message.sent— Twilio has handed the message off to the carrier network.delivered— The message reached the recipient’s device.read— The recipient opened the message (RCS-only).failed/undelivered— Something went wrong. TheErrorCodefield tells you why.
Start the server in a terminal window:
You should see:
Leave this terminal running.
Step 6: Handle replies from your recipients
Your campaign template includes two suggested reply buttons: Send my promo code and Unsubscribe. When a recipient taps either one, Twilio delivers the button’s payload as an incoming message, which you can respond to with TwiML.
Open src/Application.php and update the following setupRoutes() function to match the following:
Then, add the following function at the end of the class.
Finally, add the following use statements to the top of the file.
When a user taps a quick reply button, Twilio sends the button’s title as the Body of an inbound message webhook. This handler inspects the body and responds with the appropriate follow-up message using TwiML.
Step 7: Expose your server with ngrok
Twilio needs a public URL to call. Open a new terminal window and run:
ngrok will print a forwarding URL that looks like https://abcd-1234.ngrok-free.app.
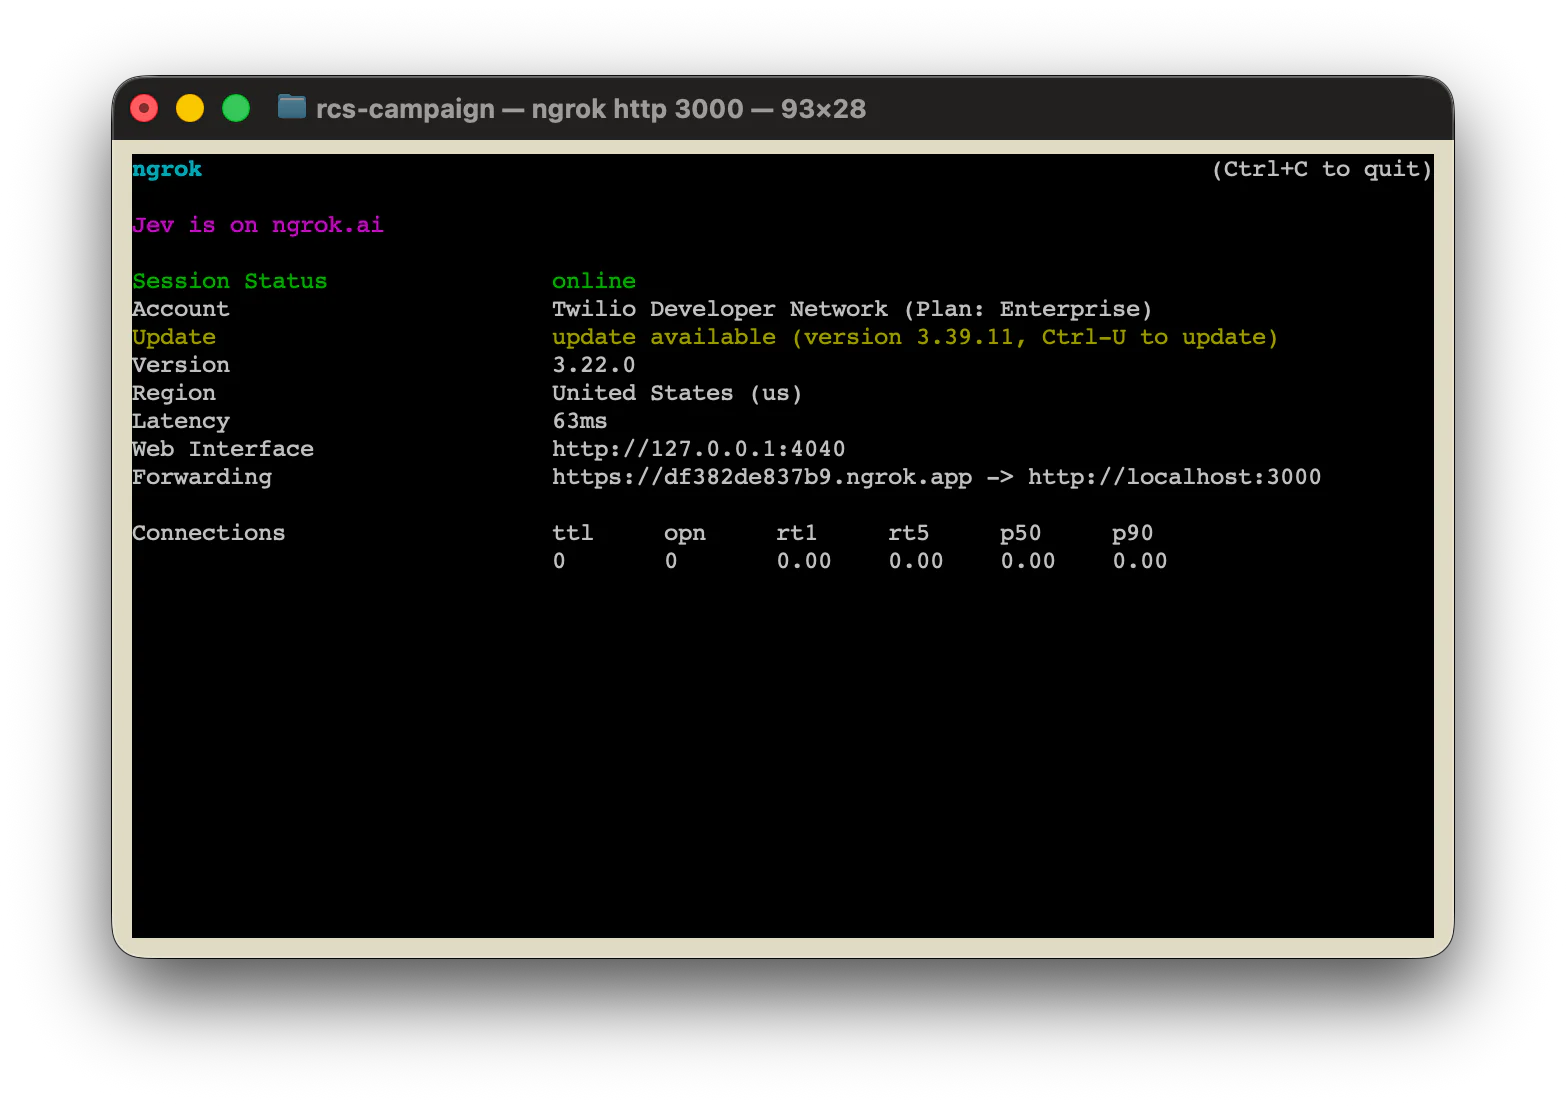
Copy the https:// forwarding URL and update the STATUS_CALLBACK_URL line in your .env file so it ends with /status:
Copy code
Save the file. Your campaign script will now include this URL as the statusCallback parameter on every message.
Step 8: Wire up the webhooks in the Twilio Console
Now, you need to tell Twilio where to send delivery statuses and inbound messages:
- In the Twilio Console, navigate to your RCS sender you created: Products & Services > Numbers & Senders > Overview > RCS and open your RCS Sender.
- Click Configuration from the top.
- In the Status callback URL field, paste your ngrok URL followed by /status (for example,
https://abcd-1234.ngrok-free.app/status). - Click Save.
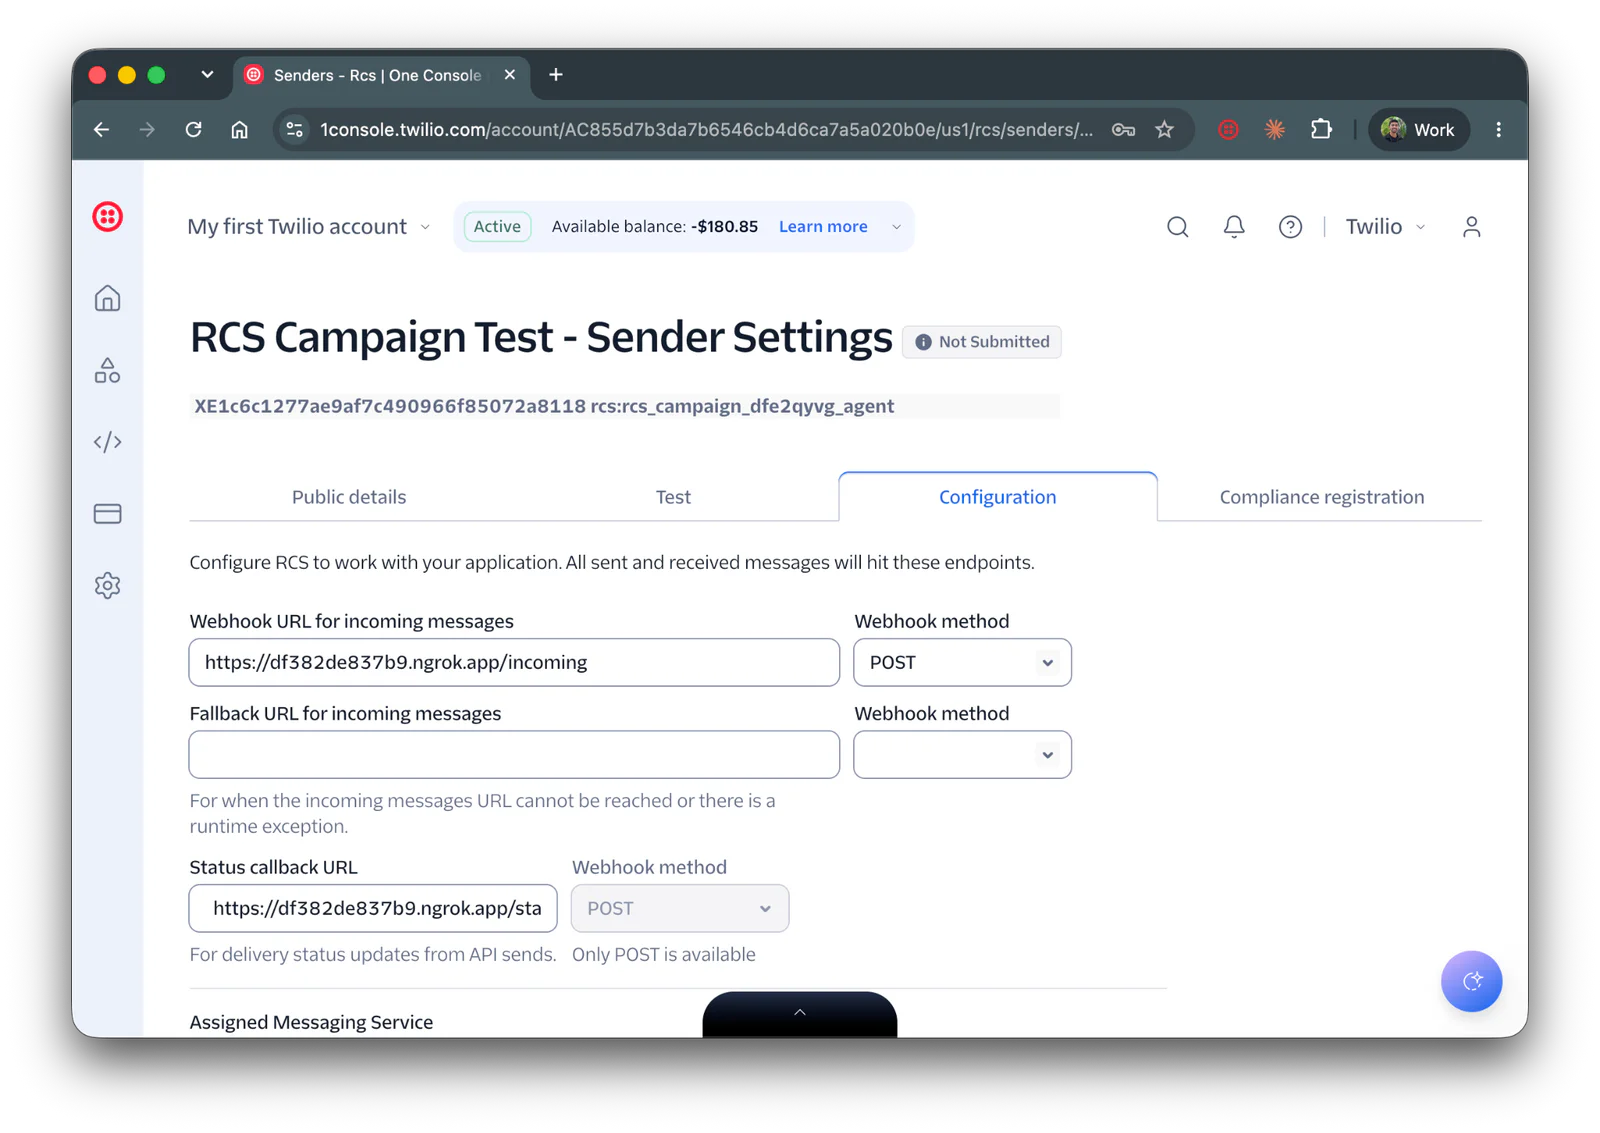
Click Save configuration.
Next, for incoming messages navigate to messaging services from your Twilio Console: Products & Services > Messaging > Services.
Then, click on your messaging service that is hooked up to your RCS sender. Navigate to the Settings tab.
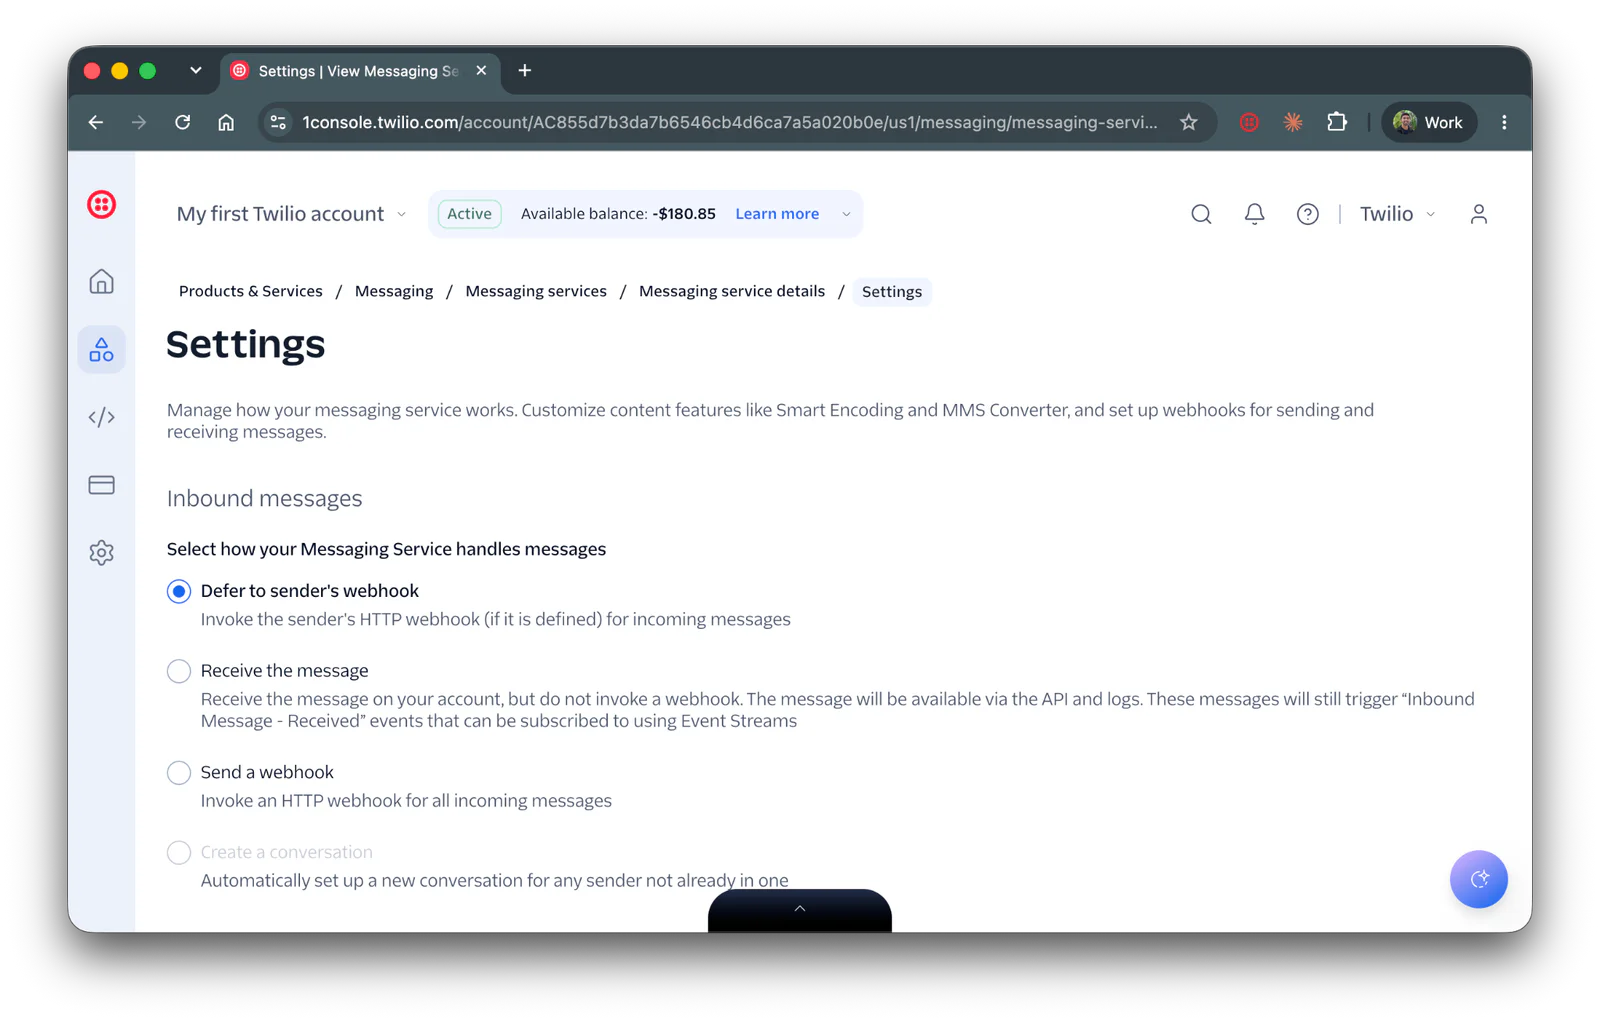
Under Inbound messages, click the Send a webhook. Scroll further and under Request URL paste your ngrok URL followed by /incoming (for example, https://abcd-1234.ngrok-free.app/incoming). Select HTTP POST for Method.
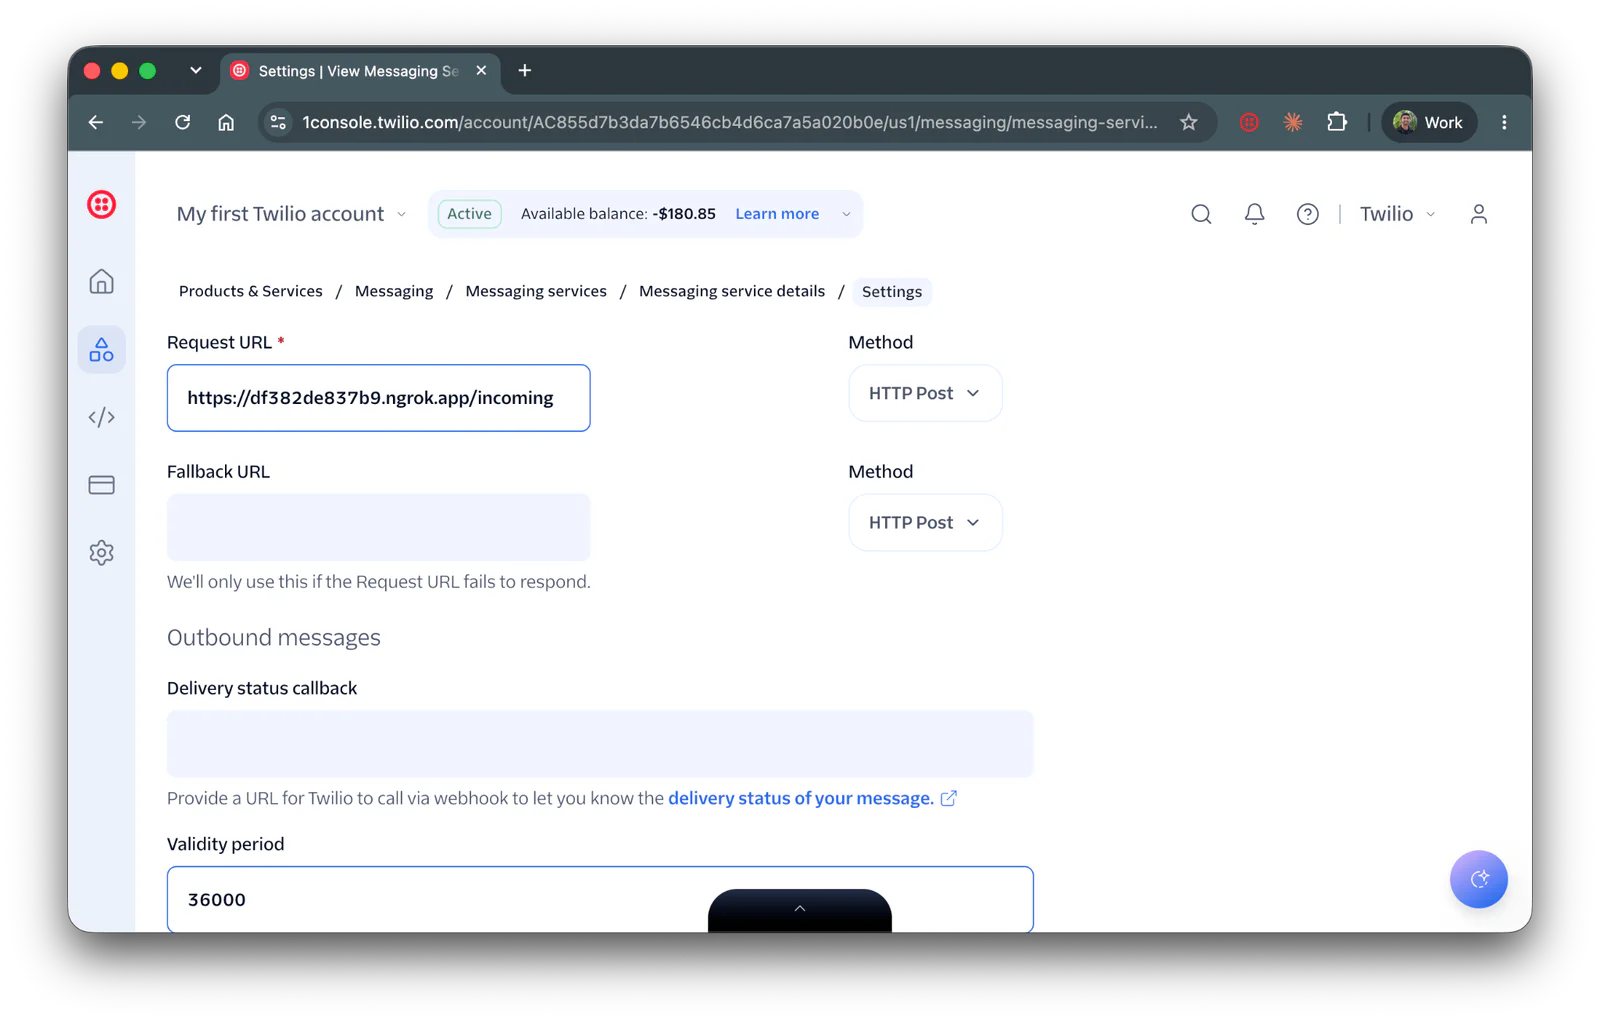
Scroll down and click Save.
Test the Campaign
You now have the server running, ngrok forwarding traffic, and the webhook wired up. Open a third terminal window (leave the PHP application and ngrok running in their own windows) and send the campaign:
Switch to the terminal tab running the PHP application. Within a few seconds, you’ll see status callbacks streaming in as each message moves through the delivery pipeline.
Check your test device. You should see a rich RCS card with your hero image, the personalized greeting, the subtitle, the body, and three buttons.
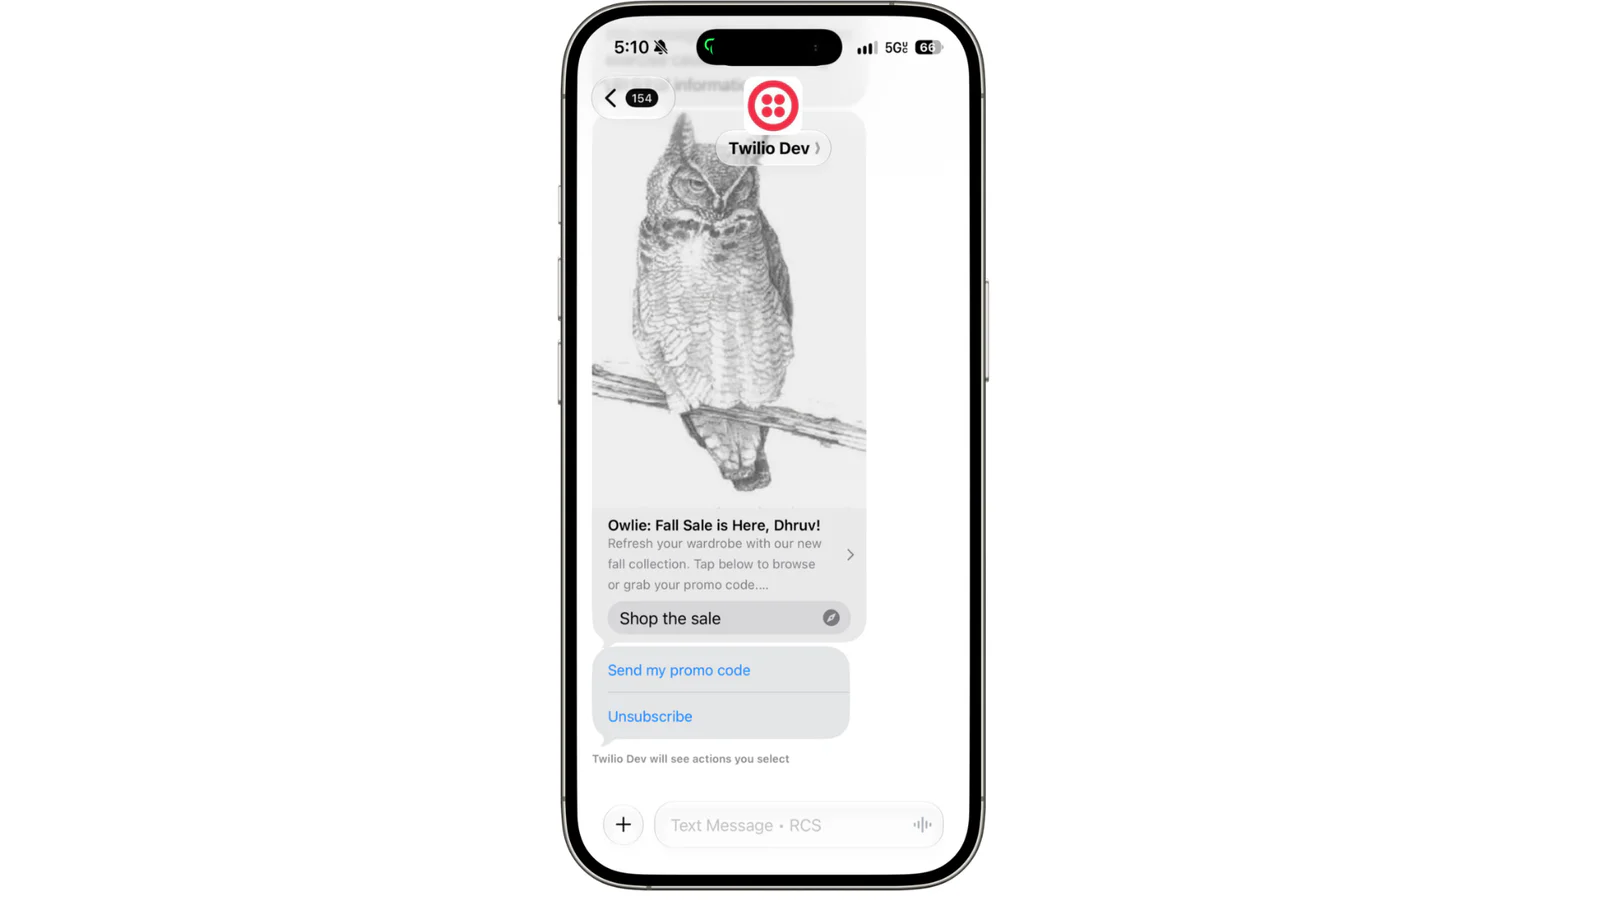
Tap Send my promo code. In the server terminal, you’ll see:
And on the phone, you’ll receive the promo code follow-up message. Tap Unsubscribe to see the opt-out response, or send any freeform text to trigger the fallback reply.
Troubleshooting
If something doesn’t behave as expected, work through these common causes:
- Messages are delivered as SMS instead of RCS. The recipient’s device may not support RCS, or the sender may still be pending approval. Confirm the device is a registered tester on your RCS Sender.
failedstatus with error code 30001 or 63001. Your Messaging Service does not have a sender that can reach the recipient. Verify the RCS Sender is attached to the Messaging Service and the phone number is in E.164 format.- Status callbacks never arrive. Confirm that
STATUS_CALLBACK_URLin your .env file matches the current ngrok URL (ngrok assigns a new URL every time you restart it) and that the server is running. - Inbound webhook not firing. Re-check the webhook URL saved in your Messaging Service’s Integration tab, and make sure the ngrok tunnel is still active.
What’s next?
You’ve built an RCS Business Messaging campaign in PHP: a rich Content Template, a personalized broadcast, live delivery tracking, and interactive reply handling. Here are some ways to take it further:
- Swap the recipient JSON file for a real audience source like Twilio Segment or your own database.
- Add a carousel template so a single message can showcase multiple products.
- Persist status events to a database and build a small dashboard on top of the running totals for real reporting.
- Secure webhooks with Twilio’s webhook request validation so your /status and /incoming endpoints only accept traffic that originated at Twilio.
For deeper reference material, check out the RCS Business Messaging documentation and the Content API resources.
Matthew Setter is a PHP, Go, and Rust Editor in the Twilio Voices team. He’s also the author of Mezzio Essentials and Deploy with Docker Compose. You can find him at msetter@twilio.com. He's also on LinkedIn and GitHub.
Related Resources
Twilio Docs
From APIs to SDKs to sample apps
API reference documentation, SDKs, helper libraries, quickstarts, and tutorials for your language and platform.
Resource Center
The latest ebooks, industry reports, and webinars
Learn from customer engagement experts to improve your own communication.
Ahoy
Twilio's developer community hub
Best practices, code samples, and inspiration to build communications and digital engagement experiences.