How to Track Opt-Outs in PHP
Time to read:
October 02, 2026
Written by
Reviewed by
How to Track Opt-Outs in PHP
Tracking when customers opt-out of communications with you is essential to not running afoul of privacy legislation, such as the Australian Spam Act 2003 and the CAN-SPAM Act 2003.
It's also essential for ensuring that customers have an excellent experience with your business or organisation. Why? Because you respect your customers' wishes if they no longer wish to receive notifications from you.
How do customers tell you this? By sending an opt-out keyword, such as "START" or "STOP", as the body of the SMS when replying to an SMS from you. But, how do you track this so that you respect their choice?
Gladly, Twilio makes tracking customer opt-outs almost trivial through its Incoming Message Webhook and Event Streams features. Both of these will include the OptOutType parameter in their requests to your application if the SMS' body is an opt-out keyword.
If this is something that you want to add to your PHP applications, by the end of this tutorial you're going to learn how. Then, you won't attempt to communicate with customers when you shouldn't.
Application architecture
The application, based on the Twilio Slim Base project, has only one route (/). Twilio will send incoming message webhook and event streams requests to the route after receiving an SMS from your customers.
If the SMS' body is an opt out keyword, such as "START", "STOP", or "HELP", it will be recorded in the application's database.
While Twilio already handles standard opt-out keywords, and blocks further messages being sent to the caller, recording opt-out preferences in the application lets you take more advanced actions, such as keeping your CRM in sync, as and when required.
The application's functionality stops at this point. However, in a production application, you could query the information in the database to determine if a customer had opted out, before attempting to communicate with them.
Prerequisites
To follow along with this app, you'll need the following:
- A free Twilio account with a phone number that supports SMS. Sign up if you haven't already. with Advanced Opt-Out enabled.
- PHP 8.5 or above
- Composer installed globally
- A database tool, such as the Command Line Shell for SQLite
- Some command-line/terminal experience would be helpful, but isn't necessary
Build the app
Now, it's time to start building the app. Thanks to it being based on the Twilio Slim project, there won't actually be a lot that you need to do.
Step 1: Bootstrap a base PHP project
Start off by running the commands below to bootstrap a new PHP project and change into the newly generated project's top-level directory.
Step 2: Add the required dependencies
Now, you need to install a few dependencies:
To install them (as always) use Composer:
Step 3: Add the ability to track opt-outs
Now, it's time to add the required functionality. To do that, start by updating the handleWebhook() function in src/Application.php to match the following version.
The new version of the function receives webhooks and event streams from Twilio. The body of the webhook will contain a parameter named OptOutType if the body of the SMS is one of "STOP", "START", or "HELP".
If an opt-out keyword is received, it will be recorded in the application's SQLite database, along with the sender's Account SID, using PHP-DB. Following this, a small TwiML (Twilio Markup Language) response will be returned to Twilio. This isn't strictly necessary, but is considered a good practice after receiving webhook requests from Twilio.
Then, add the following class constants at the top of the class.
These constants avoid using magic strings when checking the value of the OptOutType parameter. Feel free to expand the list of opt out keywords as you see fit.
Then, update the use statements at the top of the class to match the following.
Step 4: Migrate to laminas-servicemanager
With the new version of the handleWebhook() defined, you next need to migrate the application from using PHP-DI to laminas-servicemanager. This won't take all that much. Just a bit of refactoring in public/index.php and the creation of a configuration file.
Start off with refactoring public/index.php by replacing lines 27 - 30 with the following:
The new code instantiates a ServiceManager instance, passing a series of service configurations to its constructor, which PHP-DB requires. In addition, the instance is also provided with the database's configuration, so that PHP-DB knows where to find it and its type.
This change simplifies integrating PHP-DB with the project, as PHP-DB is designed to work with laminas-servicemanager.
Now, add the following code after the change that you made.
This change retrieves an AdapterInterface instance from the application's DI container. This is the core object which PHP-DB uses to connect to databases of the vendors it supports. Assuming that the instance was available, it uses it to register a TableGatewayInterface service with the DI container.
Without getting into too much detail, the object provides an object-oriented representation of a database table; its methods mirror the most common table operations. Check out this post from Martin Fowler, if you'd like to know more about it.
Now, for the final change to the file. Update the use statements to match the following, ensuring that all of the required namespaces are loaded.
Now, for the final change: creating the database configuration file. This will tell PHP-DB how to instantiate the AdapterInterface service.
In the config directory, create a new file named db.global.php, and in that file paste the code below.
The configuration tells PHP-DB to use the SQLite driver and that it will find the application's SQLite database in data/database/database.sqlite3.
Step 5: Initialise the database
Thanks to the simplicity of SQLite, and that it's a flat-file database, initialising the application's database is pretty trivial. First up, create a directory for the database by running the following command.
Then, in the data/database directory, create a file named dump.sql. In that file, paste the SQL below.
The SQL above creates a small table named user_optouts with columns for the:
- Twilio Account SID (
account_sid) of the sender of an incoming SMS - Sender's opt out preference (
opt_out_status) - Current date (
created)
It also creates a covering index on the table's three columns to speed up searches.
Now, provision the database using the SQL in dump.sql by running the following command in the data/database directory.
Step 6: Make the application publicly accessible
The application needs to be available on the public internet, so that Twilio can send requests to it. To do that, first start it by running the following command.
In the terminal output, you'll see that it's started and listening on port 8080.
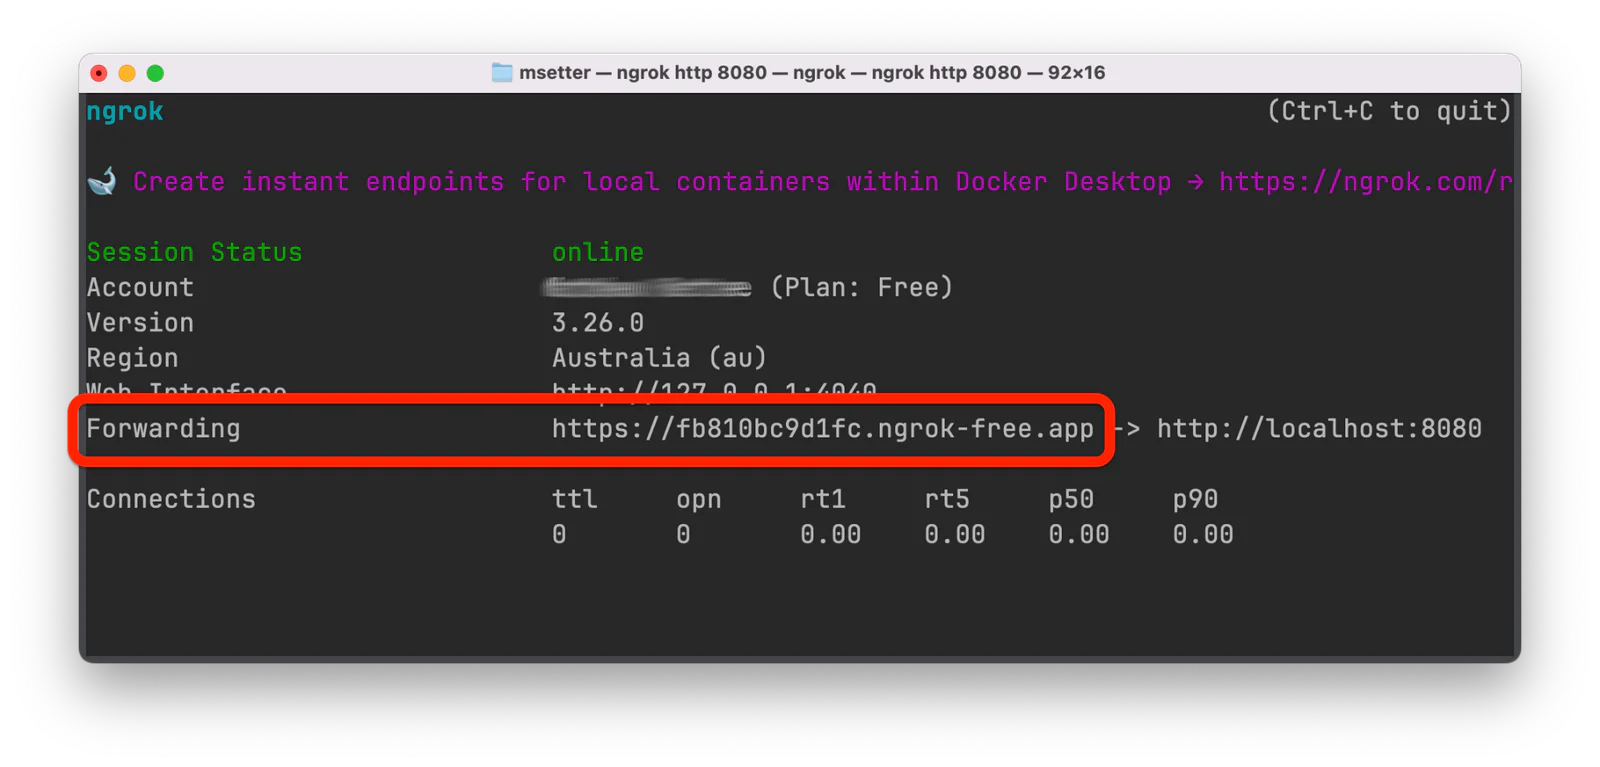
Now, create a secure tunnel between port 8080 on your local development machine and the public internet with ngrok, by running the following command.
With ngrok running, copy the Forwarding URL from its terminal output. Keep it handy, as you'll need it in the next step!
Step 7: Configure your Twilio account
As opt-outs can be tracked using both Incoming Message Webhooks and Event Streams, follow the applicable instructions below to configure your account for both approaches.
Step 7a: Configure your Twilio account for Incoming Message Webhooks
To configure Twilio to send webhook requests to the app when customers send opt-out requests, first, log into the Twilio Console.
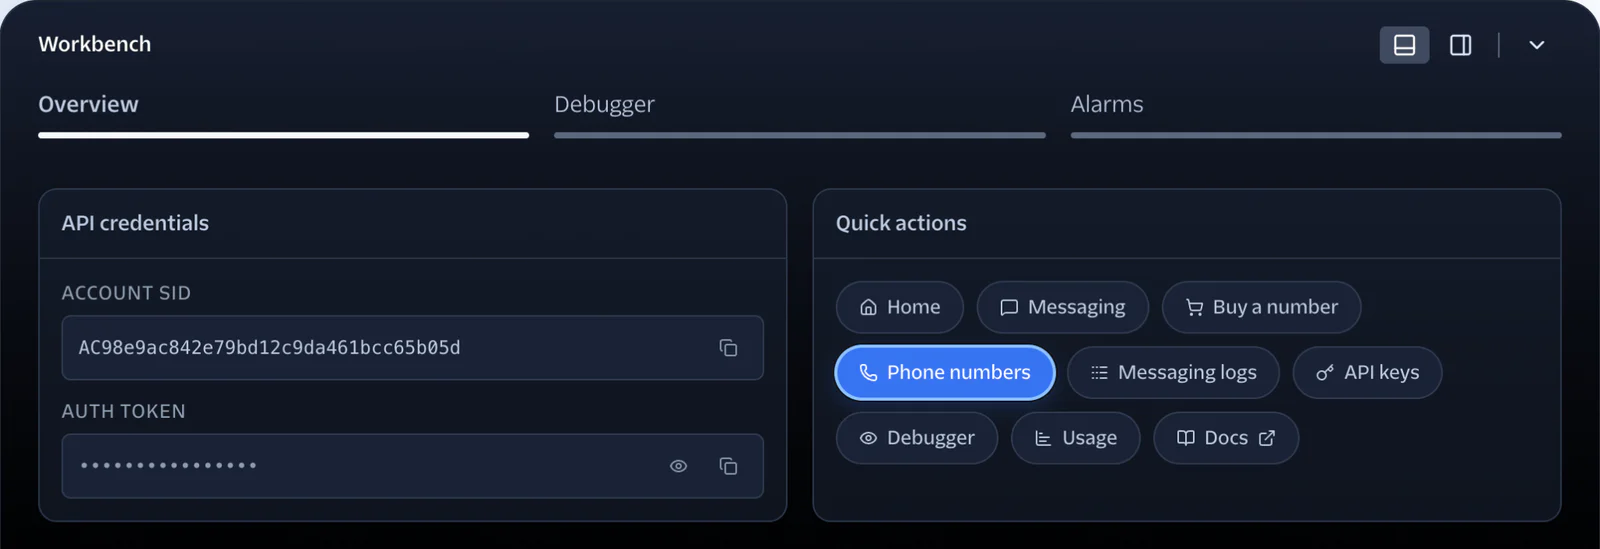
Then, open the (black) Workbench at the bottom of the page. In the right-hand side, under Quick actions, click Phone numbers.
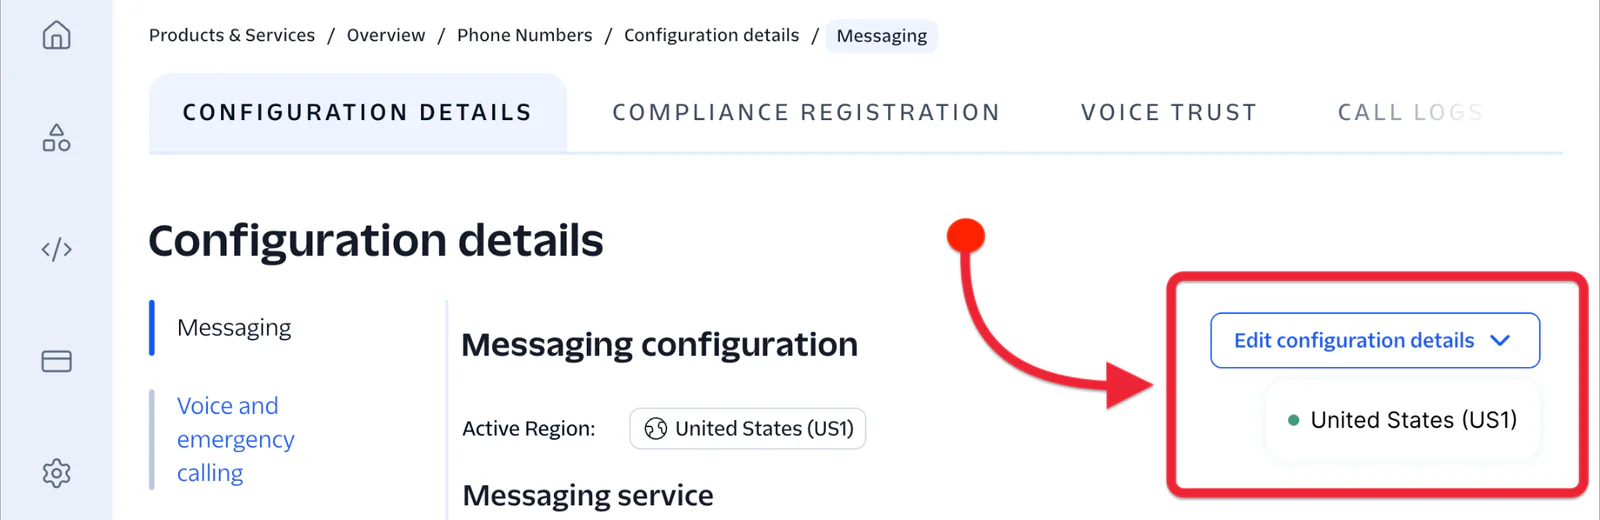
Then, click the phone number that will receive messages from customers. In the phone number's details, click the Edit configuration details dropdown, then click the available region that appears; in the screenshot above, you can see that is ”United States (US1)".
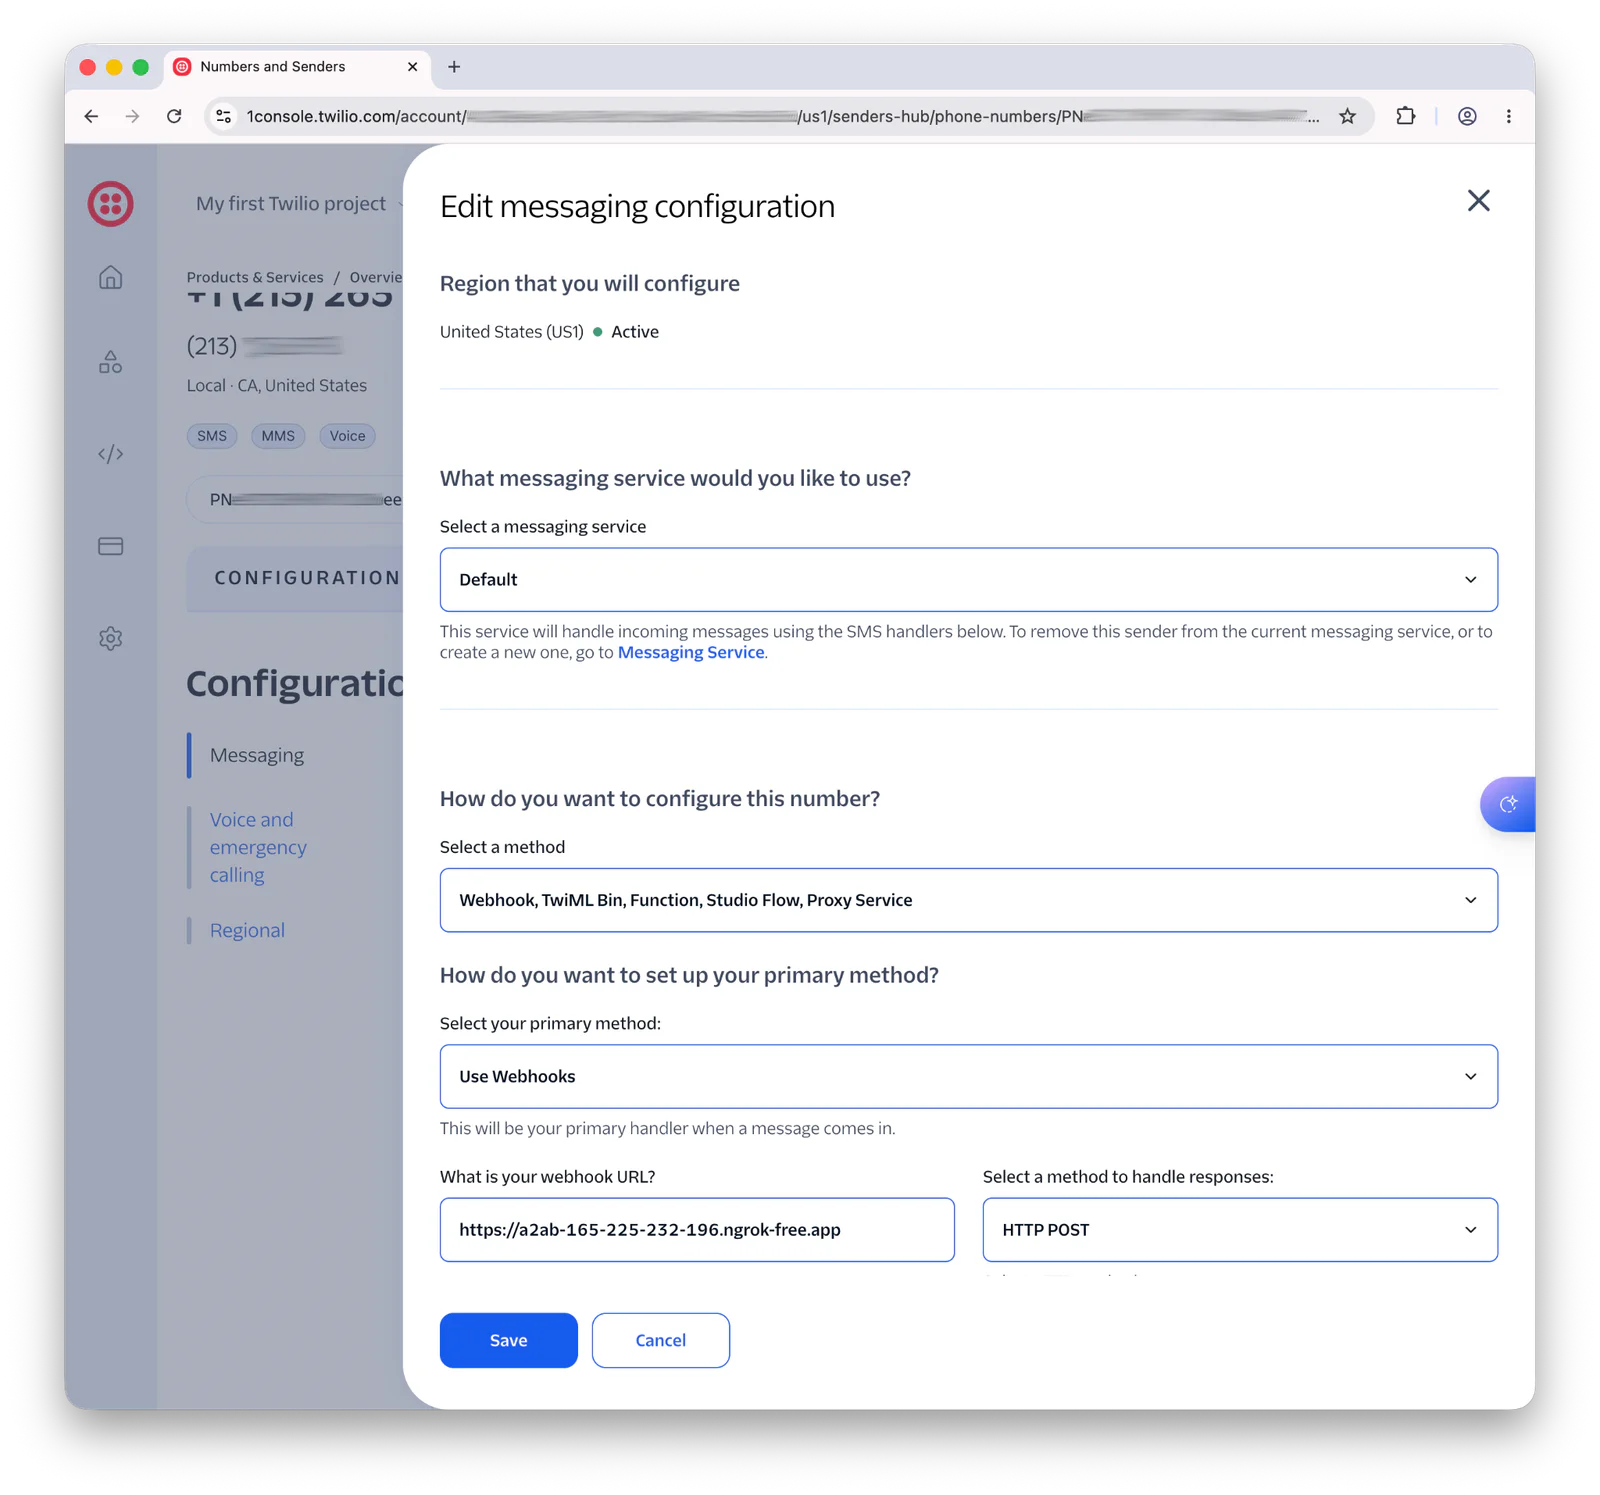
In the Edit messaging configuration dialog that appears:
- Leave Select a messaging service set to "Default"
- Set Select a method to "Webhook, TwiML Bin, Function, Studio Flow, Proxy Service"
- Under How do you want to set up your primary method?:
- Set Select your primary method to "Use Webhooks"
- Set What is your webhook URL? to the ngrok Forwarding URL that you copied earlier
- Set Select a method to handle responses to "HTTP POST"
- Click Save
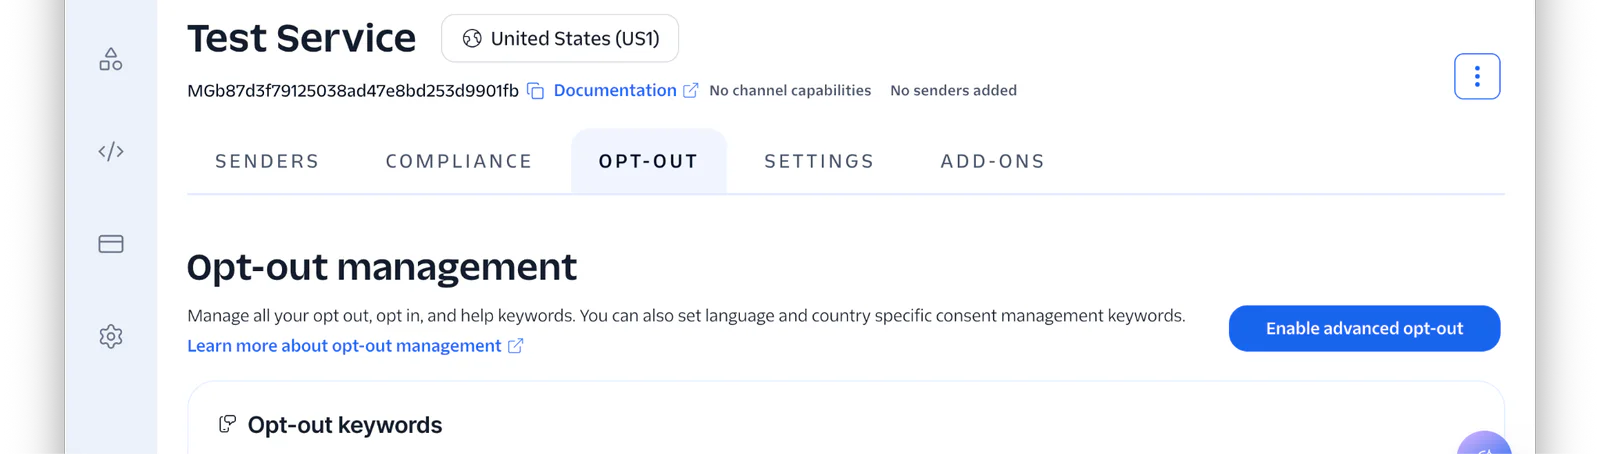
Now, you have to enable Advanced Opt-Out for your messaging service. To do that, In the Twilio Console, go to Products & Services > Messaging > Messaging services. There, Select the "Default" Messaging Service. Then, Click the Opt-Out tab. On the Opt-out management page, click the Enable advanced opt-out button.
Step 7b: Configure your Twilio account for Event Streams
To configure Twilio to send event streams to the app when customers send opt-out requests, log into the Twilio Console if you haven't already. Then, navigate through Develop > Event Streams > Sinks in the left-hand side navigation menu. There, click Create Event Stream.
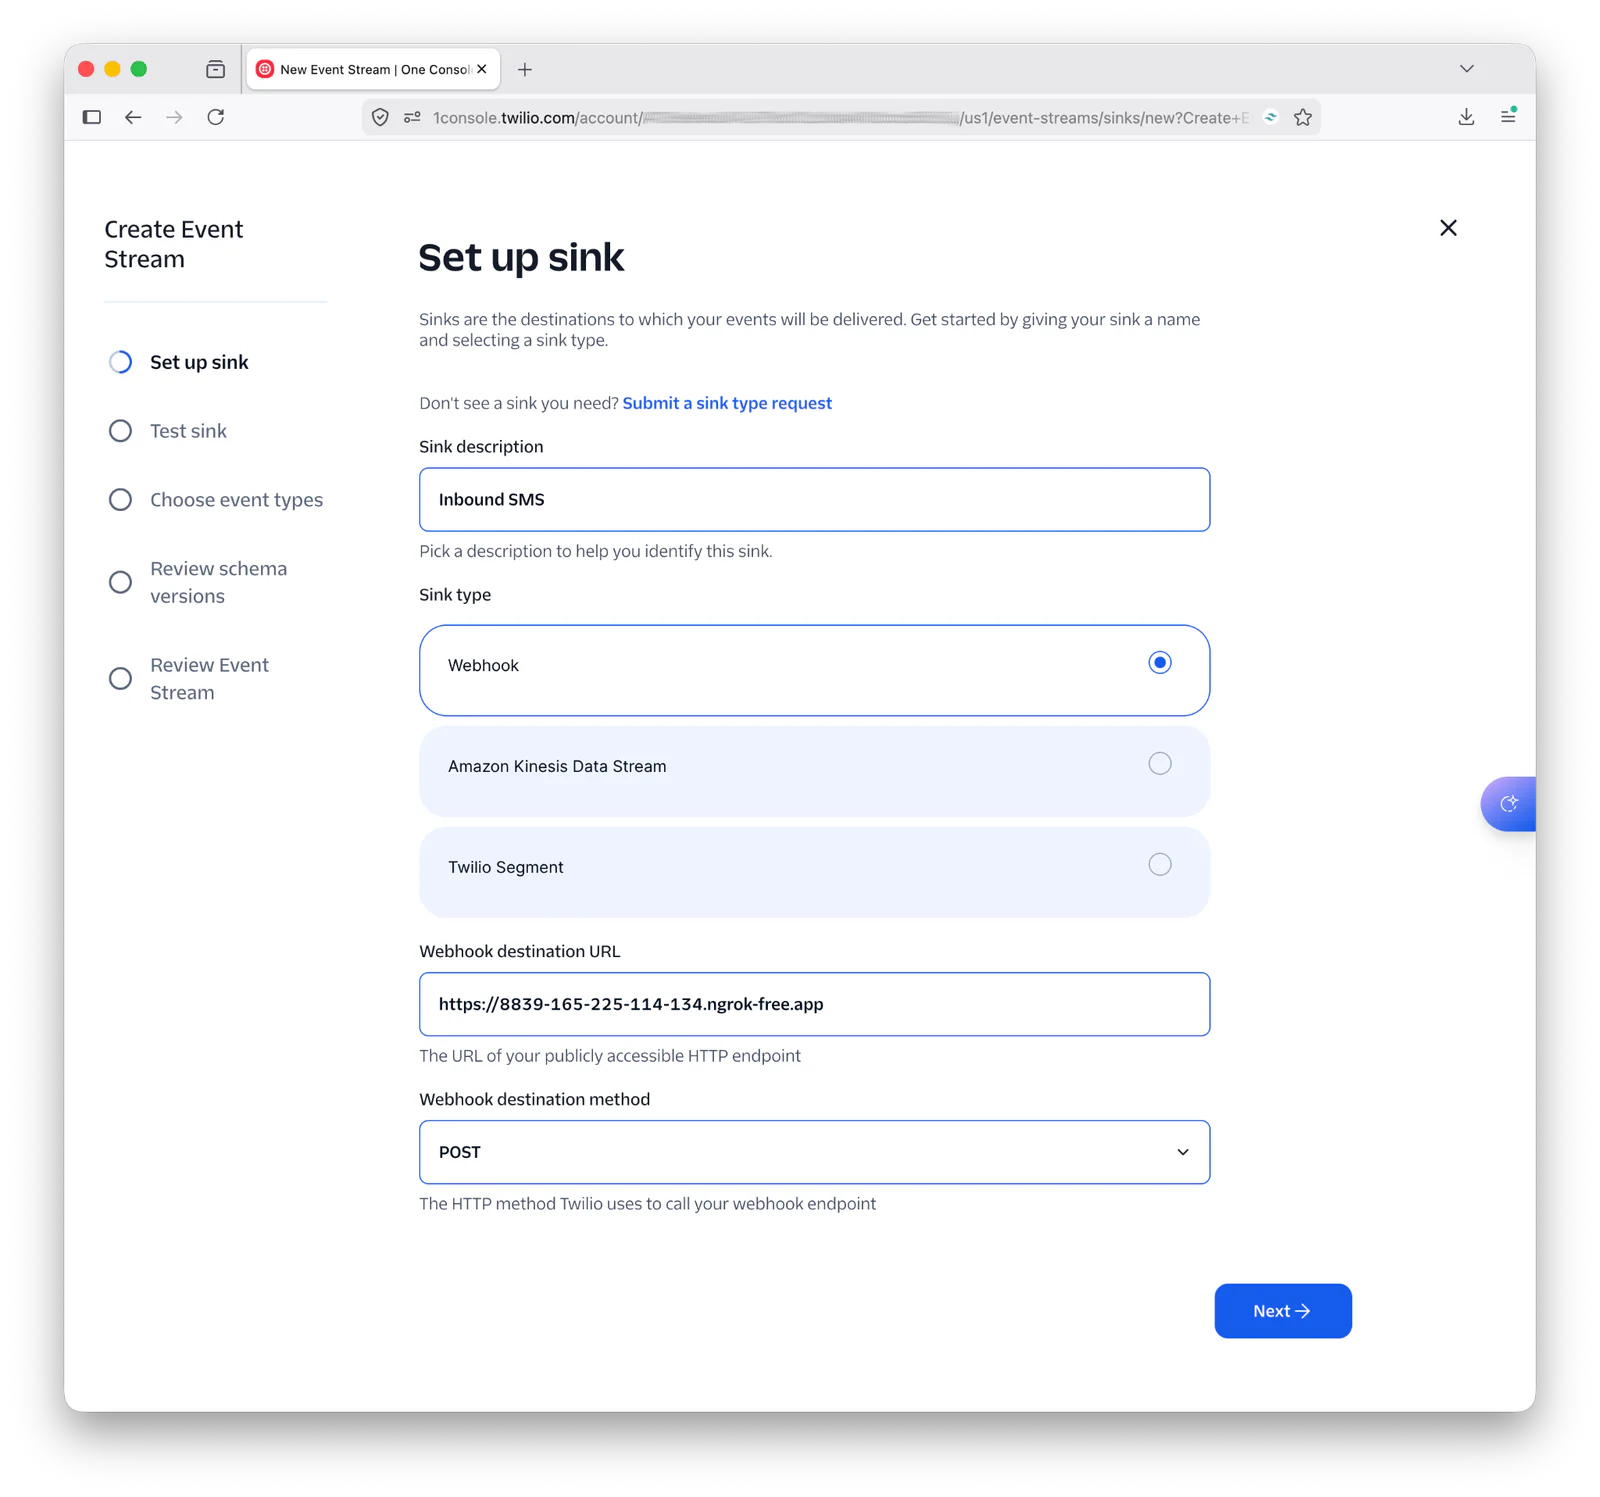
In the Set up sink form:
- Enter a value for the Sink description
- Set Sink type to "Webhook"
- Set the ngrok Forwarding URL that you copied, earlier, as the value of Webhook destination URL
- Set Webhook destination method to "POST"
- Click Next
Then, click Next to skip past the Test sink step.
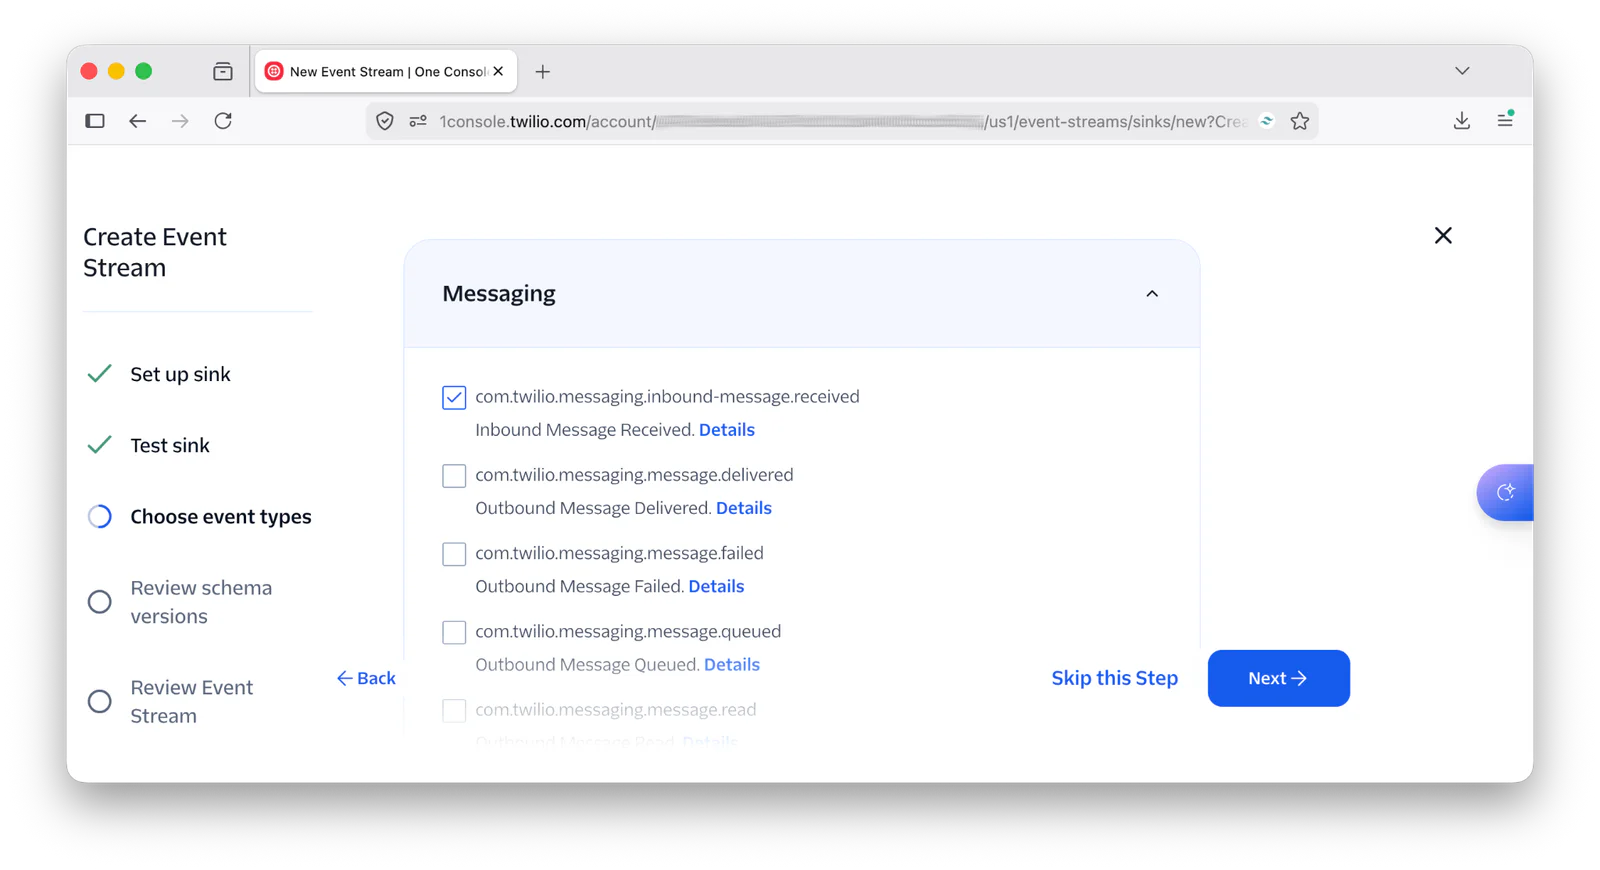
In the Choose event types stage, scroll down to Messaging, and in that section select "com.twilio.messaging.inbound-message.received", and click Next.
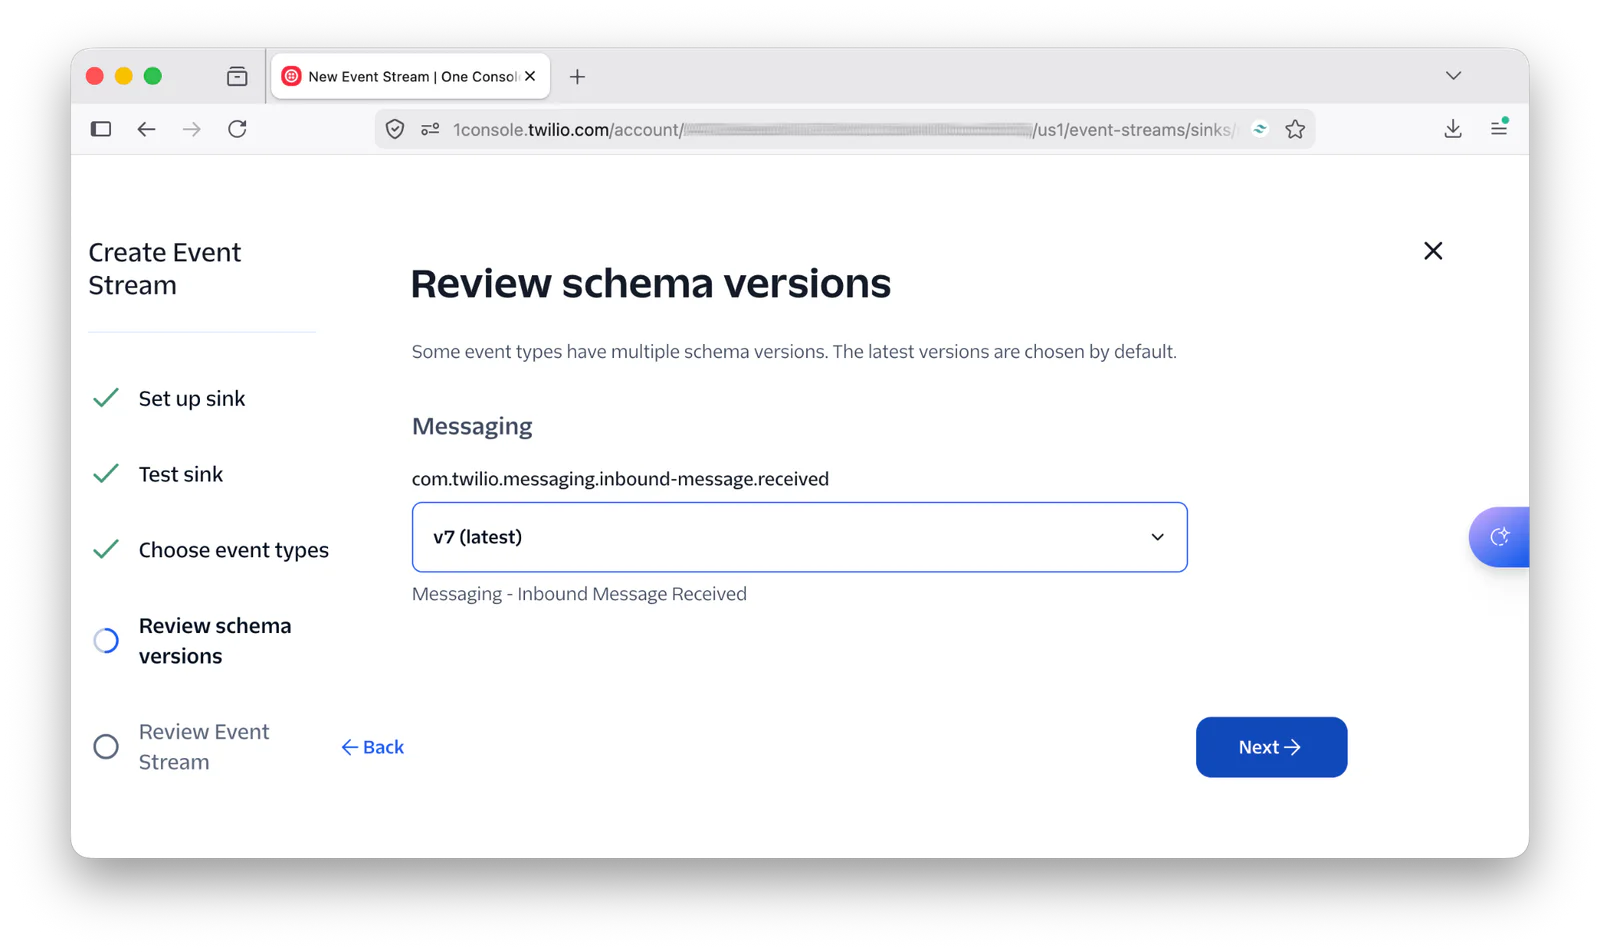
In Review schema versions, leave the dropdown set to "v7 (latest)" and click Next.
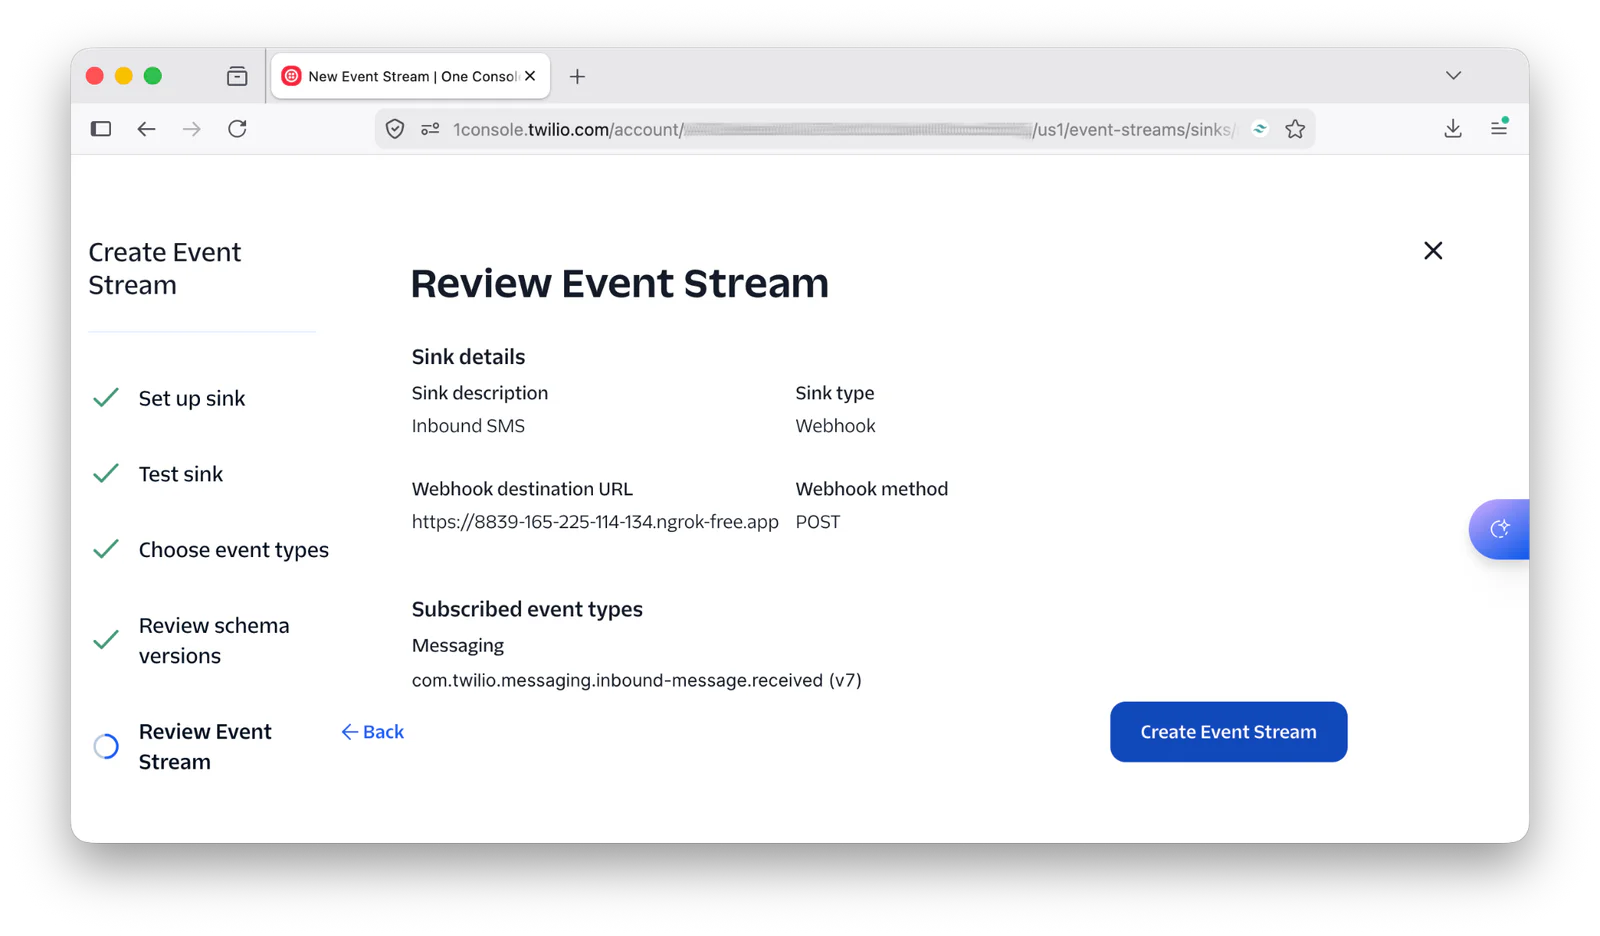
Finally, in the Review Event Stream step, click Create Event Stream.
Test that the application works as expected
To test the application, send an SMS to your Twilio phone number, with the message's body being one of "START", "STOP", or "HELP".
Shortly after, you'll receive a reply SMS from Twilio with a message based on what you sent. For example, if you SMS'd "Stop", Twilio would reply with:
You have successfully been unsubscribed. You will not receive any more messages from this number. Reply START to resubscribe.
Now, if you switch back to the terminal tab where either ngrok or Composer are running, you should see that an incoming request from Twilio was received.
Run the following SQL in your database tool to check that your phone number has been marked as being opted out in the application's database, after replacing <YOUR TWILIO ACCOUNT SID> with your Twilio Account SID.
You should see a single record returned, with "STOP" as the value of opt_out_status, and today's date as the value of created. For example:
That's how to track opt-outs in PHP
By doing so, you'll avoid running afoul of local and internal privacy legislation and ensure that your customers have an excellent experience with your business or organisation.
If you'd like to know more, check out the documentation for Incoming Message Webhooks, Event Streams and opt out keywords. And, if you'd like to learn how to validate event streams webhooks in PHP (ensuring that they came from Twilio), check out this post that I wrote showing how.
Otherwise, I can't wait to see what you build!
Matthew Setter is a PHP and Go Editor in the Twilio Voices team. He’s also the author of Mezzio Essentials and Deploy with Docker Compose. You can find him at msetter@twilio.com. He's also on LinkedIn and GitHub.


Related Resources
Twilio Docs
From APIs to SDKs to sample apps
API reference documentation, SDKs, helper libraries, quickstarts, and tutorials for your language and platform.
Resource Center
The latest ebooks, industry reports, and webinars
Learn from customer engagement experts to improve your own communication.
Ahoy
Twilio's developer community hub
Best practices, code samples, and inspiration to build communications and digital engagement experiences.