Adding Automated Speech Recognition for Phone Calls to Ruby on Rails Applications
Time to read:
May 30, 2018
Written by
This post is part of Twilio’s archive and may contain outdated information. We’re always building something new, so be sure to check out our latest posts for the most up-to-date insights.

With the advent of personal digital assistants and in-home, voice-controlled gadgets, voice technologies are on the rise. Working with voice and speech recognition technologies is a crucial skill to have, not just in emergent technologies, but also in robust, existing applications. In this tutorial, we will build an implementation of Twilio’s Automated Speech Recognition (ASR) service in a simple Ruby on Rails Application, in hopes of you being able to see the wide-reaching possibilities for other implementations in your own projects.
In this tutorial, we will build a simple “Feedback Service” that receives, responds to, and stores voice messages from user phone calls—using speech recognition—and then displays them for review at a later time.
Getting Started with Our Rails App
For this walk-through, we’ll be using Ruby 2.5.0, best installed and managed using either rvm or rbenv. Also, we will use PostgreSQL for storage and Bundler for package management. If you’re on Mac, I’d recommend using homebrew for installing these; otherwise, see install instructions for your environment in the documentation for each service. You’ll need the Rails gem installed as well, which you can do with:
All set. Start a new Rails application with:
For this project we will need to install the twilio-ruby gem. This library allows us to interact with the Twilio REST API, as well as generate valid TwiML.
In your Gemfile, add:
Lastly, we will need to install the command line tool ngrok. This tool allows us to expose our local development server to the internet by generating an endpoint that can be interacted with as if it were a production server. We will need this capability when we start to actually make test calls to our application. Instructions for installing ngrok on your machine are here.
Development in Rails
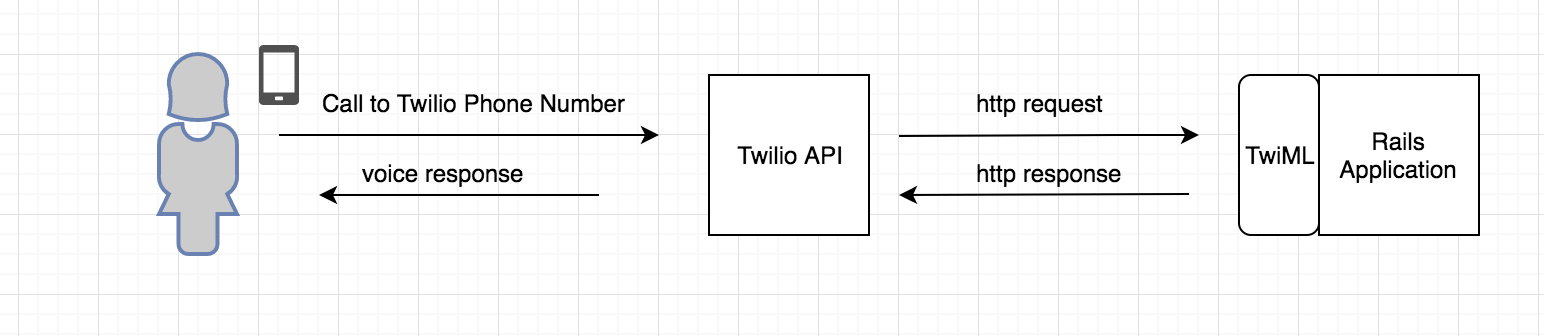
At a high level, the interactions between the user, Twilio, and our app will look like this:
Note: A code-complete example of this project is located on GitHub.
If you’ve worked with Rails before, you will be familiar with the different application environments: ’Development’, ‘Production’, and ‘Testing’. In this post, we will only be dealing with ‘Development’, though certain details would need to change if you were moving the work done here into a production environment.
Create a local database for development:
Our last piece of development setup will be to confirm that ngrok installed correctly and routing requests to our local server. Run the ngrok command after installing ngrok (see above) in your terminal:
You should see some type of ngrok log, something like:

This tells ngrok to send all request to your localhost:3000, when it receives them at the created ngrok url (yours will be different and unique).
But wait, there’s nothing listening on your localhost:3000! To rectify this, in a new terminal, type:
Cool, but we need to make sure it’s working. In your browser, paste in the ngrok url and you should see:
Great! We are ready to get started building our Twilio integration.
Twilio Phone Numbers
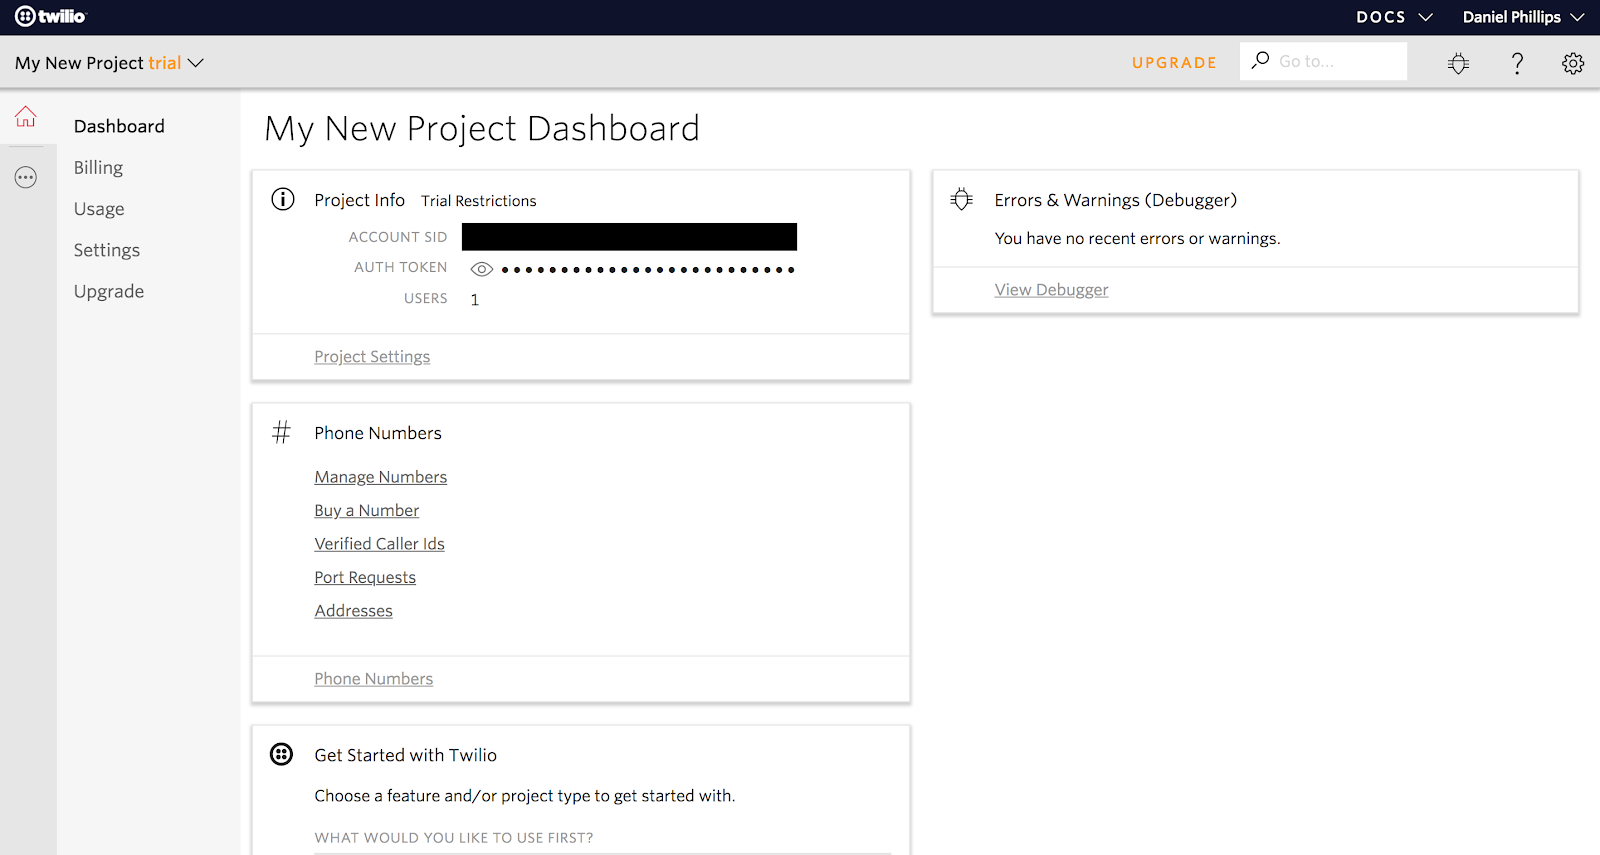
We need sign up for a free account to use Twilio’s service to obtain phone numbers. From the top left dropdown menu, select ‘create a new project’. There are many ways to customize your project settings, but for now, let’s choose to ‘skip project settings’, navigate to the Twilio Console and create a new Project:
A fundamental piece of programming with Twilio is the programmable phone number. Acquiring a Twilio number is what allows the connection between the Twilio API, your users, and your app.
We need to get a number. Under manage numbers, choose “manage numbers” and follow the prompts for getting “your first Twilio number.”
Once you have purchased (for free on a trial account) your Twilio number, return to “manage phone numbers” and click on your newly-purchased number. You should see something like:
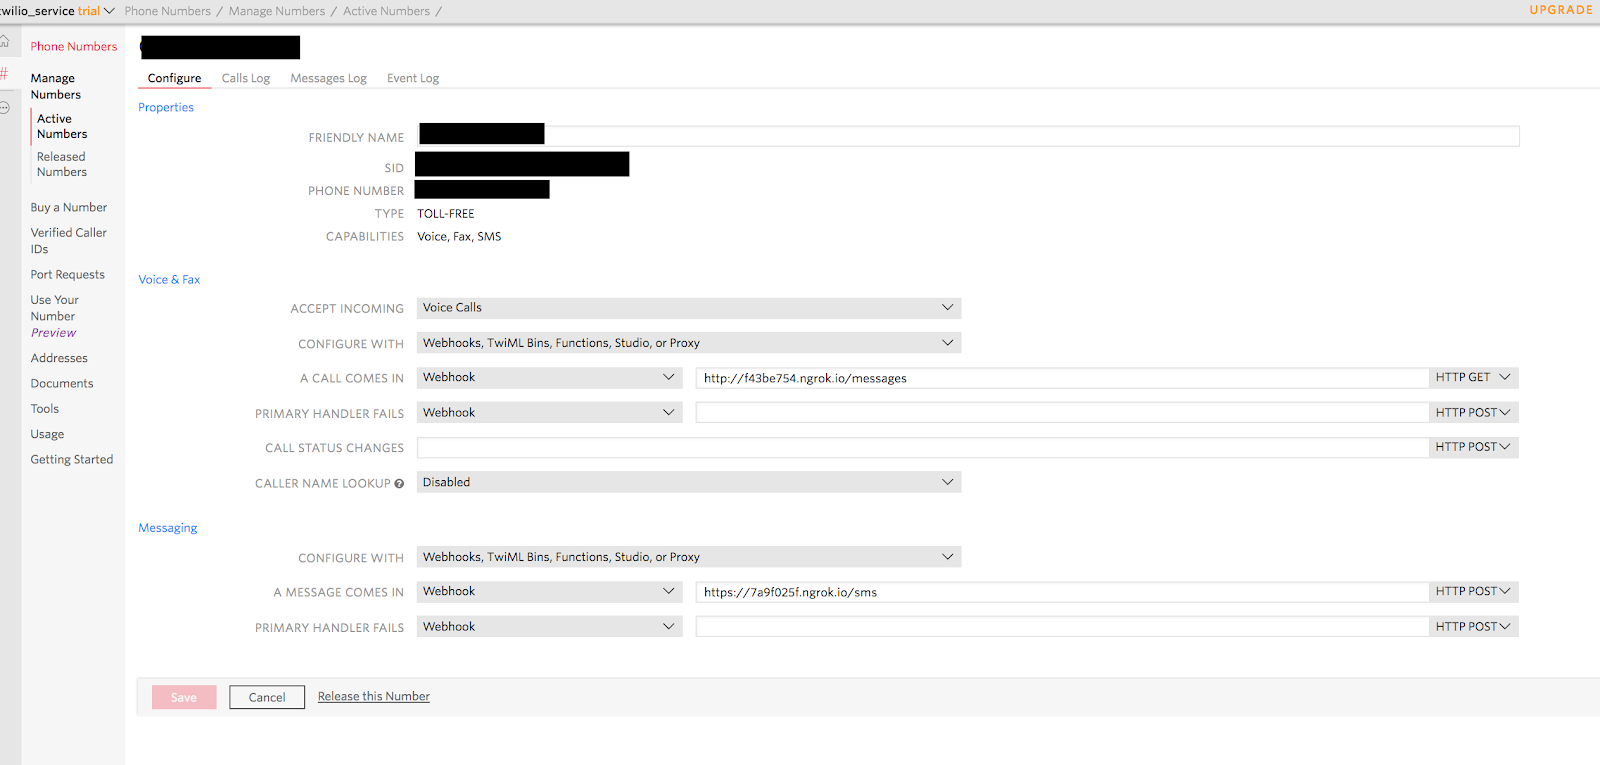
We need to tell Twilio that we want to “send” incoming phone calls to this number, and we need to be able to do this in a development environment (i.e. probably your local machine, rather than a production server). This is where ngrok comes in handy. When someone calls this number, we want to send the caller to our app, at a specific endpoint, and then we can further build how our app interacts with the caller from there.
We can grab our ngrok address (you still have your local server and ngrok running, right?) using option webhook as our base URI and say that we will route these incoming phone calls to /messages as a GET request (except you will use your own ngrok provided base url). As in:

Great work! Time to write the code for our feedback service.
Building the Integration
Start thinking about the web service interactions that will make this app possible. We need to have an interface for incoming calls. When a call comes in, TwiML is rendered, which tells the Twilio API what to do and what to listen for next. In our config/routes.rb let’s add:
Now we need a corresponding controller and action, app/controllers. Let’s generate a controller with an index action:
Open the file app/controllers/twilio_controller.rb and add skip_before_action :verify_authenticity_token under the class definition. The file should look like this:
This gives us an appropriate action for incoming requests. The skip_before_action: method overrides the CSRF protection that Rails provides for us out of the box. Whilst we don’t need CSRF protection for a webhook, we would eventually want to verify that requests to this controller came from Twilio, but we can move on for now.
We have an endpoint for requests, but we need to have this endpoint return something that the Twilio number will be able to interact with. Enter: TwiML.
From the TwiML docs:
Twilio Markup Language (TwiML) “is a set of instructions you can use to tell Twilio what to do when you receive an incoming call or SMS.”
“When someone makes a call or sends an SMS to one of your Twilio numbers, Twilio will look up the URL associated with that phone number and make a request to that URL. Twilio will read TwiML instructions at that URL to determine what to do: record the call, play a message for the caller, prompt the caller to press digits on their keypad, etc.”
With that in mind, we need to take advantage of TwiML to both respond to a call, and listen for input, which in our case, will be speech from the caller.
What allows us to execute such magic is the TwiML <Gather> verb. <Gather> allows us to receive and collect different types of input from a caller, and determine what to do with it. We want our Markup returned from this endpoint to look like this:
The attributes on <Gather> allow us to give details on handling the call to Twilio. action="/messages" and method="Post" instructs Twilio to send the gathered speech as a POST request to /messages. input="speech" indicates spoken speech input, and timeout="2" tells Twilio to wait 2 seconds until ending the call if no input is received (typically, Twilio defaults to timing out after 15 seconds of non-speech). The nested <Say> verb is speech that will be played to the caller.
This is a simple example, but TwiML, like other Markups, can become a drag to write on larger projects. Luckily, we have the twilio-ruby gem, which abstracts TwiML and lets us write clean Ruby code that creates TwiML for us!
In the aim of keeping responsibilities discrete, we will build out a specific service for building the Twilio interface layer in app/. Add add a /services/ folder and a twilio_service.rb file.
We can use the tools given to us by the Twilio-Ruby gem to render TwiML on an instance of this class; as such, the instance methods we build for this class will indicate how we want to interact with the caller. Thinking about the behaviors of our caller and our app, we will build out the structure of this class accordingly:
We know, at the very least, we need to “get” the speech from our caller, and “say” goodbye.
Time to build our response object. In our initialize method, type:
This gives us an instance to work with to build our Twilio response interface. Remember the markup we looked at above? Well, we can build that in Ruby like this:
To put this to work in our twilio_controller, type:
To make sure Rails detects our Twilio Service, let’s restart our dev server. With both our local dev server running and ngrok listening for requests, open up a browser tab and navigate to /messages. You should see:
We are almost ready for a test call, but we are still missing one piece. In the above markup, we are still telling Twilio to send the gathered speech to /messages with a POST request. In our config/routes.rb we’ll add:
And back in our Twilio Controller:
Great! Now we are ready to receive calls.
Our First Test Call
We are set up to receive calls to our app, but we don’t really know what the data looks like as it comes in. To do this, let’s take advantage of one of the coolest debugging tools in the Ruby ecosystem: pry.
In your Gemfile, add:
Then on the command line:
We can now catch a call with our debugger. In our empty create action above, throw in our pry debugger:
Let’s recap the process before we run a test call.
- Someone calls your Twilio number.
- Twilio re-routes this call to your specified apps endpoint; in our case, it is our
/messagesendpoint as a GET request. - When the request comes in, TwiML is returned. This tells Twilio how to handle the call.
- The TwiML that we rendered using our twilio-ruby library indicated that the speech from the caller that is recorded (and parsed) by our <Gather> verb should be sent to a
/messagesendpoint as a POST request. This is where our ‘create’ action exists on our Twilio controller, which currently only houses our debugger.
Cool? Let’s make a call.
After calling, you should eventually hear ‘What is your message for Daniel’s Banana Cabana?’ or whatever you put in your attribute. In a test call, you could say something like “This is a test message”. If everything worked according to the process we just outlined, in our development console, we should have hit our debugger:
The <Gather> verb sends data over url parameters and Rails gives us a params object that will show us what was sent over. If you specify a key you should see our spoken message:
Also worth looking at is parameters["Confidence"], which Twilio provides as a score between 0 and 1.0 to indicate the likelihood that your speech transcription is correct.
With that, your app has automated speech recognition! Next we’ll talk through storing and displaying these messages.
Storing and Displaying Messages
We’re not going to ship an app with a debugger in it, and what good is a message service if we can’t store and see our messages? So, let’s do the following:
In your console, type:
This will generate a migration for a Messages Table, along with a Message Model, with the attributes “caller” and “body” on the Model. Run the migration with:
Now, back in our create action in our twilio_controller.rb, we should take out our debugger and replace it with something that works to persist our message to our new message table.
This allows us to create a message, unless no “SpeechResult” parameter is present.
We still don’t have a graceful way to end the call, so let’s add a “say goodbye” method to our TwilioService class:
And in our controller,
We can think of our message service as a way for users of an app to call and leave feedback about a product or service. To make it more useful, we can incorporate the idea of an “inbox” that an admin could review.
Generate a new controller with:
In routes.rb, replace the line get 'inbox/index' with:
Open app/controllers/inbox_controller.rb and load the messages in the index action:
This code allows our application to send a collection of messages to the HTML template layer. To complete this view create an erb file under app/views/inbox/index.html.erb (or copy it from GitHub) with the following markup.
Add to your application.css file as well:
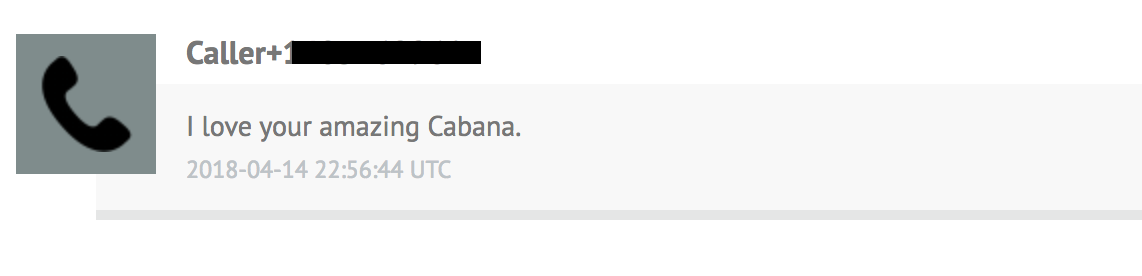
Make a call, and leave a message for “Daniel’s Banana Cabana”, saying:
“I love your amazing Cabana!!”
Navigate to localhost:3000/inbox (or your ngrok endpoint) and you should see:
What’s Next?
Congrats! You just integrated Twilio ASR into a Ruby on Rails Application. This is just the tip of the iceberg of what’s possible with Twilio’s voice services. If you want to dig deeper into automated speech recognition with Twilio, I’d recommend looking into adding Partial Result Callback to fine-tune your speech recognition integration.
Related Posts
-
 The Ins and Outs of DMARC Monitoring in 2026Denis O'Sullivan
 -
 Detecting iOS 26 Call Screening and Leaving Voicemail: How Twilio AMD and Real-Time Transcriptions Make It PossibleRosina Garcia Bru Robert McCulley
 -
 Model Context Protocol: Real-World Performance Testing of Twilio Alpha's MCP ServerNoah Mogil
Related Resources
Twilio Docs
From APIs to SDKs to sample apps
API reference documentation, SDKs, helper libraries, quickstarts, and tutorials for your language and platform.
Resource Center
The latest ebooks, industry reports, and webinars
Learn from customer engagement experts to improve your own communication.
Ahoy
Twilio's developer community hub
Best practices, code samples, and inspiration to build communications and digital engagement experiences.