How to Use WhatsApp Reply Context with Content API and Twilio Sync
Time to read:
May 18, 2023
Written by
Reviewed by

If you have multiple departments and use cases running through a single WhatsApp sender and your application needs help understanding which message your customer is replying to, this post is for you.
In this tutorial, you will learn how to use the Reply Context feature from Twilio Programmable Messaging combined with Twilio Sync to preserve message context and know precisely what a customer is replying to when you receive an inbound message.
A Brief Intro to WhatsApp Replies
In the past, it was not reasonable to expect the end user to use the "Reply Message" feature on WhatsApp when communicating with businesses, as placing that responsibility on them would typically lead to bad UX. However, when WhatsApp released its "Quick Reply" feature (commonly referred to as "Buttons"), the situation drastically changed. When users select one of the Reply options, the app automatically sends a message to the business replying to the original one. You can now safely assume most messages will come with that associated context.
Imagine you send two messages to your customers. The first one welcomes the user and asks if he wants to know more about your company. The second contains promotional information about a specific product, having its own call to action. When the customer interacts with one of them by selecting one of the options, Twilio provides the information on which message they selected, and you can take different actions for each one.
Prerequisites
- A Twilio Account
- A Production WhatsApp sender (you can learn how to create one here)
- Access to the Twilio Content Editor/API (if your account doesn't have it yet, you can reach out to your Account Executive or contact our Digital Sales team)
- A Messaging Service with your WhatsApp number added to it (required to work with the Content Editor/API)
- Twilio Serverless Toolkit
- Node.js and yarn (alternatively, you can use npm)
With every requirement set up, you are ready to go.
Getting Started
First of all, let's set up your environment:
Next, install the Twilio Helper Library and the dotenv package:
Create two new files inside your whatsapp-send directory.
Open the .env file and add the environment variables according to the example below:
These variables store your Twilio Credentials, as well as some relevant SIDs. Leave these blank for the moment. You'll get back to these in a minute.
Creating Content
Before writing code, you must create some content to send. Head to the Content Editor, click Create New, input quick_reply_template as the name and English (US) as the language. As for the content type, select Quick Reply.
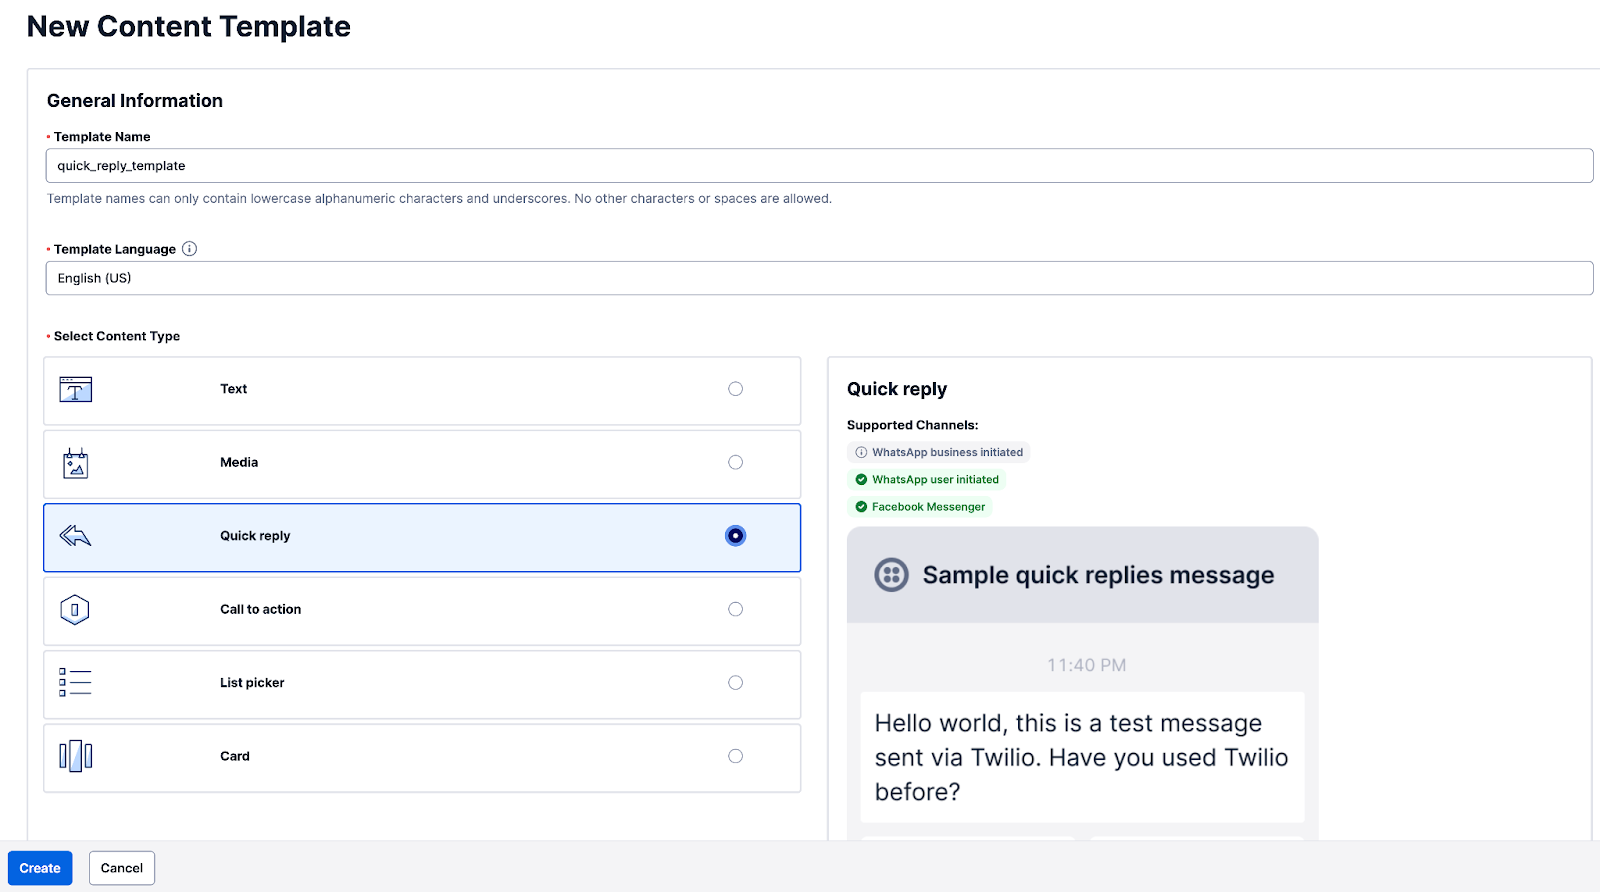
Click Create to see a new screen to provide details on your content, following the example below. Remember to click the Add Variable button instead of typing their references directly to enable the Sample Content boxes.
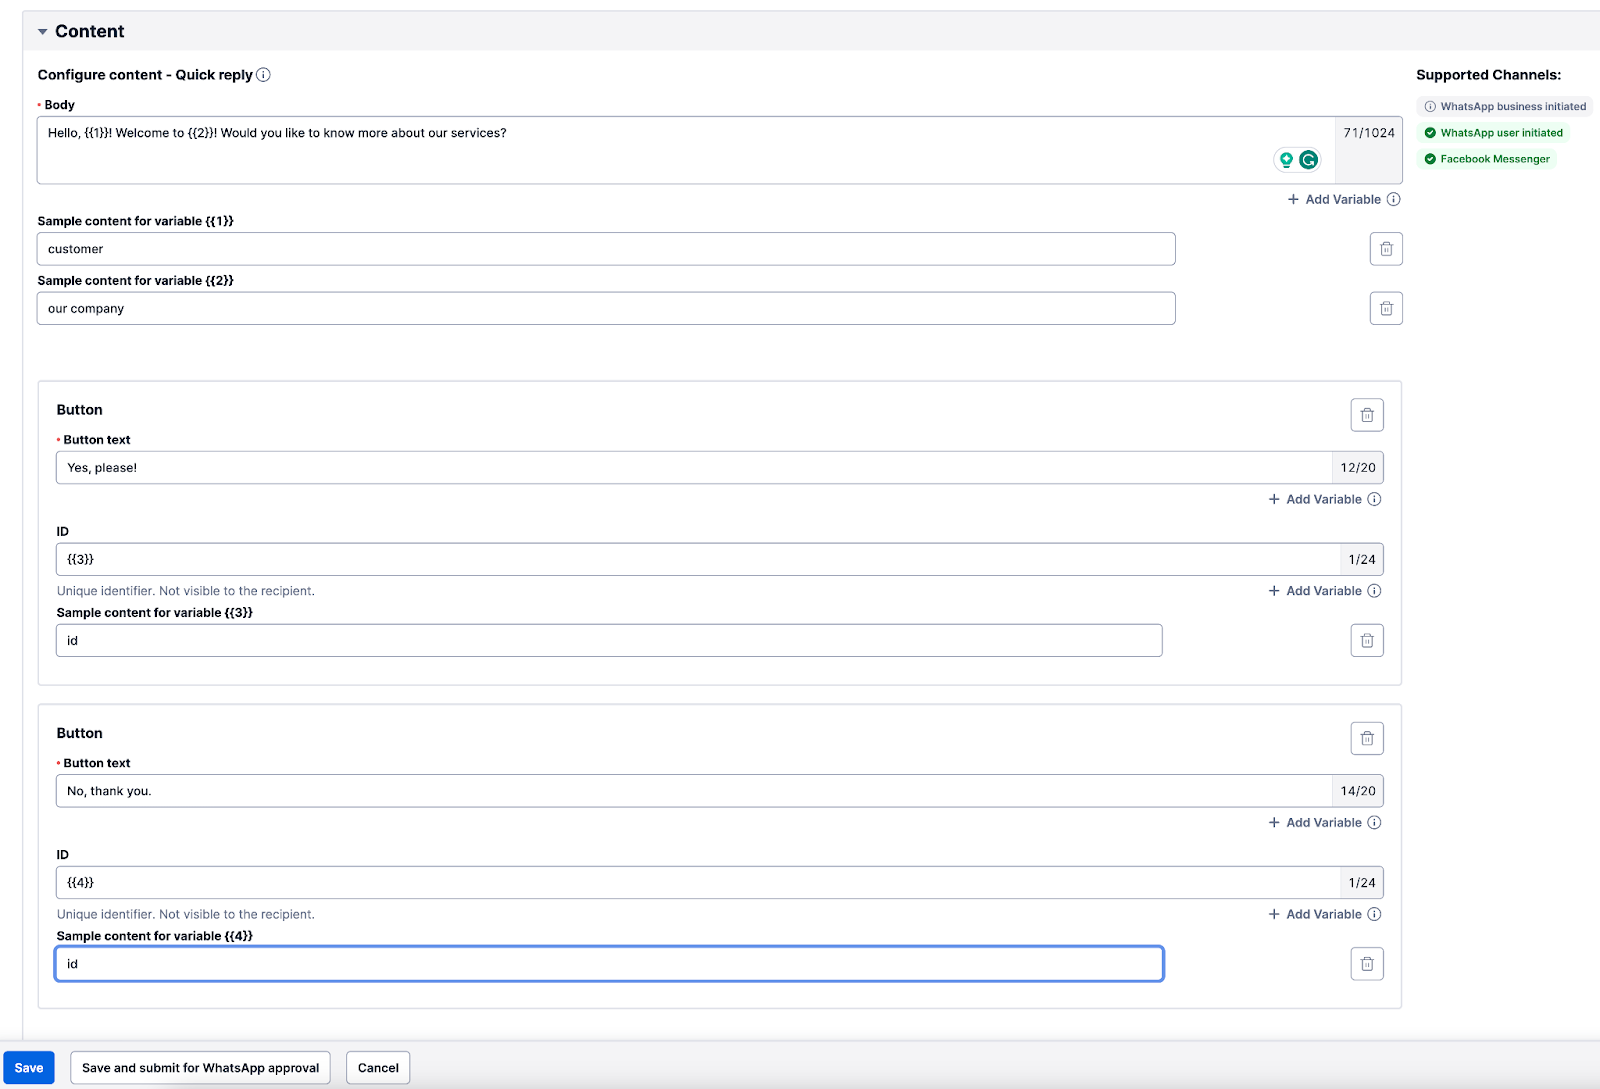
Keep in mind that for WhatsApp Business Initiated messages, you'll need approval from Meta. In this case, click Save and submit for WhatsApp approval, select Utility as the type of your message, and wait for its status to change. The approval process typically takes a few minutes but can take up to a business day.
Copy the Template SID. You'll need it for sending the message.
You can check our official documentation for more information. The documentation explains all content types beyond those used in this example and how to use variables best. You can also check our Support Article on what kind of message you should select when asking for approval.
Let's Write Some Code
The next step is to send a sample message registering the message context within Twilio Sync. But first, let's fill in the environment variables you left blank before.
Head to your main dashboard within the Twilio Console and find your Account SID and Auth Token. Copy and paste these values into the .env file you created earlier as the variables TWILIO_ACCOUNT_SID and TWILIO_AUTH_TOKEN values, respectively.
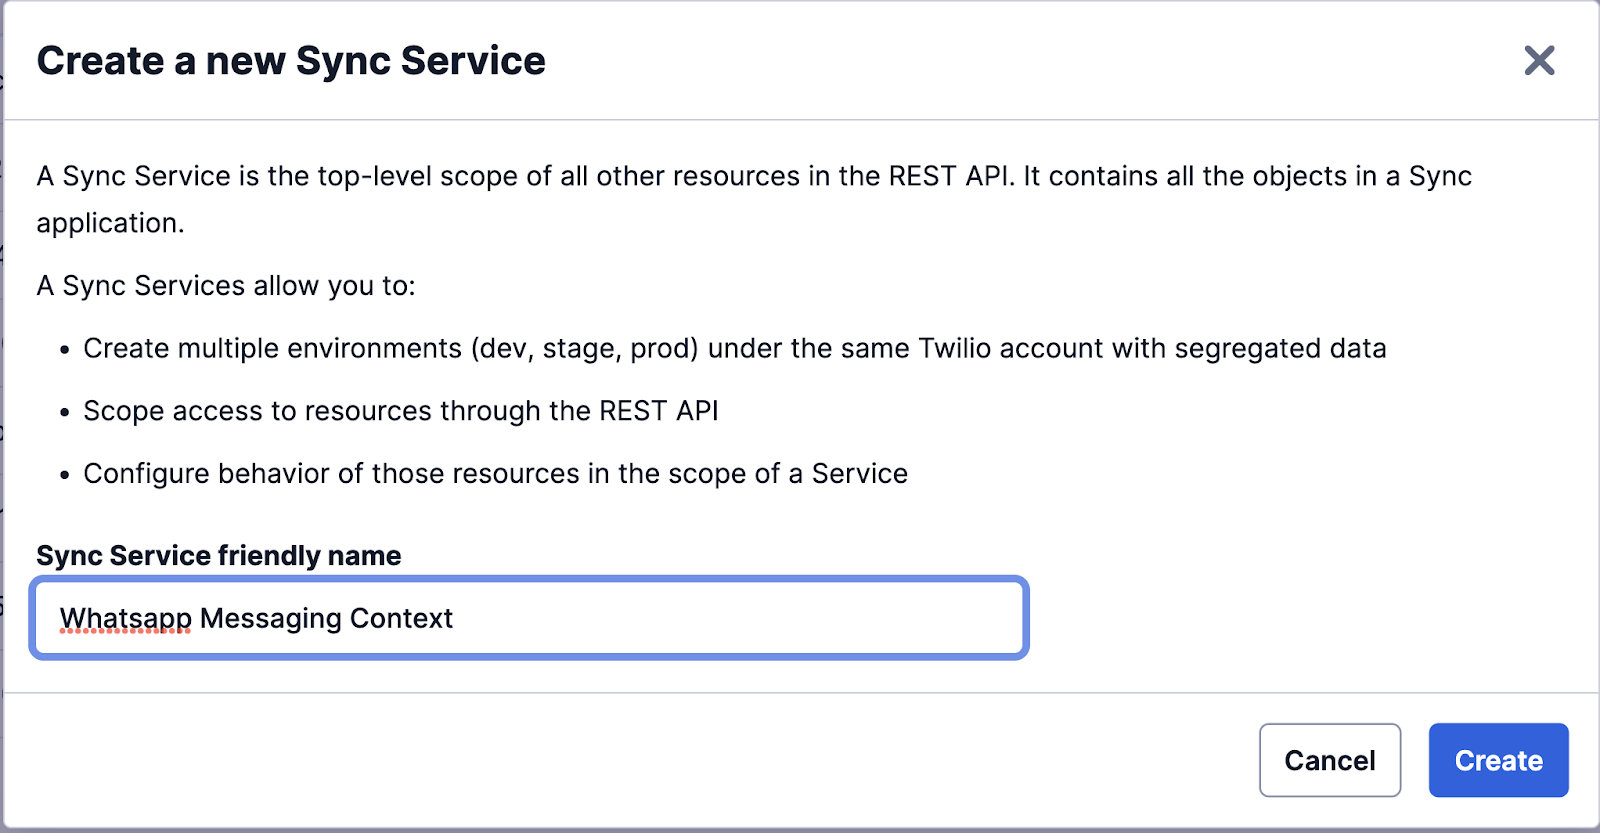
Next, head to the Twilio Sync dashboard. Create a new service by clicking Create new Sync Service, name it "Whatsapp Messaging Context", and you'll be directed to its page. Copy the Service SID on the right and paste it into the SYNC_SERVICE_SID variable.

Click Maps on the left menu, and then Create a new Sync Map. Input "messages" as the Unique Name and a Time-to-live (TTL). Leave the latter blank unless you want the map to expire at some point (this configuration is for the whole map, not its items).
You'll now see the Sync Map page. To retrieve its SID, click Back to Maps and copy the Map SID. Paste it into the SYNC_MAP_SID variable.
Finally, you'll retrieve your Messaging Service SID. You can follow our official documentation if your WhatsApp number is not already a part of one. To get the SID, head to the Messaging Services dashboard, copy the SID that includes your WhatsApp number, and paste it into the MESSAGING_SERVICE_SID variable.
Sending the Message
Open up the index.js file you created earlier in your favorite text editor. Copy and paste the following code into this file, replacing placeholders with your actual values for phone numbers and SIDs):
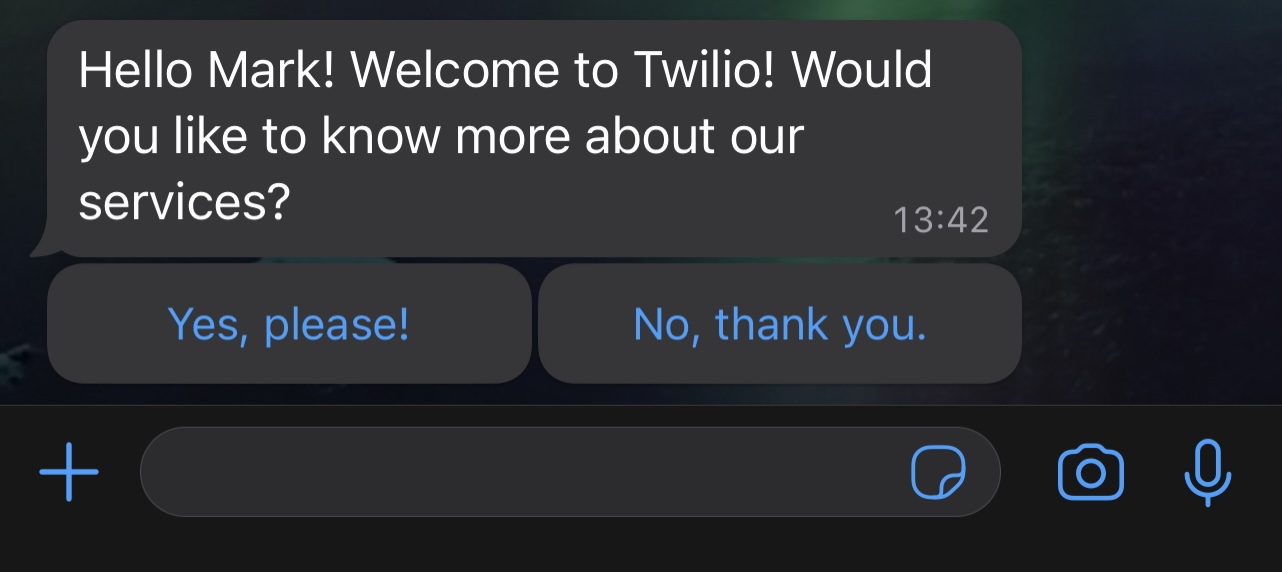
The contentVariables object contains the values for all variables defined during content creation. In this example, you'll give your customer a name and define the company's name, along with ID definitions for the reply buttons. Unused variables will be ignored, and variables not passed as parameters will be sent as the placeholders defined upon content creation.
Before sending the message, make sure that Meta already approved your template.
Run the code:
You should receive a message like this:
Registering the Context
Now that you learned how to send a message using predefined content, it is time to register that you sent it to the user.
Copy and paste the following code into your index.js file:
And add a then callback to sendSingleMessage():
Rerun it. Now Twilio stores the phone number, the content SID, and the content variables in Twilio Sync.
Processing Users' Replies
When the user replies to the sent message, you need to infer the content the reply references and need a way to process the reply.
You'll create a Twilio Function using the Serverless Toolkit to do that. Run:
Open the pre-created .env file and paste the SYNC_SERVICE_SID and SYNC_MAP_SID with the same values as before.
Create a file get-context.protected.js inside the functions directory, and paste the following code, replacing the placeholder with your content SID:
Deploy the function to your Twilio account. Run this code in the project directory of the Twilio Functions.
Every time a user selects one of the quick reply options, Twilio is going to receive an incoming message with three particular parameters:
- ButtonText
- ButtonPayload
- OriginalRepliedMessageSid
The ButtonPayload parameter contains the id defined for each button. In our example, it can be "yes" or "no". The OriginalRepliedMessageSid parameter is the original message SID containing the quick reply buttons.
This function takes the message and looks for any context in Twilio Sync, sending a message back to the user depending on his answers.
Adding New Content
You learned how to create content and process message for that specific content. You can now follow the same steps to build new message templates, adding the newly created content SIDs to the switch within the Twilio Function.
Additionally, you can use our Studio to make the building more user-friendly, allowing non-developers to add new content.
Conclusion
You can now send multiple messages to your customer base and understand which message they are referencing when they reply. To make this app production-ready, here are a few suggestions:
- Switch the Auth Token authentication to API Keys;
- Use the Content Editor to create the auto-responses. This will reduce your maintenance efforts when adding new content.
You can find an improved version of this sample code in this Github repository. This solution takes the same logic and extends it to send multiple messages in bulk based on a CSV file versus just sending one message at a time.
This is a great start. To improve your WhatsApp communication, consider looking at the following articles:
- How to Transcribe Audio Messages on WhatsApp using OpenAI Speech to Text;
- Create a WhatsApp Bot to Discover Restaurants using Twilio and Node.js;
- How to Build an InvestorGPT AI Chatbot on WhatsApp with Django, Twilio, and the ChatGPT API.
Biography
Gabriel Oliveira is a Solutions Architect for Latin America. He has been working with the WhatsApp Business API since its release in 2018 and with digital communications since 2011. He focuses on improving customer experience in digital channels. You can reach out to him at goliveira [at] twilio.com.

Related Resources
Twilio Docs
From APIs to SDKs to sample apps
API reference documentation, SDKs, helper libraries, quickstarts, and tutorials for your language and platform.
Resource Center
The latest ebooks, industry reports, and webinars
Learn from customer engagement experts to improve your own communication.
Ahoy
Twilio's developer community hub
Best practices, code samples, and inspiration to build communications and digital engagement experiences.