Build an SMS Event Reminder in PHP with Laravel, MySQL and Twilio SMS
Time to read:
October 17, 2019
Written by

In our day to day activities, we might get too busy for seemingly simple tasks. Too busy to drop a message, check up on loved ones or to remember an appointment. You could solve this by setting alarms right? But what if there was a more efficient way for reminders to send a message to your loved one, or request your lunch at a set time without you having to do it?
In this tutorial, we will learn how to use Twilio’s Programmable SMS to create an SMS reminder system with Laravel. At the end of this tutorial, you would have developed a custom SMS reminder system that alerts your users at a specific time via SMS.
Prerequisites
In order to follow this tutorial, you will need the following:
- Composer installed on your local machine.
- MySQL setup on your local machine.
- Basic knowledge of the Laravel Framework.
- A Twilio account.
Setting up Our Project
Let’s get started by creating a new Laravel project. We will do so using Composer. If you have Laravel installed, you can also create a new project using the Laravel command. The command below creates a new Laravel project using Composer create-project:
This will generate a Laravel project (event-reminder) in our working directory.
Setting up Twilio SDK
Next, let’s install the Twilio PHP SDK which we will use for sending out SMS reminders. Open up a terminal and navigate into the newly created Laravel project (event-reminder) and run the following command:
Having done that, let’s grab our Twilio credentials. We will use these for setting up access to the SDK. Head over to your Twilio dashboard and copy both your account_sid and auth_token:

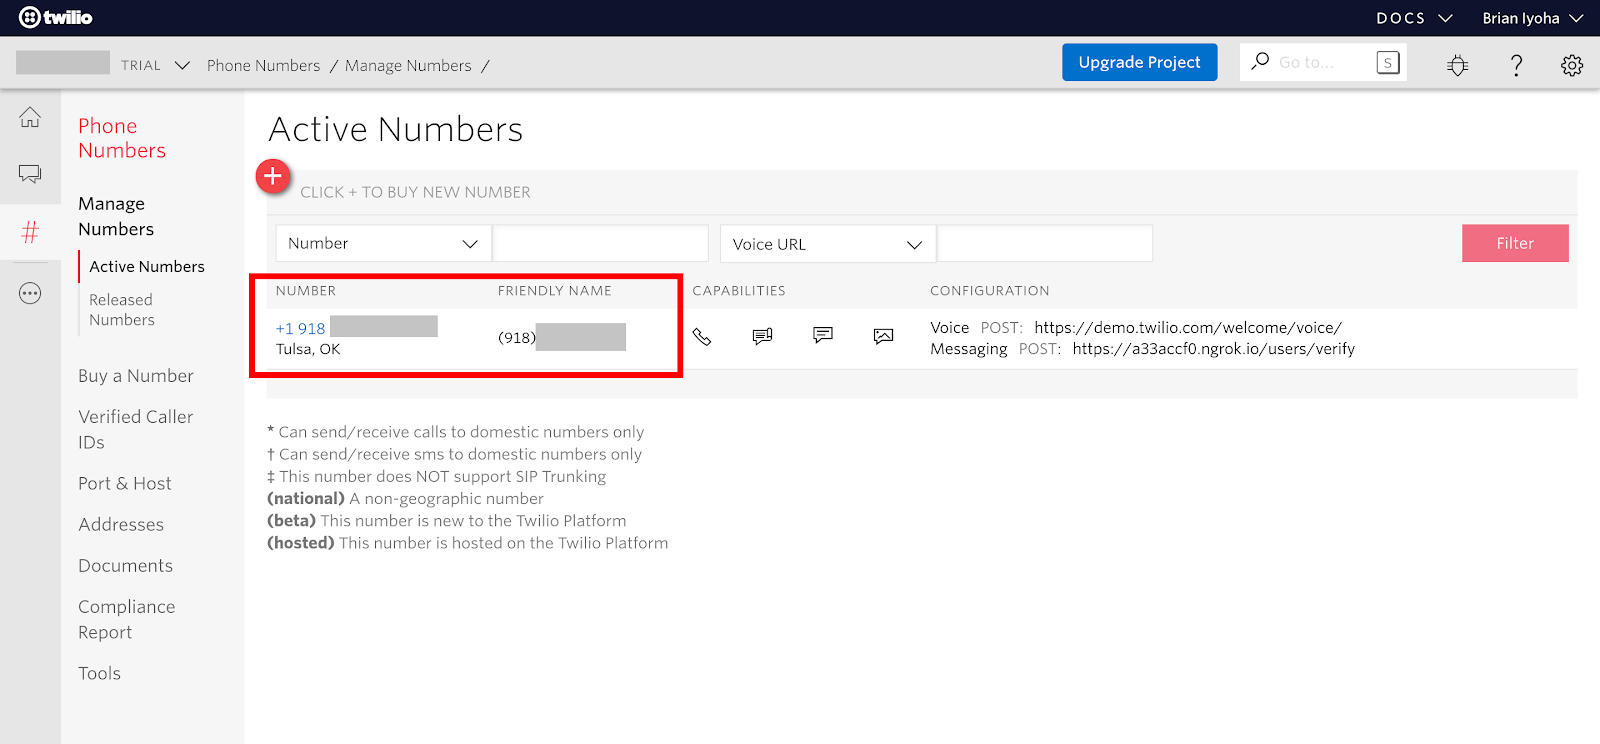
In addition, you will need an SMS enabled number. Navigate to the Phone Number section and also copy your active phone number:
Next, let’s update the environmental variables in our .env file located in the project root and add the following:
Building the Event Reminder
Setting up the Database
We will use a database in order to keep track of events. If you already know how to create a MySQL database or make use of a database management application like phpMyAdmin, then go ahead and create a database named sms_reminder and skip this section. If not, then complete the following steps to create a MySQL database using the MySQL CLI.
Note: The following commands require MySQL to be installed on your computer. You can install MySQL from the official site for your platform.
Open up your terminal and run this command to log in to MySQL:
Note: Add the -p flag if you have a password for your MySQL instance.
Once logged in, run the following command to create a new database and also close the session:
Next, we need to update our database credentials in our .env file. Open up .env and update the following variables accordingly:
Now that our database is in place, we need to make a migration. We can do that by running this command in the terminal.
This will generate a migration file found in the database/migrations directory. Now open up the project in your favourite text editor/IDE so we can make necessary adjustments to it. Let’s start off by updating our migration file to include the fields needed for our table. Open up the newly created migration file and make the following changes to the up() method:
This means we have a database table named reminders expecting to have the id, name, mobile_no, timezoneoffset and message fields. Laravel automatically adds the created_at and updated_at fields for us using the $table->timestamps(). To apply these changes, we have to run the migration command in the terminal:
This will create the table in our database with the fields mentioned above.
Now let’s generate a model for our table. The Eloquent model makes it easier to query our database without having to write raw SQL queries. Run the following command to generate a model for our reminders table:
This will generate a file named Reminder.php in the app/ directory.
Creating Reminders
We have successfully set up our database and also migrated our tables. Now let’s write out our logic for getting and storing a user’s reminder. Generate a controller for handling requests by opening up a terminal in the project directory and running the following command:
Open up app/Http/Controllers/ReminderController.php, which was just generated by the above command and make the following changes:
The create() method receives the data needed to create an event from the $request body and then validates the data using the request→validate() method. After which, the validated data is then stored in our database.
Note: Carbon is used to convert the time and date from the user input into a proper datetime stamp.
Scheduling the SMS alerts
Now that we are able to save details for an event, let’s proceed to actually send out the SMS at the appointed time. To do this, we will make use of Laravel's Artisan command for writing a custom command to send SMS to users if the time set for an event is equal or greater than the current time. This command will run every second to ensure we don’t delay in sending out the SMS. Tasks that require running a command at set intervals can easily be done with a cron job. Unfortunately, cron jobs only support scheduling tasks at a minimum of one minute (60 seconds) intervals, hence we can’t really make use of it in this use case. The only way to successfully run our command is by using a daemon. We will wrap our command logic in an infinite while loop and then using the PHP sleep() method we will delay execution of the loop for one second at every iteration.
Now, let’s proceed to create our custom command. Open up your terminal in the project directory and run the following command to create a custom Artisan command:
This will generate a file (app/Console/Commands/SendReminder.php) now open up the file and make the following changes:
Let’s take a closer look at what is happening in the handle() function. We wrapped our entire logic in a while() loop and initialized the Twilio PHP SDK using our Twilio credentials stored in .env. The current DateTime in our local time zone (which for me is Africa/Lagos 🇳🇬). This was also used to store the DateTime in our database.
Next, we query the database for reminders equal to the current time and set its status to pending. Each reminder will then be delivered via SMS while also updating their status to sent. After successful execution of this circle, we then delay the code execution by one second using the sleep(1) method called at the end of the loop. This will ensure our loop is delayed for at least a second before continuing the loop iteration. Now, whenever we run our command using the $signature, it will keep running our logic for every second until it is destroyed.
Setting Up Our User Interface
At this point, we have successfully written out our logic for both storing and sending out our event reminders. Now let’s build the user interface which our users will use to submit needed information for creating a reminder. We will make use of Bootstrap to ease styling of our forms. Open up /resources/views/welcome.blade.php and make the following changes:
With our form set and pointed towards the named route add-reminder, let’s proceed to create the route. This route will submit the form parameters of our reminder. Now open up routes/web.php and make the following changes:
Testing our Application
Well, that has been a lot of coding! Now let’s actually test our application. Open up a terminal in the project directory and run the following command to start the Laravel application:
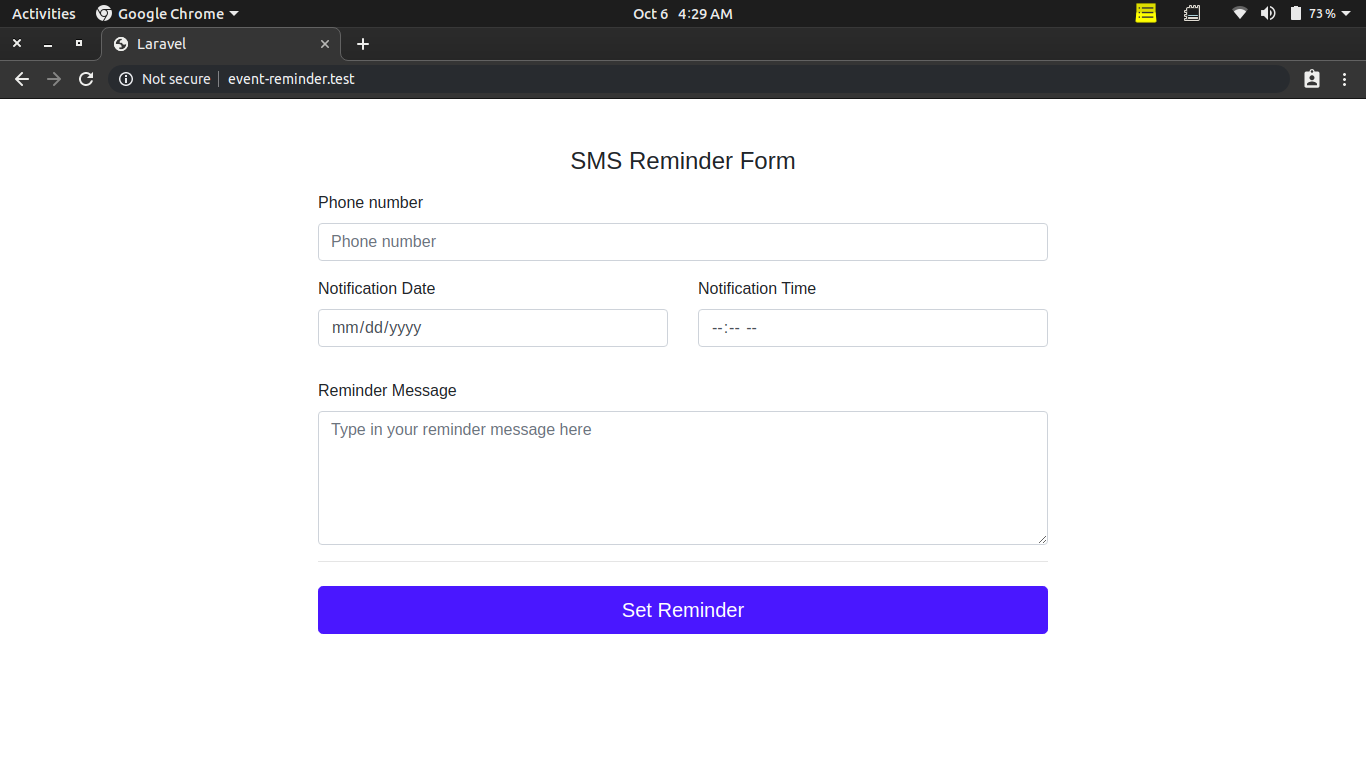
You should see a message printed out on your terminal with the URL to your application, typically http://127.0.0.1:8000. Now open up your browser and navigate to the specified URL, you should be greeted with something similar to this:
Next, with your Laravel application still running, let’s start our custom daemon by running our custom artisan command. Open up another instance of your terminal (still in the project directory) and run the custom artisan command using it’s defined $signature:
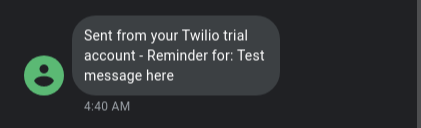
You should see a message “Reminder Daemon Started” printed out on your terminal. Now, head back to your browser and create a custom reminder, setting the phone number the reminder should be sent to, event date, event time and message of the reminder. At the due date and time, you should receive an SMS alert with your message.
Note: When entering the phone number, it is imperative to enter the country code alongside it.
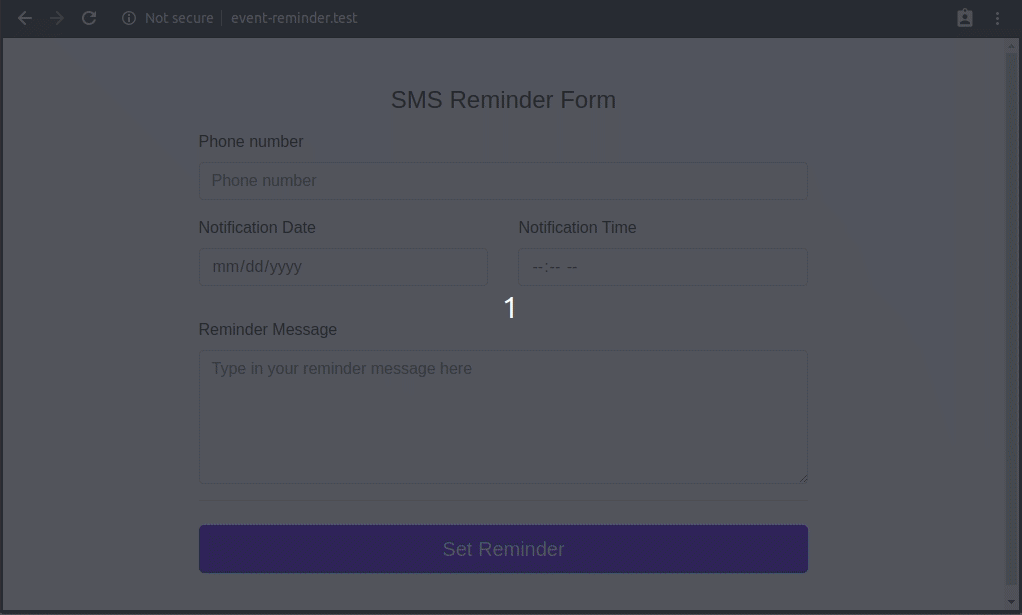
Gif showing how to create a reminder
Conclusion
Awesome! At this point, you should have a working SMS based reminder system. You have learned how to make use of Twilio’s programmable SMS for sending out SMS from your Laravel application and you also saw how to create a custom artisan command in a Laravel application and how to run it as a daemon.
If you would like to take a look at the complete source code for this tutorial, you can find it on Github.
You can also take this further by running your daemon using Supervisor. Supervisor can be used to monitor your daemon and restart it upon failure.
I’d love to answer any question(s) you might have concerning this tutorial. You can reach me via
- Email: brian.iyoha@gmail.com
- Twitter: thecodearcher
- GitHub: thecodearcher


Related Resources
Twilio Docs
From APIs to SDKs to sample apps
API reference documentation, SDKs, helper libraries, quickstarts, and tutorials for your language and platform.
Resource Center
The latest ebooks, industry reports, and webinars
Learn from customer engagement experts to improve your own communication.
Ahoy
Twilio's developer community hub
Best practices, code samples, and inspiration to build communications and digital engagement experiences.