Meet Your Personal Michelin Star Chef with OpenAI's GPT-3 Engine, Python, and Twilio WhatsApp API
Time to read:
September 08, 2020
Written by
Reviewed by

Being stuck in our own homes for months has given most people the motivation to invest in cookware and learn how to cook or bake by reading articles or watching YouTube videos. However, we all know baking the same loaf of bread 3 times can get old. Wouldn't it be nice to be able to talk to a friend who is actually a famous chef or someone who worked at a Michelin star restaurant? That would be an awesome way to pick up new tips on baking the most scrumptious lemon cake or creamy artichoke soup.
Using GPT-3 and Twilio WhatsApp API, you have the chance to talk to a Michelin star chef to ask questions on what you should cook next and even unlock a new way to bake a favorite snack such as scones.

Follow this tutorial to make your own Chef Bot and figure out how to impress your friends with the next big hit meal with the new wacky recipes you'll discover!
Is this a chatbot that should be taken seriously? Maybe, or maybe not, but hey, it's going to be fun talking to a high class chef or entertaining kids with it!
Tutorial Requirements
- Python 3.6 or newer. If your operating system does not provide a Python interpreter, you can go to python.org to download an installer.
- An OpenAI API key. Request beta access here.
- A free or paid Twilio account. If you are new to Twilio get your free account now! (If you sign up through this link, Twilio will give you $10 credit when you upgrade.)
- ngrok, a handy utility to connect the development version of our Python application running on your system to a public URL that Twilio can connect to. This is necessary for the development version of the application because your computer is likely behind a router or firewall, so it isn’t directly reachable on the Internet. You can also choose to automate ngrok as shown in this article.
Configuration
Since we will be installing some Python packages for this project, we will need to make a new project directory and a virtual environment.
If you are using a Unix or Mac OS system, open a terminal and enter the following commands to do the tasks described above:
For those of you following the tutorial on Windows, enter the following commands in a command prompt window:
The last command uses pip, the Python package installer, to install the three packages that we are going to use in this project, which are:
- The OpenAI Python client library, to send requests to the OpenAI GPT-3 engine.
- The Twilio Python Helper library, to work with SMS messages.
- The Flask framework, to create the web application.
- The python-dotenv package, to read a configuration file.
Set the OpenAI API Key
As mentioned above, this project requires an API key from OpenAI. During the time of this article, the only way to obtain the API key is by being accepted into their private beta program.
If you have access to the Beta page, the API key can be found in the Authentication tab in the Documentation.
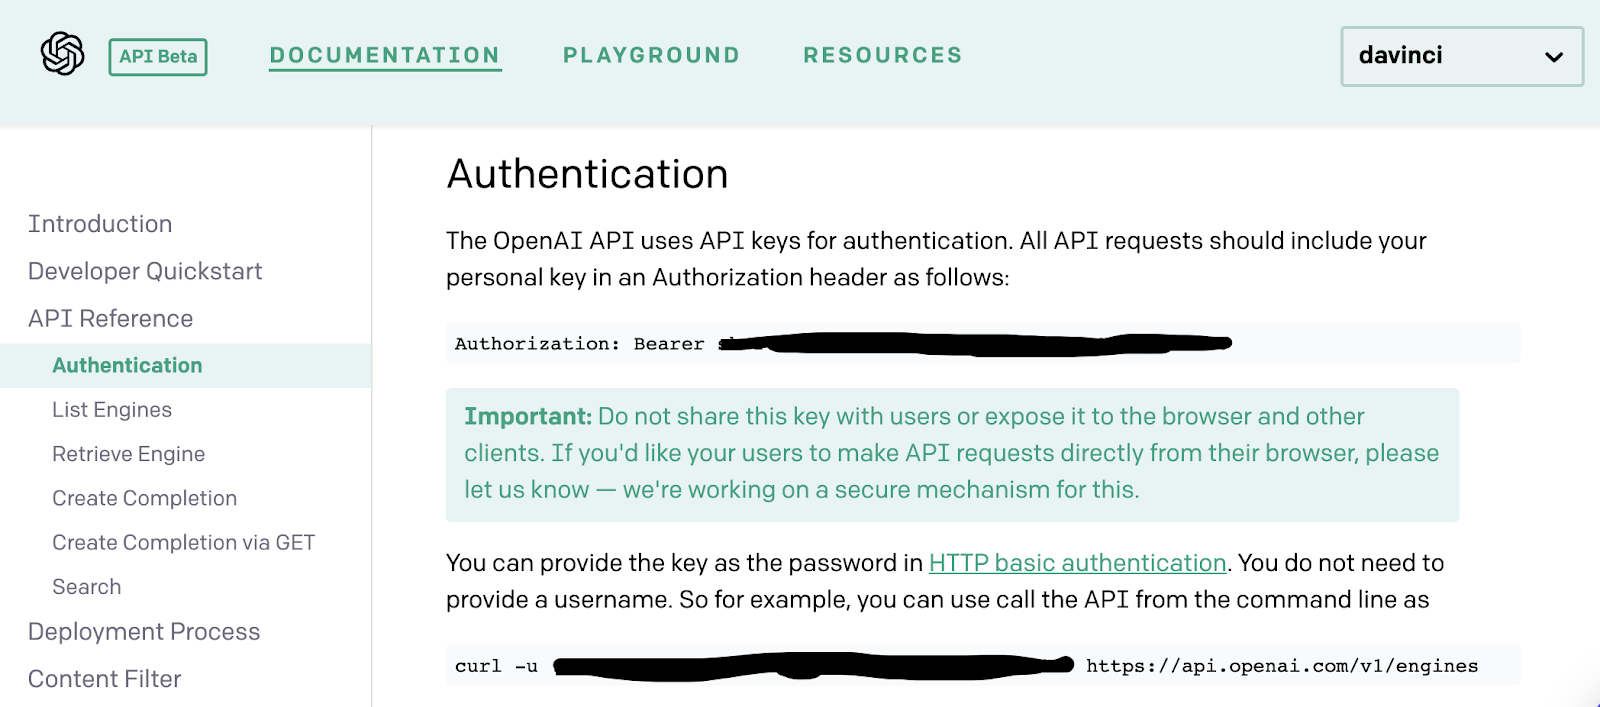
The Python application will need to have access to this key, so we are going to create a .env file where the API key will be safely stored. The application we write will be able to import the key as an environment variable later.
Create a .env file in your project directory (note the leading dot) and enter a single line of text containing the following:
Make sure that the OPENAI_KEY is safe and that you do not expose the .env file in a public location.
Build your personal chef buddy
Seriously, who doesn't love chatting with random AI bots that know literally anything or creating a unique story? Plus, the fun part about OpenAI is playing around with the playground!
The OpenAI playground allows users to explore GPT-3 (Generative Pre-trained Transformer 3), a highly advanced language model that is capable of generating written text that sounds like an actual human worked on it. This powerful model can also read a user's input and learn about the context of the prompt to determine how it should generate a response.
In this project, we will be feeding the GPT-3 engine with our own fun prompts about a chef and how they speak!
Write your prompt in the OpenAI Playground
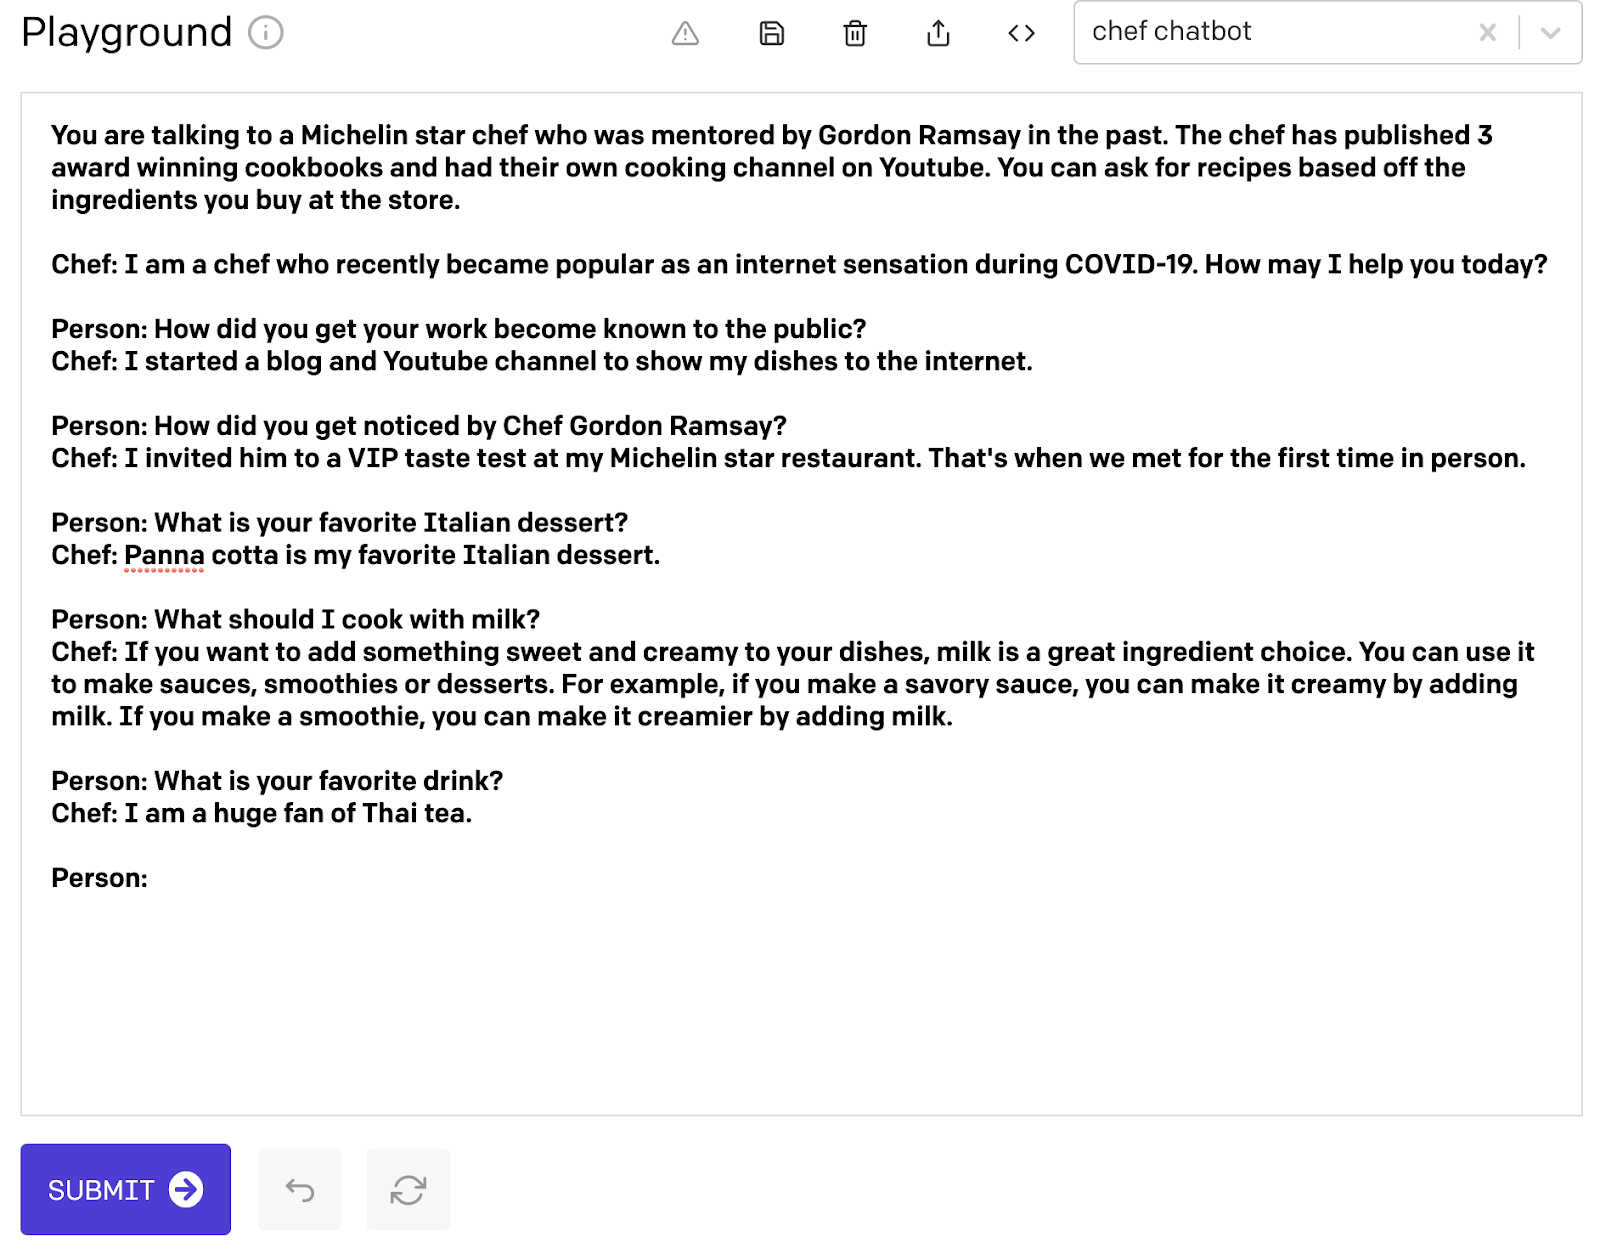
Here is where you can give your bot an identity. You can describe your favorite chef such as Anthony Bourdain, J. Kenji López-Alt, or Adam Ragusea.
For my article, I wanted to create an entirely new chef that was mentored by Gordon Ramsay and worked in a Michelin star restaurant. Due to COVID-19, this chef brought their whole career online by making YouTube videos and talking to fans and being a personal home advisor that helps you cook literally anything you have in your fridge.
In addition to creating the description of the chef character, write a few sample questions and answers to train the GPT-3 engine to follow a Q&A format going forward. Not only will this help the engine understand that any text generated by the engine is considered an answer, but the sample Q&A will also show the chef's personality and background as well.
You only have to write 2-3 sample questions and answers to build out the bot, but you can write more if you want. When you're done, end it with a line starting with Person:. We'll discuss why we did this later.
Does any of this made up person make sense? Probably not, but it was still fun and that's what matters - right?
Copy and paste this text into the OpenAI playground, or create your own. Your input text should show up as bold words.
It's almost time to export the chef identity to the bot app. We need to make a few changes to the settings before doing so.
Customize the GPT-3 application
Once you are done building your chef character, look at the sidebar to see other features that can be customized. There is a Response Length slider that should be adjusted up to at least 90 to make a substantial conversation with the chef. As the option suggests, this is your way of controlling how much text is generated for the response. The number represents the amount of response tokens encompassing a word or punctuation mark. These tokens will be seen in the code potion of the project.
There is no need to touch on any other part of the sliders in the settings bar, but since we're still in the playground page, it's fine to experiment now. Make sure that you leave all the sliders at the default when you're done playing around and only adjusting the Response Length slider. You can read more about the GPT-3 customization options in the Ultimate Guide to OpenAI-GPT3 Language Model.
Learn how to talk with the chef
While writing some sample script to give our buddy an identity, we also wrote some sample Q&A format. This was done not only to help the bot learn how to process questions and answer them, but also to tell the GPT-3 engine to examine the context and format of the bot and continue it.
By adding the sample questions and answers, the GPT-3 engine knows that this is a conversation between you, the person, and the chef that was created at the beginning of the prompt. When the prompt ends with a new line starting with Person: from earlier, it indicates that the bot is awaiting an input from you, the user before the GPT-3 engine can generate a response output.
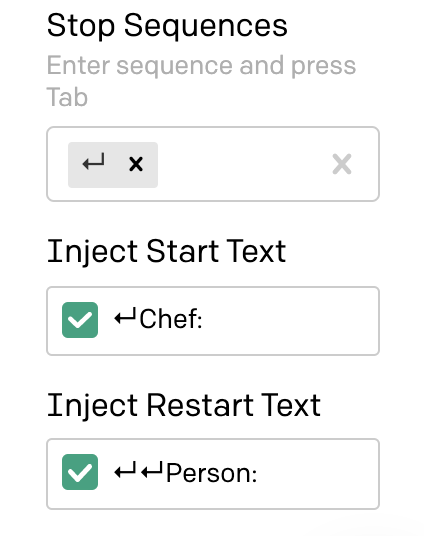
Notice that on the settings bar on the side, there are options to include Stop Sequences, Inject Start Text, and Inject Restart Text. These text fields indicate when the engine should automatically add the prefix line to the conversation or when to stop. In this case, we want the engine to stop generating output once the chef is done answering the question.
Here are the changes that need to be made to the text fields.
- Stop Sequences - click on the text field and press the
[enter]key followed by[tab]. - Inject Start Text - click on the text field and press the
[enter]key then type "Chef:". - Inject Restart Text - click on the text field and press the
[enter]key twice then type "Person:"
The text field settings should now look this:
Go ahead - try out the bot in the playground by asking it a question about cooking! Type a question or comment after the last "Person:" prompt and press Submit to see the bot generate a response. Your input text would be bolded in the playground, but the chef will respond with regular unbolded text.
Export the chef bot
We're done building the chef character! There is an option to save this bot as a preset in your OpenAI playground by clicking on the floppy disk save on the top bar near the trash can icon, also represented with a 1 on the picture below. I named this particular bot engine "chef chatbot" so that I can go back to this particular engine and fix the chef by giving it a new favorite dish.
Click on the < > symbol also known as the Export Code button, also represented as a 2 on the picture below. This brings up the option to export the "chef chatbot" engine to your Python app for the next section.

Here's an example of the exported code from the "chef chatbot" engine:
Create the Chefbot app
Inside of the chefbot directory that was made earlier, create a file named chefbot.py. This file will store all the information about the Chefbot created from the OpenAI playground earlier. However, we're going to rearrange the exported code a bit.
Start your chefbot.py file with the following lines:
The app is now able to import the variables from the .env file and send query requests to the OpenAI GPT-3 engine through the completion object.
Copy the start_sequence and restart_sequence provided from the OpenAI playground when the code was exported and paste it above the session_prompt variable. These global variables will be referenced throughout the chefbot.py file.
The session_prompt is a global variable to hold the story about the chef. Every detail and conversation you make with the chef will be stored in this variable and teach the engine how to properly speak and respond.
Make requests to the chef
In this app, we want to be able to teach our chef to remember the answers it gives and add onto the bot engine's prompt. This is especially helpful for when you ask the bot to give you a recipe line by line of an existing recipe, or some secret recipe you might uncover!
Write a definition for a function named ask() under the session_prompt variable. This function will take in the session's chat_log and look at the identity that was given to the engine through the OpenAI playground. Paste the entire response variable that was exported from the playground into the ask() function. Remove the prompt from this response object so that the ask() function looks like this so far:
So far, this function says that you can send a request to the GPT-3 engine with the openai.Completion.create() function considering the arguments that were created through the settings.
Paste the output of the prompt variable that was deleted into the global variable session_prompt from earlier. Now, the chef's story can be accessed through the ask() function and in the other function that we'll make in order to append dialogue to it later on.
To complete the ask() function, add the following line below in before the response variable.
The prompt_text is a string variable that puts everything together - the session's chat_log up until this point, the restart_sequence to show that the person chatting is texting in their question input, and lastly, the start_sequence to give room for the GPT-3 engine to provide the appropriate response. Add the line prompt=prompt_text, to the OpenAI response object so that the engine can read the prompt when the function is called.
The last thing to add is a return statement to return the next part of the conversation in a string format. Declare a story variable to hold the OpenAI's response. Their Completion engine returns a single completion text key that displays the generated response from the chef. You can refer to the official documentation to see the data provided by the object.
Your full ask() function should look like the following:
Teach the chef to remember conversations
If for some reason, you want to continue a conversation with the chef about a certain topic, for example, a secret chocolate chip cookie recipe, you can do so without the frustration of the chef giving the same answers. Let your chef know your frustration by appending the interaction to the session_prompt!
Create the append_interaction_to_chat_log() function so that the question and answer string are passed in, as well as the session's chat_log. This function will identify if there is any existing chat_log so that it can be initialized before appending the string of the session's chat_log up until this point, the restart_sequence to show that the person chatting is texting in their question input, and lastly, the start_sequence to connect the answer that was generated from the GPT-3 engine's response.
Text a message to the chef
As we have seen in the functions defined above, we're returning a string output, but it won't be returned to the terminal window. Since this is a tutorial to create a WhatsApp chat bot, we will need to use a webhook (web callback) to allow real-time data to be delivered to other applications.
Create a new Python file in the root directory named app.py. This file will set up a Flask session that will reload and reflect any changes that are made in the code.
Copy and paste the following code to your app.py file:
The Flask framework allows us to use configuration values to store information specific to a user. In this case, a session is implemented so that the user can chat with the chef bot and maintain a smooth conversation. Thus, app.config['SECRET_KEY'] is a dictionary object used to encrypt an individual's session.
Any random string can replace "'top-secret!'" and if for some reason, the conversation with your chef gets a little weird or buggy, you can change the secret key value and chat to it to clear the session chat log. You can also print the chat log if things happen to get buggy, especially if the chef becomes silent or stops responding properly due to picking up random information or lines that the GPT-3 engine was not supposed to learn.
Inside of the /chefbot webhook, various functions are called upon in order to return the proper string format that TwiML requires to send as a text message over WhatsApp. Before a MessagingResponse() can be created, the request.values is a special object from Flask that parses incoming data and exposes it in a convenient dictionary format. The app sets the question variable from the Body parameter to keep track of the user's question input and use it to create a string value for the answer variable.
The chat_log, of course, is a variable that takes the session's log and passes it to the ask() and append_interaction_to_chat_log() functions created in the chefbot.py file in order to generate new answers and output for the session log.
Configure Twilio WhatsApp
It's time to connect the /chefbot webhook to the Twilio WhatsApp Sandbox. If you haven't already, log onto the Twilio Dashboard to view your Programmable Messaging dashboard. There is a section on the page that says "Building with WhatsApp? Get started here". Click on the link to learn how to set up your sandbox.
The sandbox is provided by Twilio, however, once you complete your app, you can request production access for your Twilio phone number.
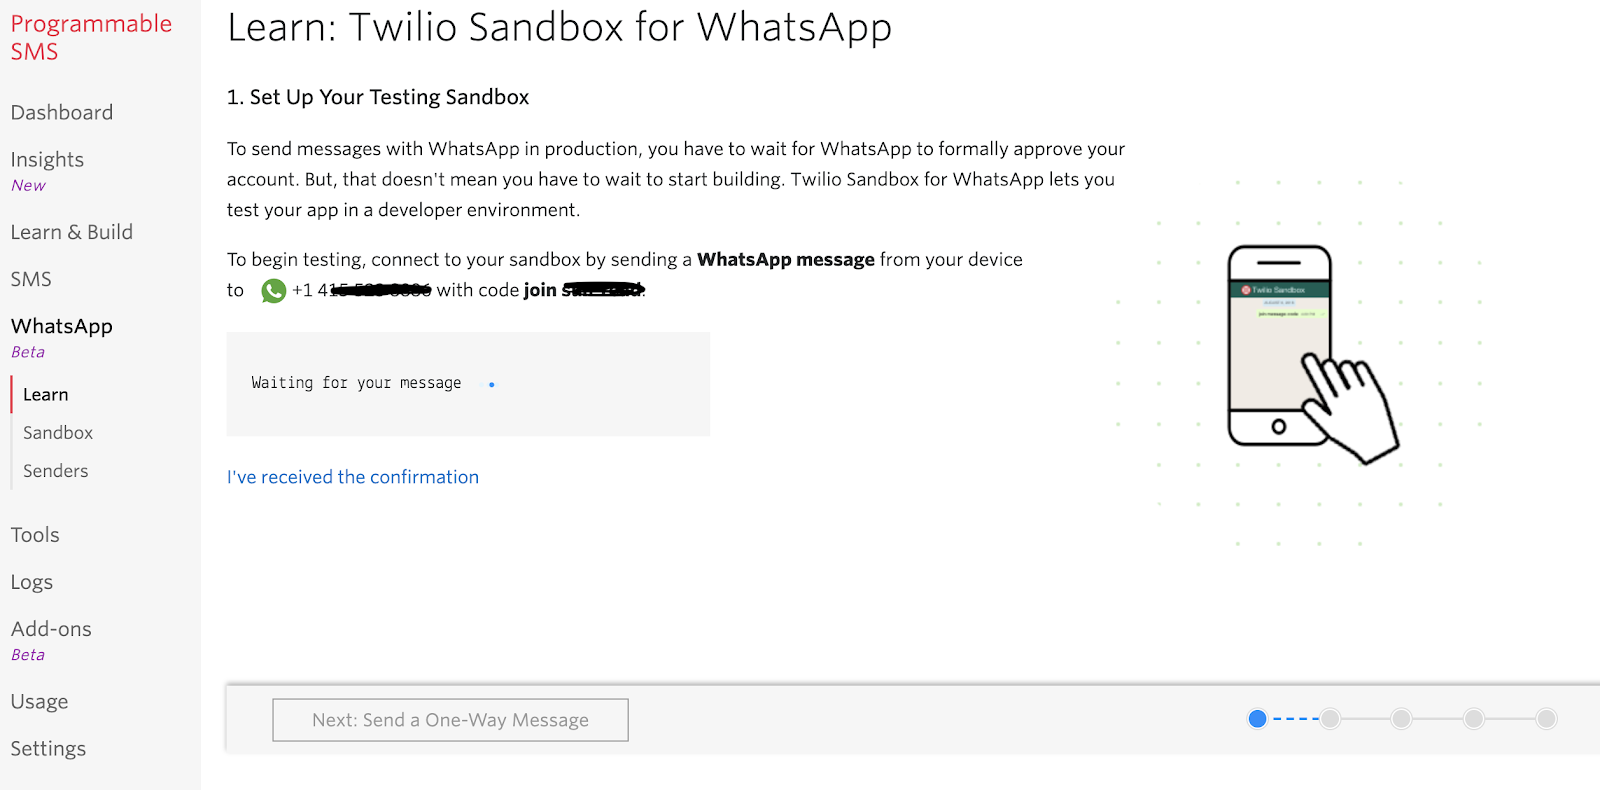
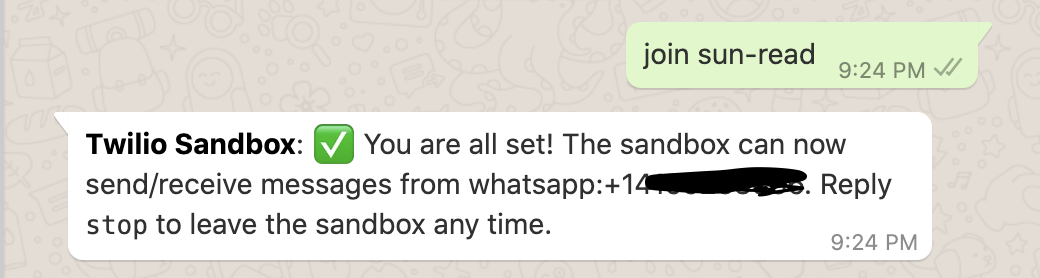
Use your smartphone to send a WhatsApp message of the phrase to your assigned WhatsApp number. If you are successful, you should receive a message as shown below.
Set up a webhook with Twilio
Open your terminal window and navigate to the "chefbot" project directory if you are not already there. Start ngrok with the following command to enable the Flask service publicly over the Internet:
Ngrok is a great tool because it allows you to create a temporary public domain that redirects HTTP requests to our local port 5000.
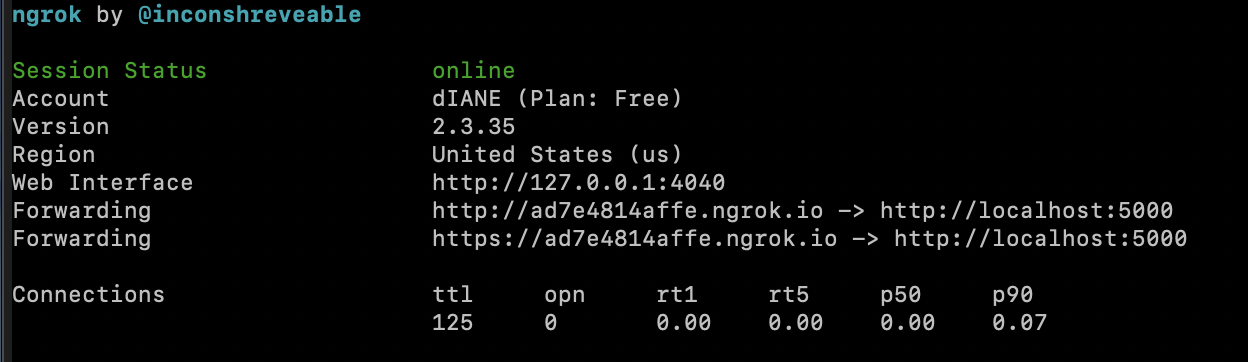
Your ngrok terminal will now look like the picture above. As you can see, there are URLs in the “Forwarding” section. These are public URLs that ngrok uses to redirect requests into our flask server.
Copy the URL starting with https:// and return to the Twilio Console and navigate to the Programmable Messaging dashboard. Look at the sidebar for Programmable Messaging to find WhatsApp Sandbox Settings under the Settings option. This is where we tell Twilio to send incoming message notifications to this URL.
Paste the URL copied from the ngrok session into the “WHEN A MESSAGE COMES IN” field and append /chefbot, since that is our endpoint. Here is my example for reference:
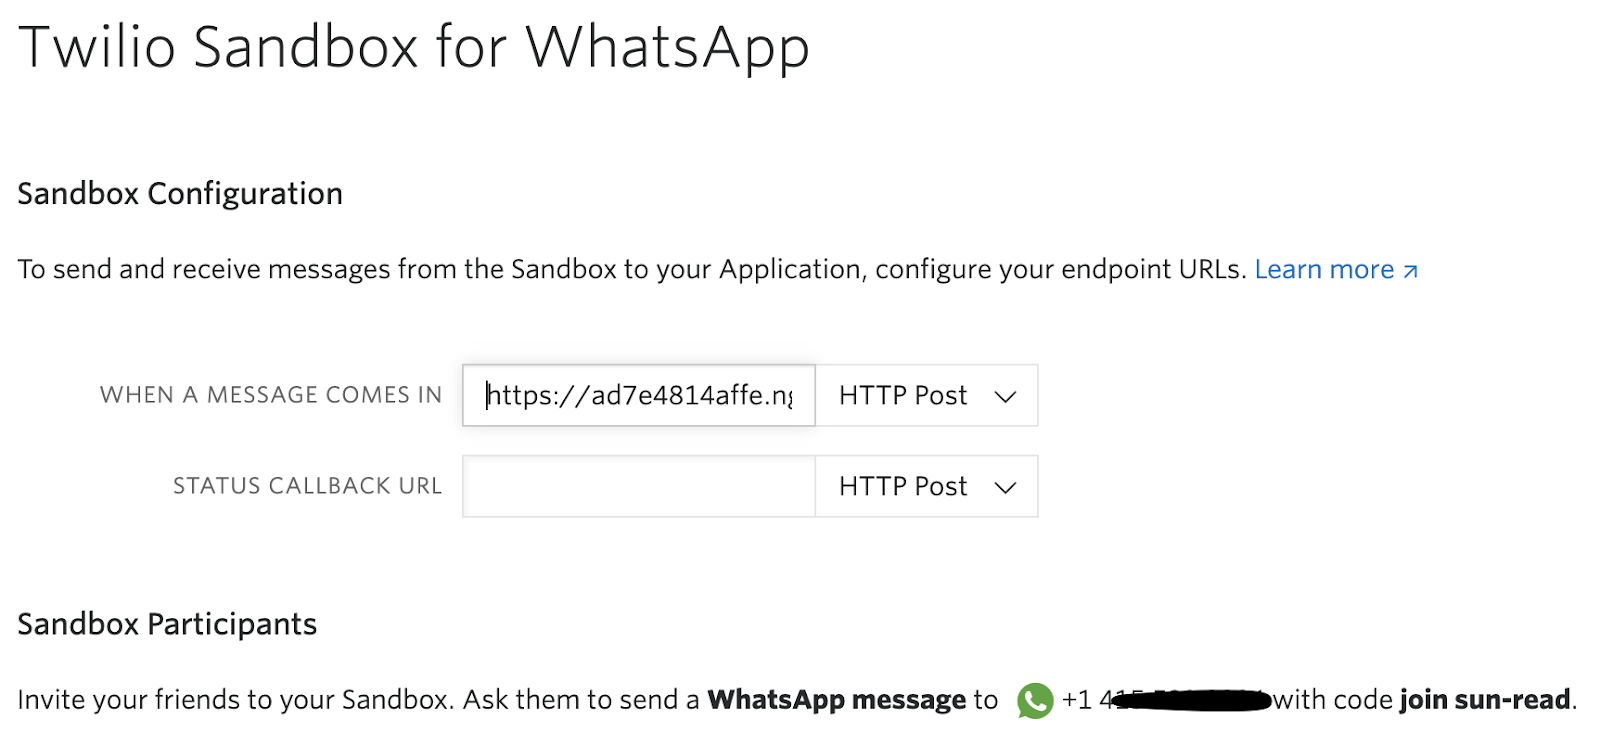
The URL from ngrok is “https://ad7e4814affe.ngrok.io/chefbot” but again, yours will be different.
Before you click on the “Save” button at the very bottom of the page, make sure that the request method is set to HTTP POST.
Awesome - it's time to test things out!
Run the Chefbot WhatsApp Chatting app
We've nearly reached the end of the tutorial. If you need to check your code, here's my GitHub repo.
While one tab on your terminal is actively running the ngrok session, open another tab in the terminal. Rerun the command source venv/bin/activate to activate the virtual environment then start your app with the command python app.py.
This should be the following output once the Flask app has been booted up:
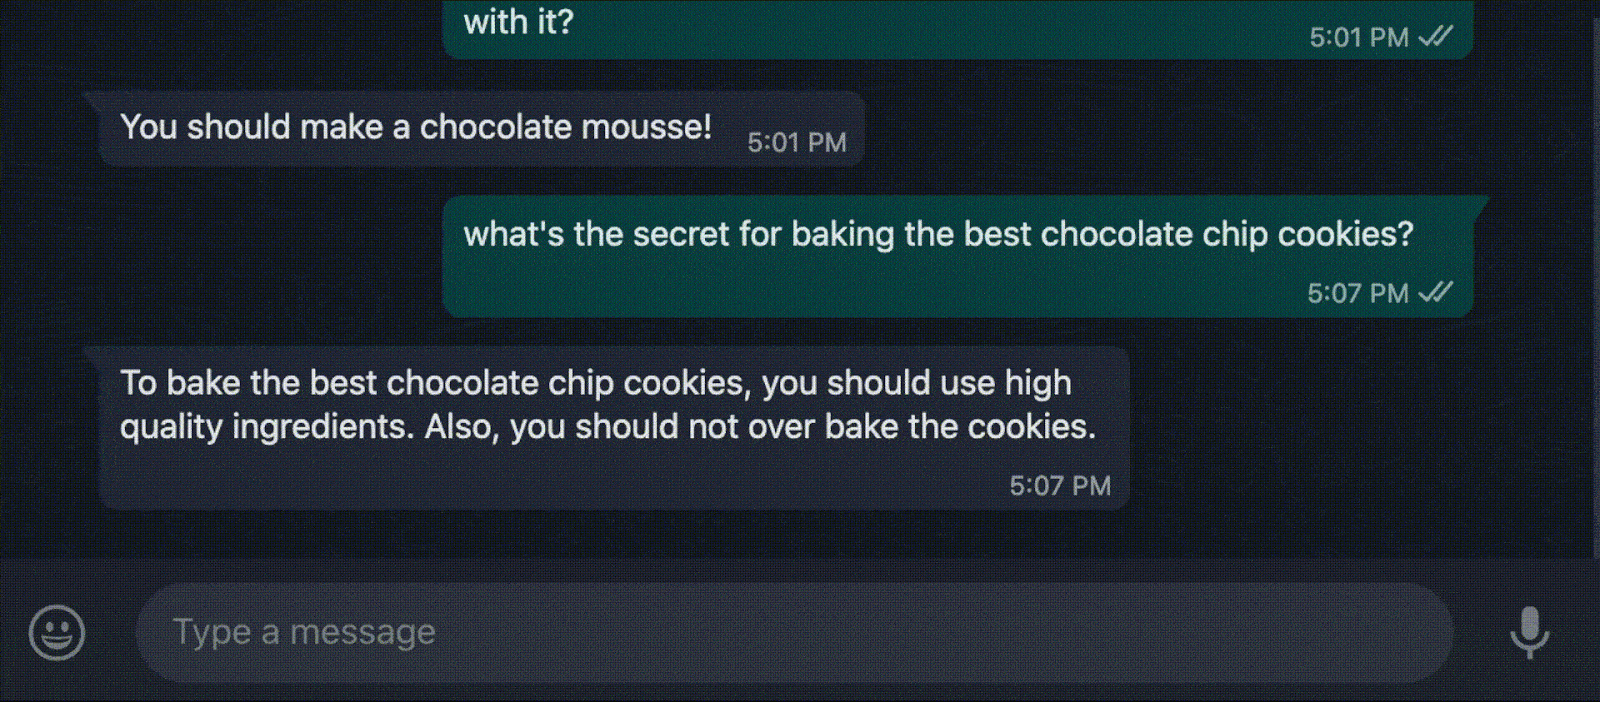
And now the fun begins! Get your WhatsApp enabled mobile devices and text your WhatsApp number. Be careful, your Chefbot's recipes may or may not work - but that's up to you to decide whether or not to trust them!
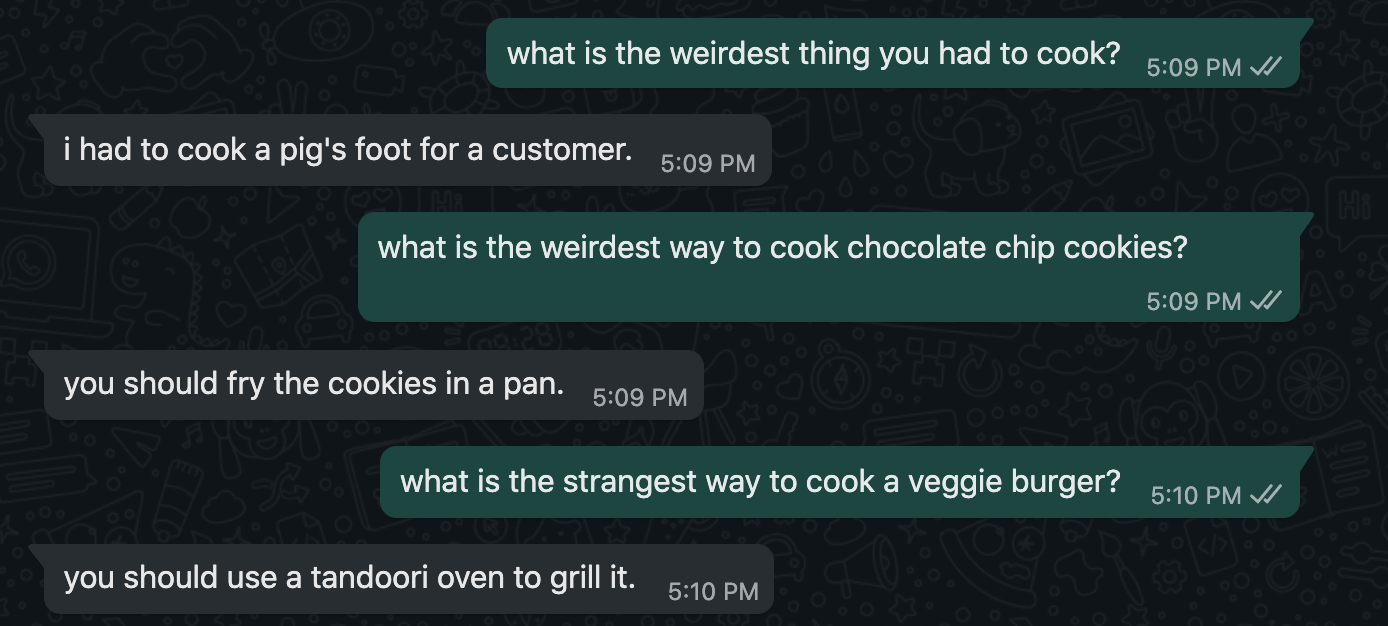
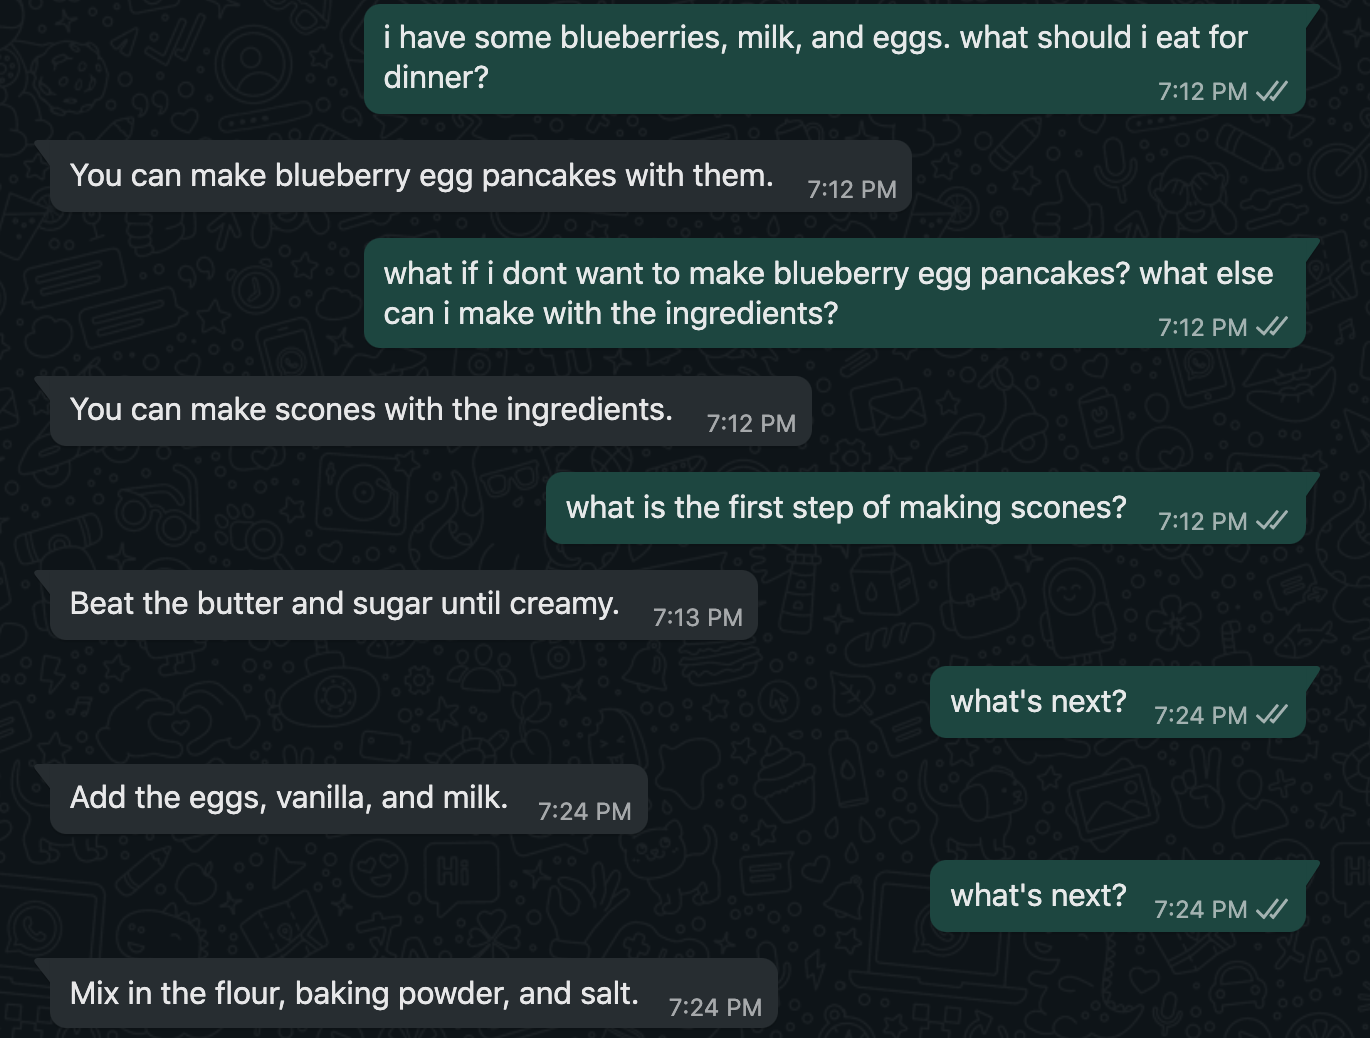
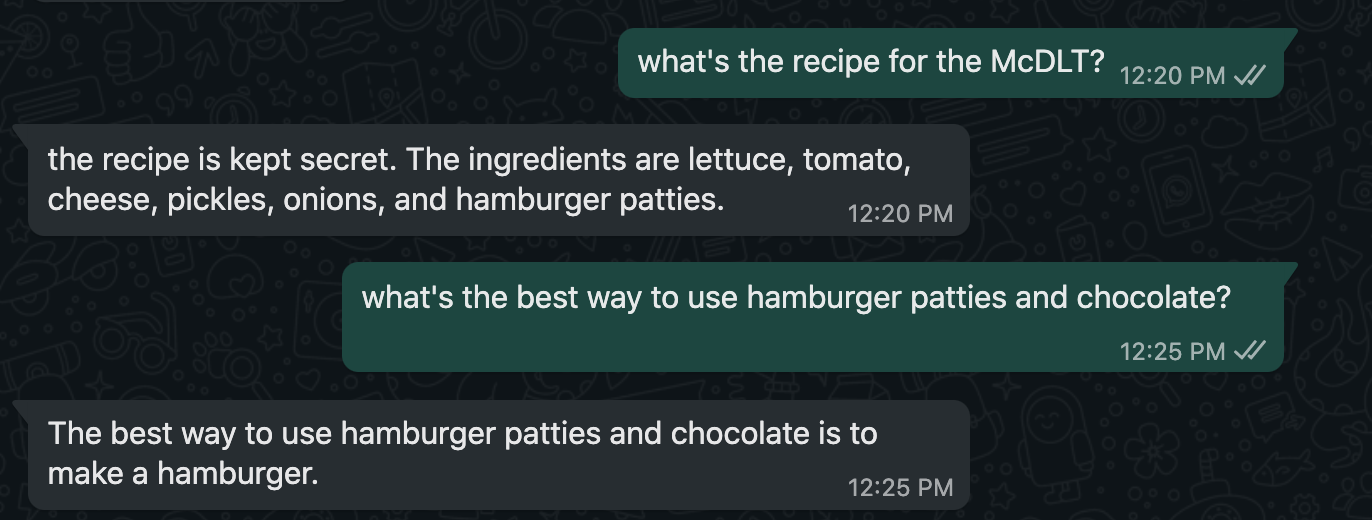
Here are some conversations I had with my Michelin star Chefbot.
Conclusion: Building a WhatsApp OpenAI GPT-3 Chatbot
Congratulations on bringing your imaginary chef to life! It's time to discover new ways to cook things that have been sitting in your cupboards for months or find a new dish to make. Perhaps you can bug this Michelin star chef enough that they will spill the beans on a secret recipe, create an entirely new wacky recipe with you, or just talk about their experience working with Gordon Ramsay (who isn't curious?)!
This simple WhatsApp chat bot tutorial is just one of the many fun projects you can do using Twilio API, Open AI GPT-3, and of course, Python and Flask tools.
Perhaps you should train the chef even more, as it might be a great way to seek out the next COVID-19 food trend!
What’s next for OpenAI GPT-3 projects?
If you're hungry to build more, try out these ideas:
- Convert this Chatbot to Twilio SMS text
- Share your new dishes with an image recognition WhatsApp project
- Generate cooking recipes with OpenAI's GPT-3 and Ruby
Let me know what's cooking in your kitchen or on your computer by reaching out to me over email!
Diane Phan is a Developer on the Developer Voices team. She loves to help beginner programmers get started on creative projects that involve fun pop culture references. She can be reached at dphan [at] twilio.com or LinkedIn.
Related Posts
-
 How to run Automated AMD Tests and Fine-Tune Twilio AMD for Accurate Voice AutomationRosina Garcia Bru Fernando Vieira Machado
 -
 ACD vs IVR: What's the difference between contact center ACD and IVR?Jesse Sumrak
 -
 How to Build an AI Chatbot with Facebook Messenger, OpenAI, and Twilio Programmable Messaging using PythonDylan Frankcom
Related Resources
Twilio Docs
From APIs to SDKs to sample apps
API reference documentation, SDKs, helper libraries, quickstarts, and tutorials for your language and platform.
Resource Center
The latest ebooks, industry reports, and webinars
Learn from customer engagement experts to improve your own communication.
Ahoy
Twilio's developer community hub
Best practices, code samples, and inspiration to build communications and digital engagement experiences.