Migrate from Twilio Elastic SIP to Programmable Voice
Time to read:
August 29, 2022
Written by
Reviewed by

Why migrate to Programmable Voice?
Twilio’s Elastic SIP Trunking service automatically scales, up or down, to meet your traffic needs with unlimited capacity. Moving to Twilio’s Programmable Voice builds on the same underlying infrastructure, but gives you the power of building voice experiences with software control. With Programmable Voice you get the ability to build features such as IVRs, AI chat bots, near real-time voice transcription, Agent Assisted Payments, etc. Intelligently handling calls to increase deflection through self-service, before routing your calls to your existing SIP (Session Initiation Protocol) trunks, if you want to keep your existing SIP destinations makes your existing investments work even harder for you.
Prerequisites
- Existing Elastic SIP trunks
- Working knowledge of how Elastic SIP Trunking is configured. If not, there's a great guide to learn more here
- Access to the Twilio account with Elastic SIP trunk to be migrated
- Working knowledge of Twilio Functions
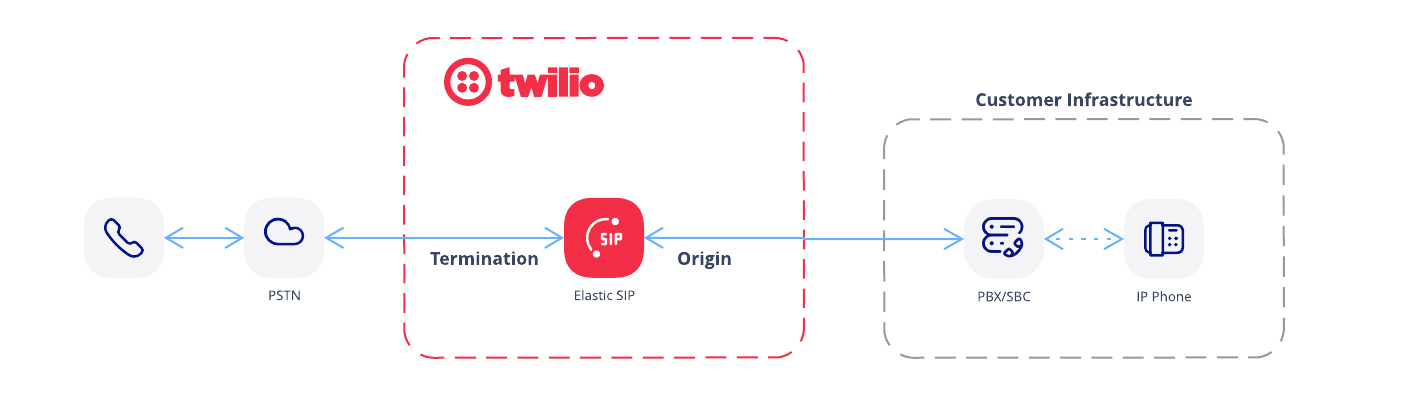
Existing Elastic SIP Trunking
Here’s a typical Elastic SIP trunking implementation to an existing PBX (Private Branch Exchange). The configuration consists of a Termination and Origination component to handle calls to and from the PSTN respectively as shown in the diagram.
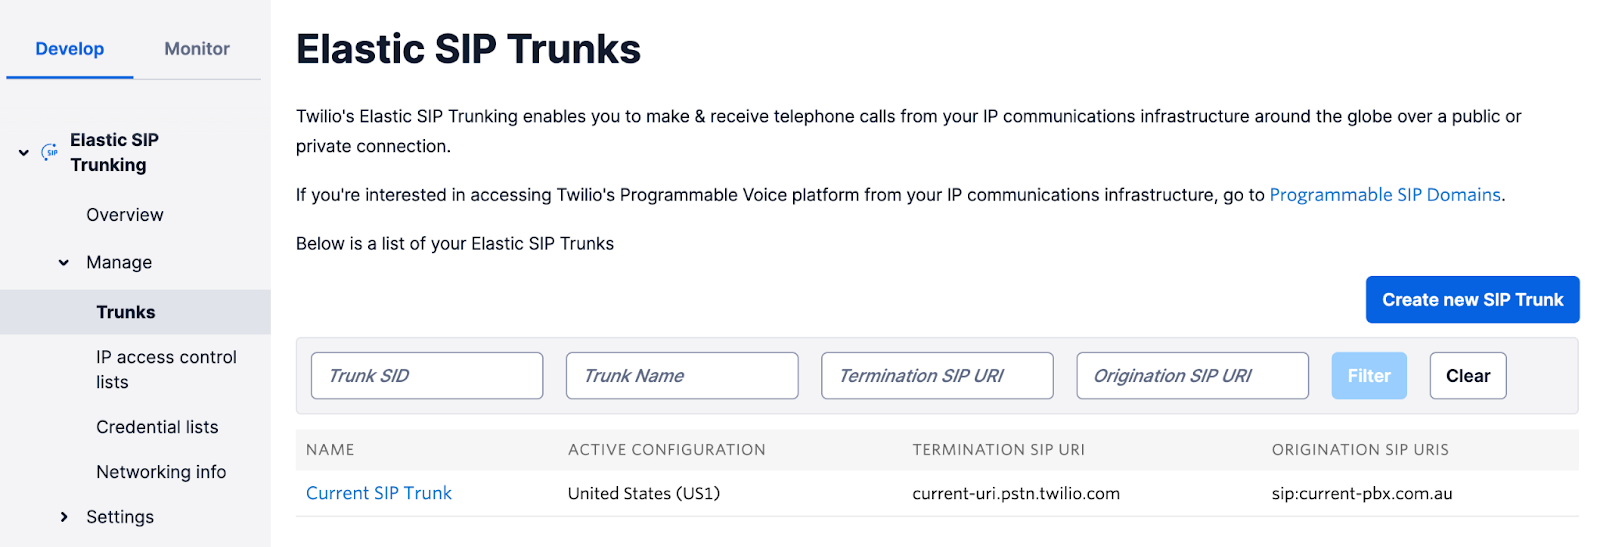
Here’s what that Elastic SIP trunk configuration with the Termination (current-uri.pstn.twilio.com) and Origination (current-pbx.com.au) URIs would look like in the Twilio Console.
Programmable Voice
Unlike Elastic SIP Trunking, Programmable Voice offers you the ability to manipulate each of the call legs before, during and after a call. Rather than just a single call, Programmable Voice works with call legs.
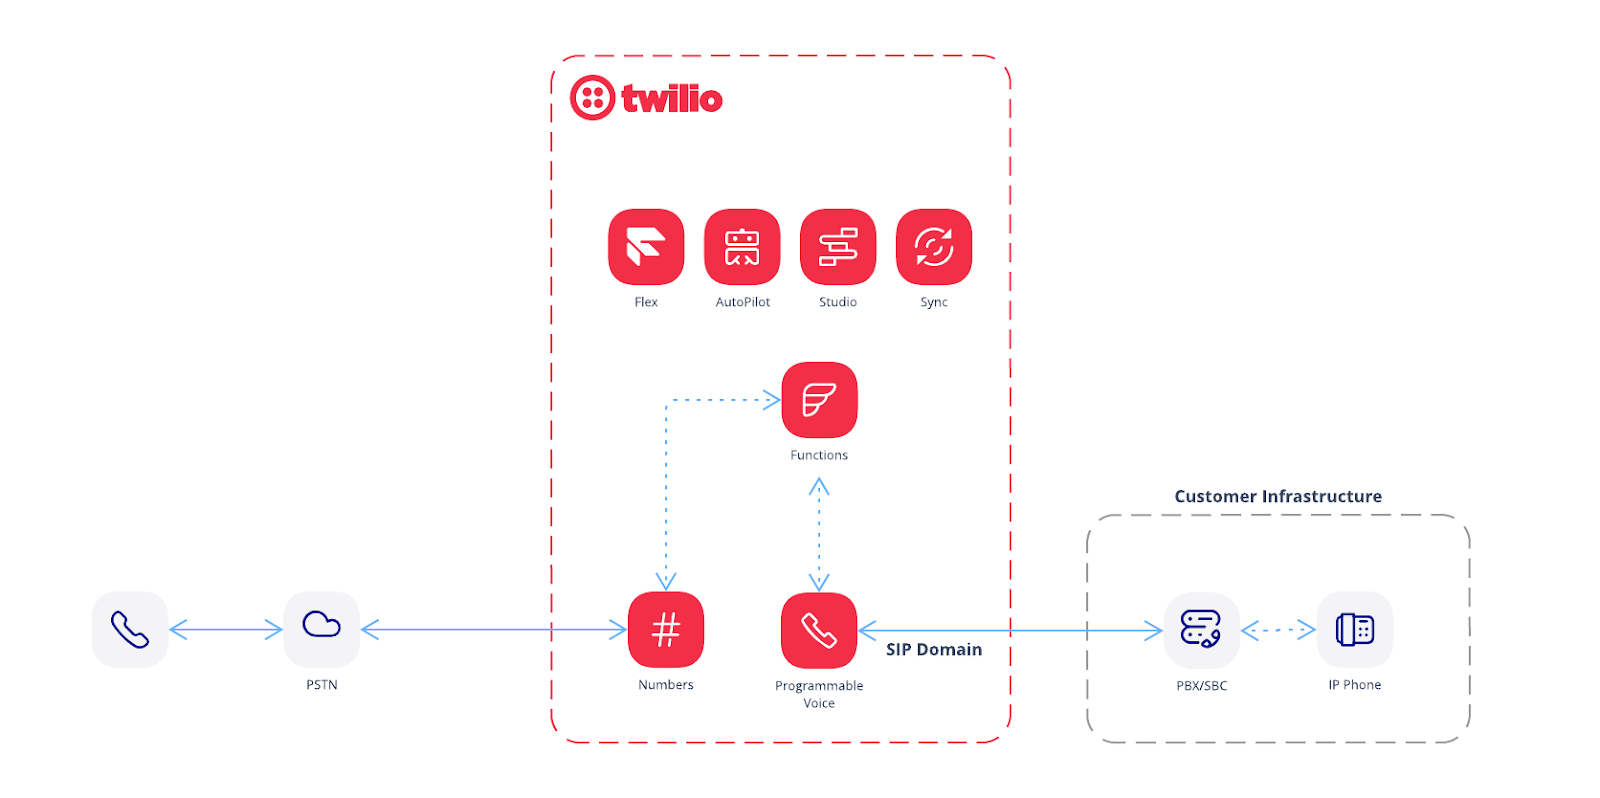
The diagram below shows the equivalent PSTN to PBX implementation, with the key difference being how inbound and outbound calls are handled.
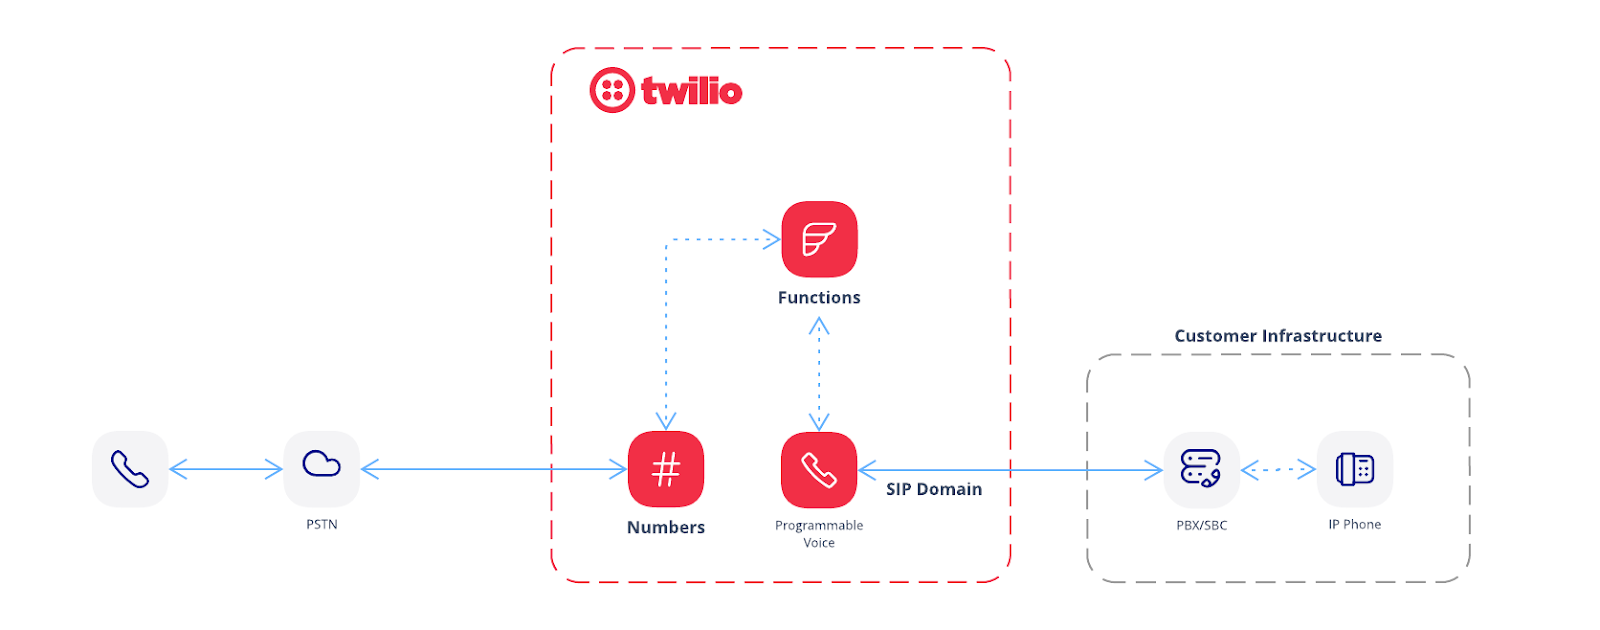
A PSTN call to your Twilio number is used as the “trigger” to invoke the programmable component with call instructions from Twilio Functions in this case. Similarly a PBX call to the Twilio SIP Domain is used as the trigger to invoke the programmable component with call instructions from Twilio Functions. The difference in naming conventions between Elastic SIP Trunks and Programmable voice is shown in the table below for reference.
| Call Direction | Twilio Call Direction | Elastic SIP Trunk | Programmable Voice Trigger |
| PSTN -> PBX | Outbound | Origination | Numbers -> Functions |
| PBX -> PSTN | Inbound | Termination | SIP Domain -> Functions |
Note: The convention used for inbound and outbound call direction in this document is done from a Twilio perspective, not from the Customer PBX perspective:
Preparation
Migrating to Programmable Voice requires some preparation steps, some testing and finally migration of the SIP trunk and Twilio numbers. The process is outlined in the steps below:
Step 1 - Inbound calls from PBX
- Implement /inboundHandler code in Functions
- Create a new SIP Domain
- Configure existing Elastic SIP ACLs
- Configure use of /inboundHandler Function
- Configure new SIP trunk on PBX, pointing to the Twilio SIP Domain
- Make inbound test calls to a PSTN number
Step 2 - Outbound calls to PBX
- Configure new SIP trunk on PBX
- Implement /outboundHandler code in Functions using the SIP Trunk URI
- Configure a Twilio Phone Number to use /outboundHandler
- Make Outbound test calls to the Twilio number
Step 3 - Migrate all Inbound calls to use the new PBX SIP trunk.
Step 4 - Migrate all phone numbers to use Programmable Voice configuration
Optional Configuration Options
- Secure media
- Secure SIP signaling
- Use local SIP edge URIs
Step 1 - Inbound calls from PBX
First step is to implement the new code to handle Inbound calls from PBX to Twilio. A simple and convenient way to add programmability is to use Twilio Functions. Twilio Functions is a serverless environment that empowers developers to quickly create production-grade, event-driven Twilio applications that scale with their businesses. Since you will be using Programmable Voice, Functions is a good choice to host the code needed to control the calls at scale.
Navigate to Twilio Functions in the Console and select Services to create new Functions.
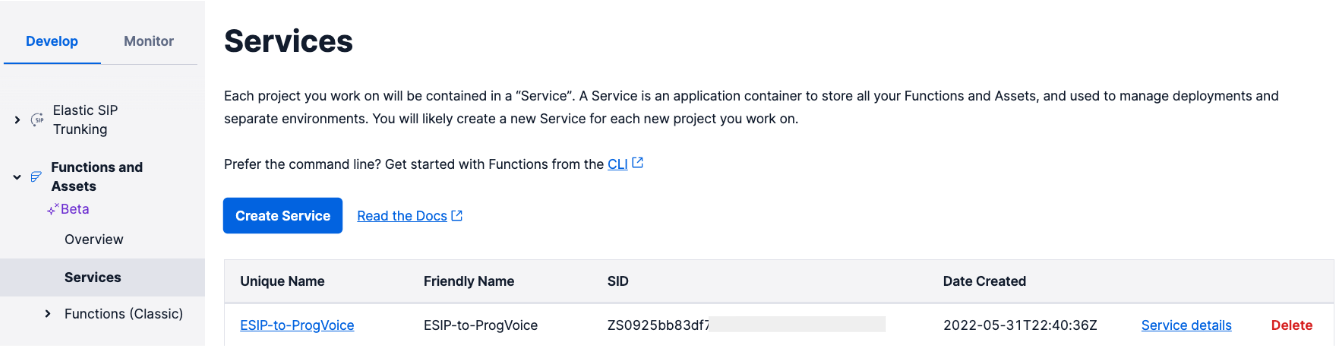
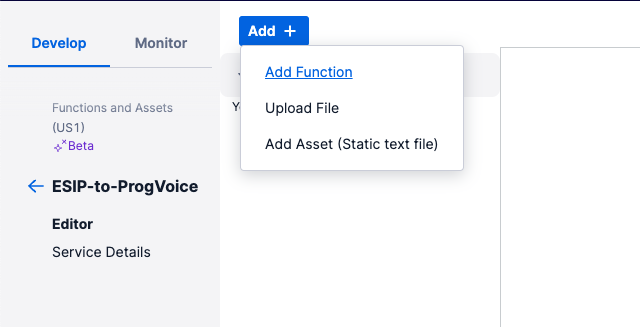
Create a new Service by clicking the “Create service” button. Once created, you can add the function code to control inbound calls. To create a Function, click the “Add” button and then click "Add Function". Click the three-dotted icon next to your Function and then click Rename to change the name/path of your function. Change the path to /inboundHandler path function.
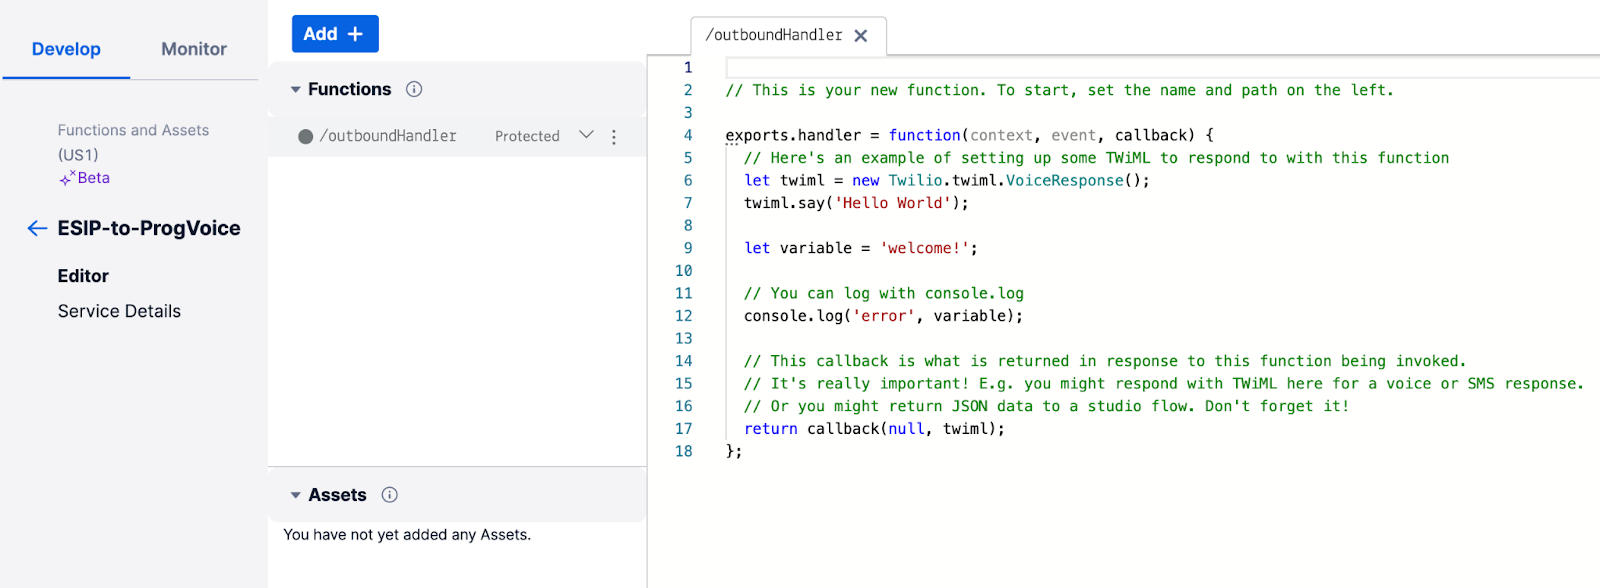
The newly created function is now shown below with some sample code.
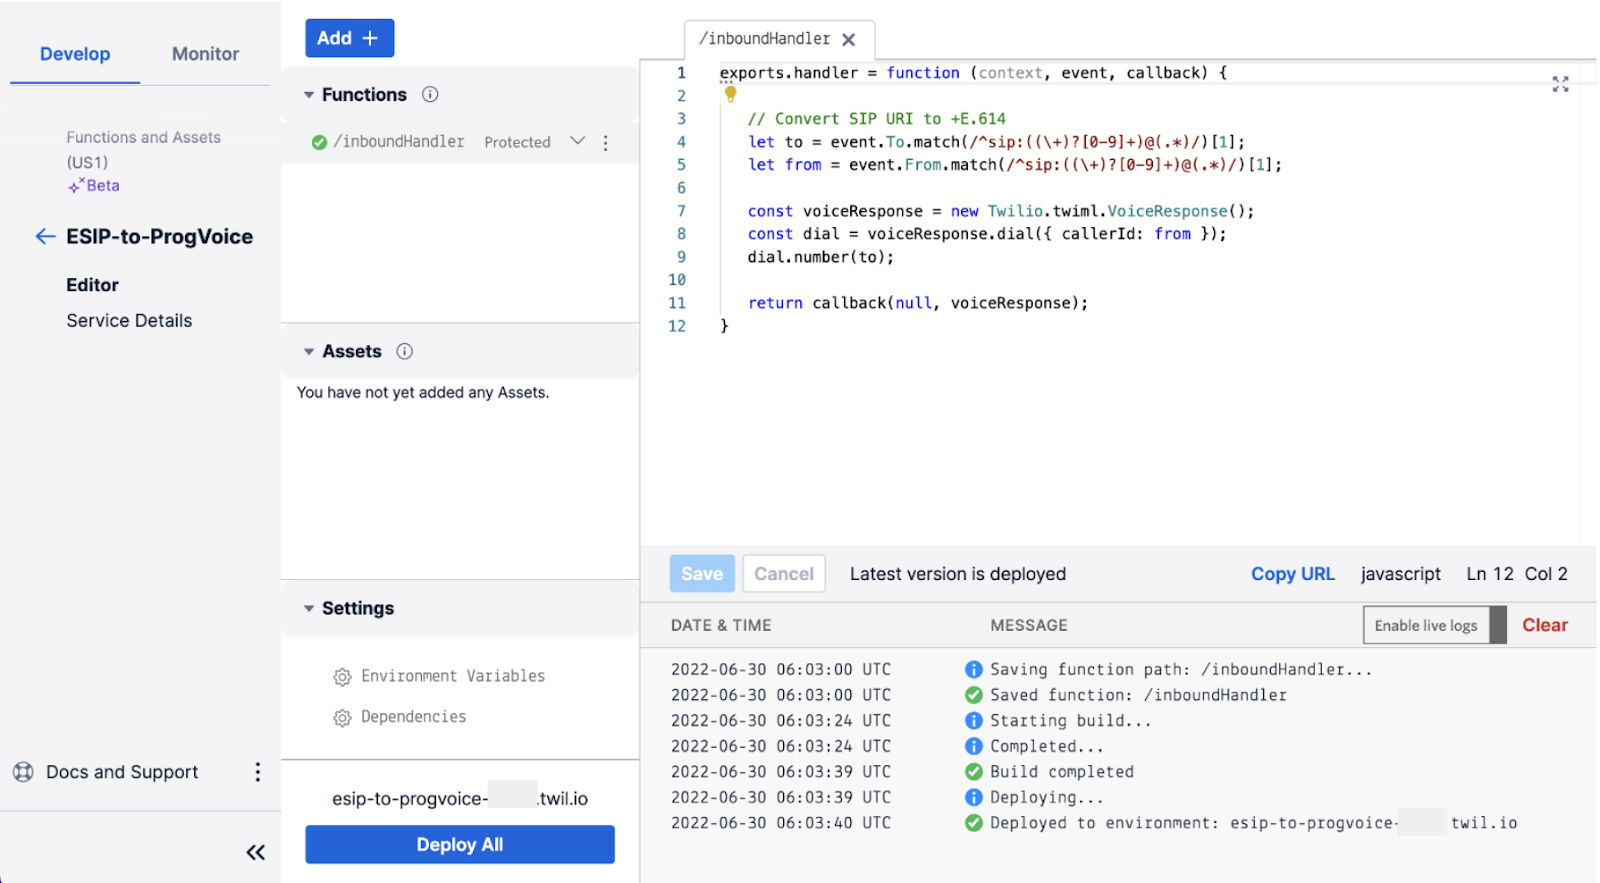
Completely replace the sample code for the /inboundHandler functions with the code below and save your function.
/inboundHandler
The above code creates a new VoiceResponse that extracts the E.164 “To” and “From” number values from the PBX SIP call, stripping the URI domain. The VoiceResponse is what tells Twilio how to handle the call it just received, which in this case is to use the “to” and “from” values to make a PSTN call. More details on “dial” can be found in the Twilio Voice API documentation.
You are now ready to deploy your first Function. Click the Deploy All button and wait for the full deployment as shown below.
Your Twilio Function is now ready to be used.
SIP Domain
Next we need to create a new SIP Domain for the PBX calls to land on and configure the domain to use the new Function code.
Go to Voice > Manage > SIP Domain
- Click “+” to add a new SIP Domain
- Give it a friendly name
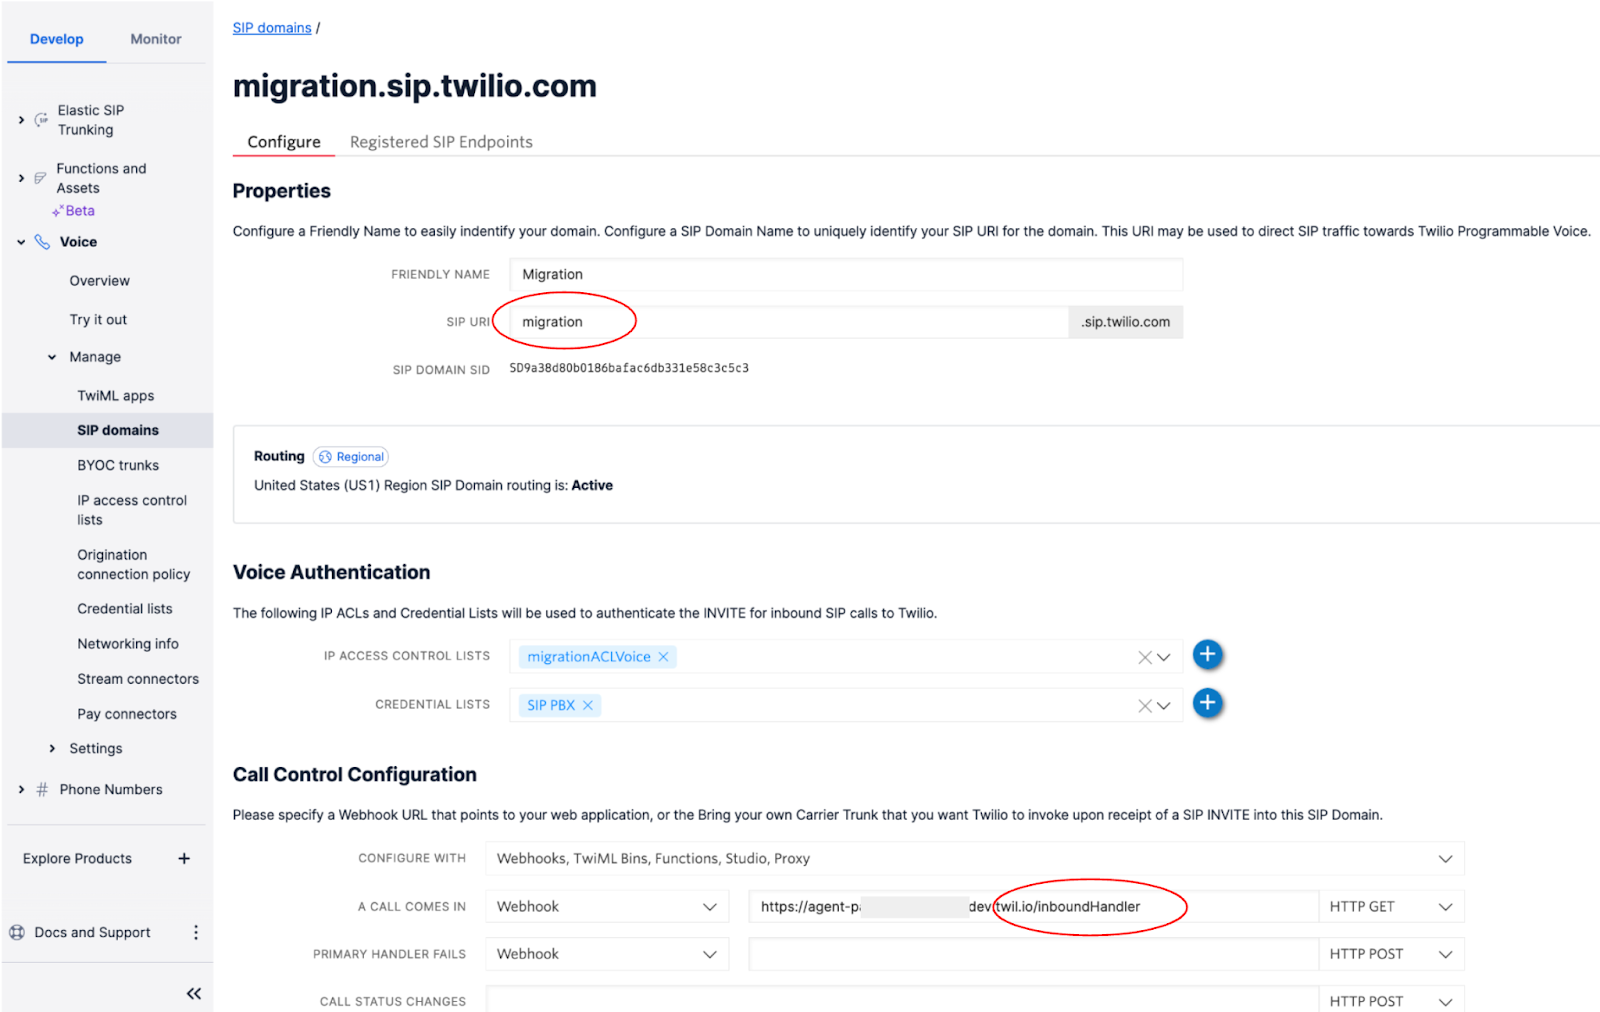
- Enter a new URI for the SIP Domain (migration in this case). We will check if it is unique and available.
- Select the same IP Access Control Lists and Credential Lists values as per Elastic SIP Trunking. These will be reused for the PBX access.
- Set the Call Control Configuration to use the /inboundHandler Function URL (The URL can be copied from Functions). This now instructs Twilio to call the inboundHandler for any calls from the PBX.
Note: The IP Access Control Lists (IP-ACL) and Credential lists are shared between Elastic SIP trunk and Programmable Voice, so they can simply be reused with Programmable Voice without needing to recreate them.
Now test Inbound calls from the PBX to Twilio using the SIP domain to ensure the /inboundHandler establishes a call to the PSTN via the new SIP trunk and Programmable Voice.
Congratulations, you have made your first Programmable Voice call!!
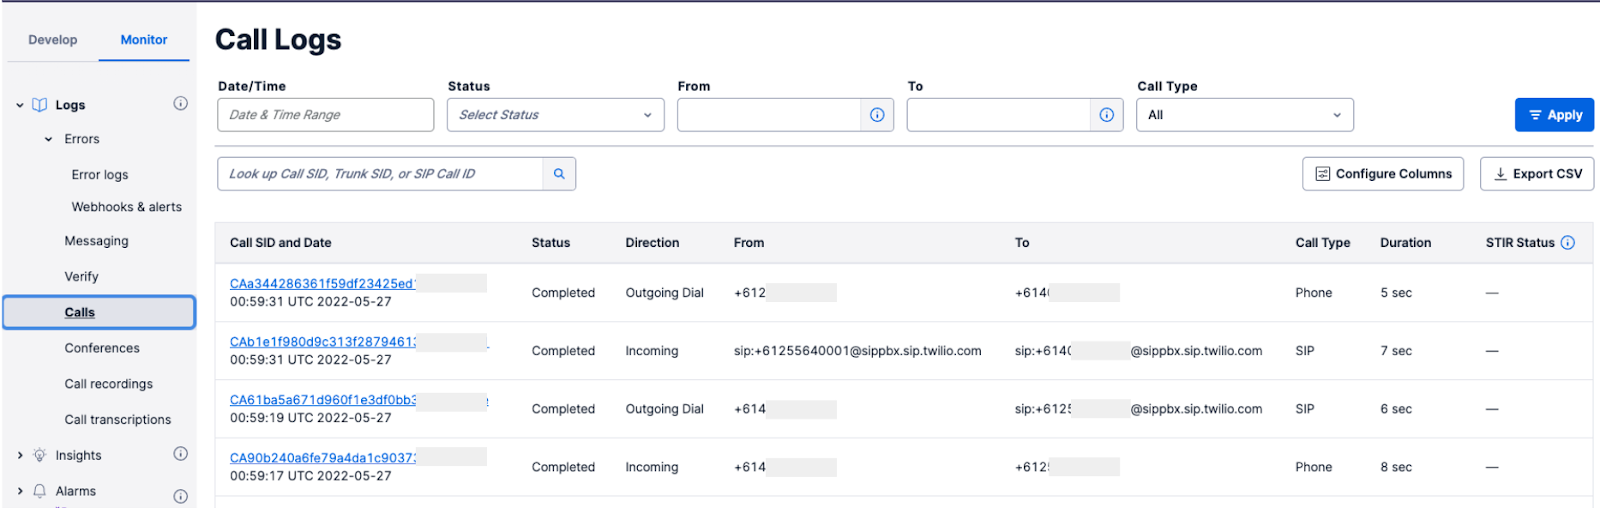
If the call fails you can go over the steps above again and also check the call logs. Simply go to Monitor > Logs > Calls and look for the call just made. Note that there will be two call logs for the call made as shown below:
- PBX to SIP Domain (SIP URI)
- Twilio to PSTN (E.164)
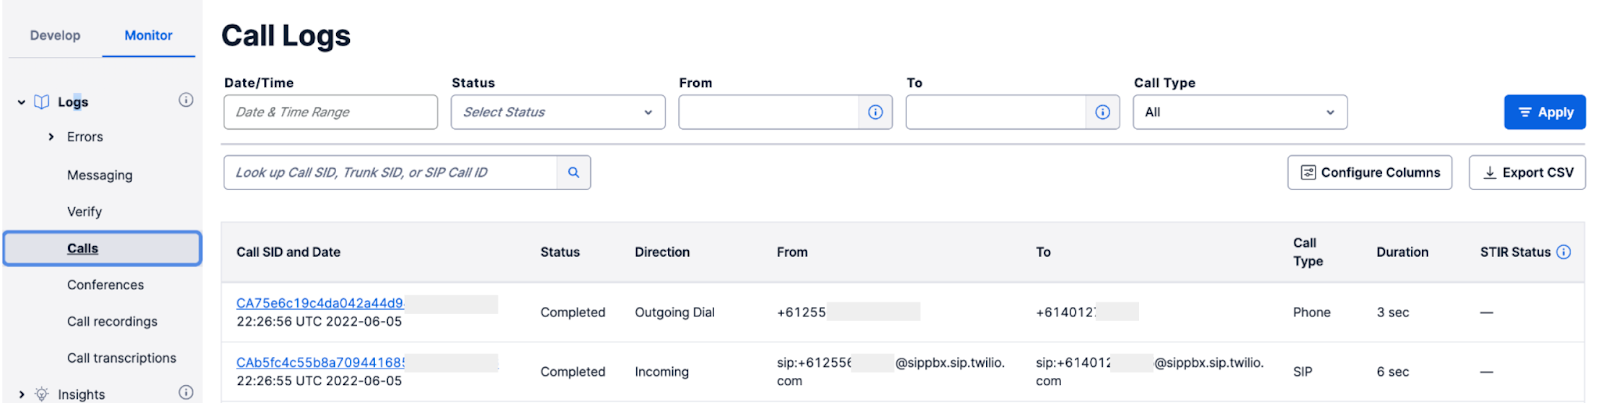
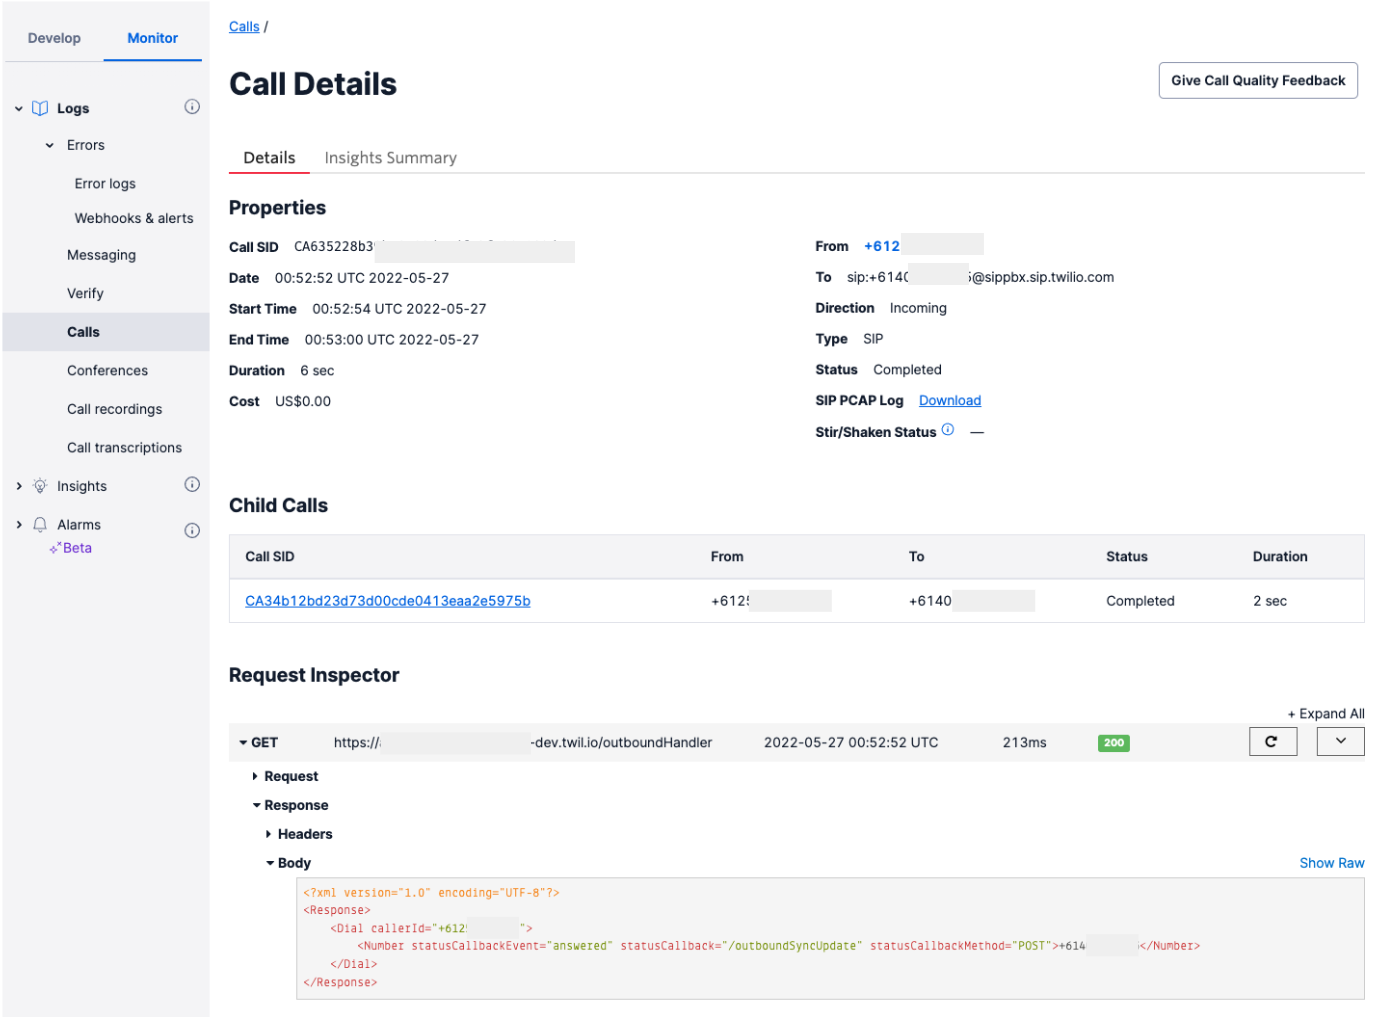
Below is further detail of the call.
Step 2 - Outbound calls to PBX
Next we switch direction and configure Programmable Voice for Outbound calls to the PBX. As with Inbound calls we will use a Twilio Function to control the call when received, but this time it will be on a Twilio number.
Go back to Functions and add a new Function with the path of “/outboundHandler” and replace all the code with the code shown below:
/outboundHandler
Save and Deploy the new function
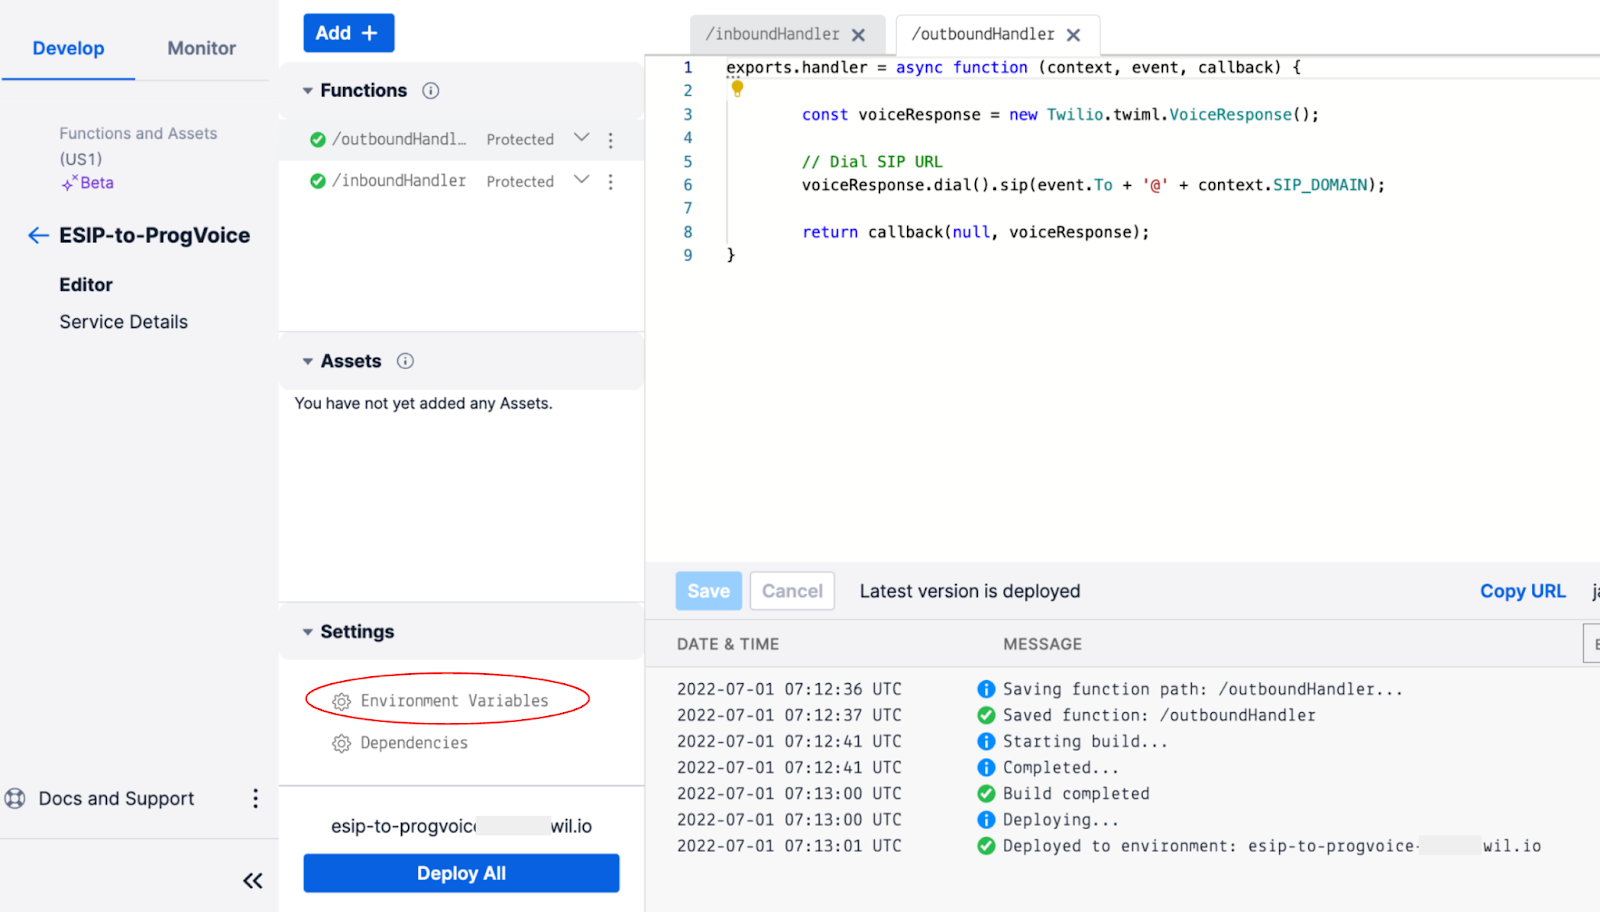
You will notice that the /outboundHandler code utilizes an environment variable called PBX_DOMAIN. Environment variables are set up directly in the Service by clicking the “Environment Variables” link under Settings (shown above). Fill in the variable name as PBX_DOMAIN and value as the URI needed to reach your PBX SIP trunk; pbx.sip.domain.com in this example and click Add. Note that variable names are case-sensitive.
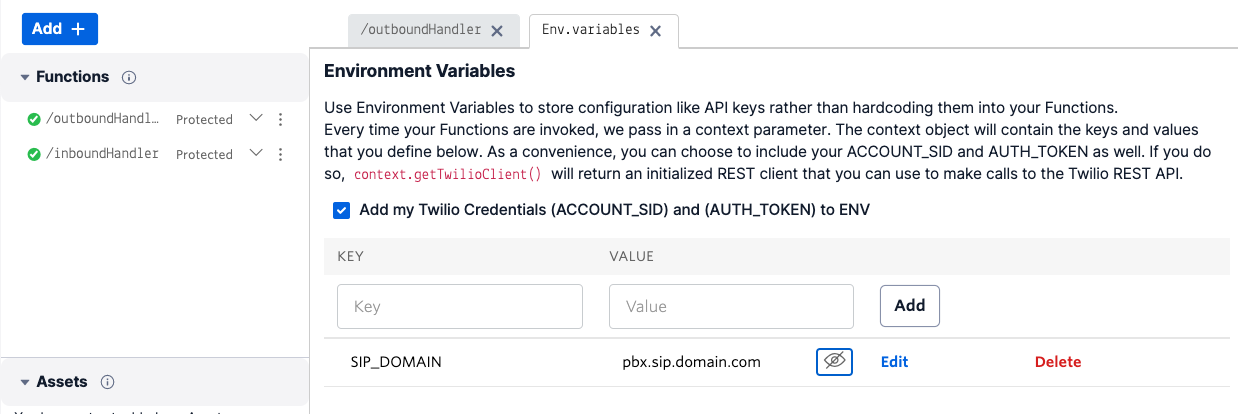
The above code will make an outbound SIP call to the “PBX_DOMAIN” URI, prepending the called number in E.164 format, e.g. “sip:+612xxxxx@pbx.sip.domain.com”.
Configure Twilio Phone Number
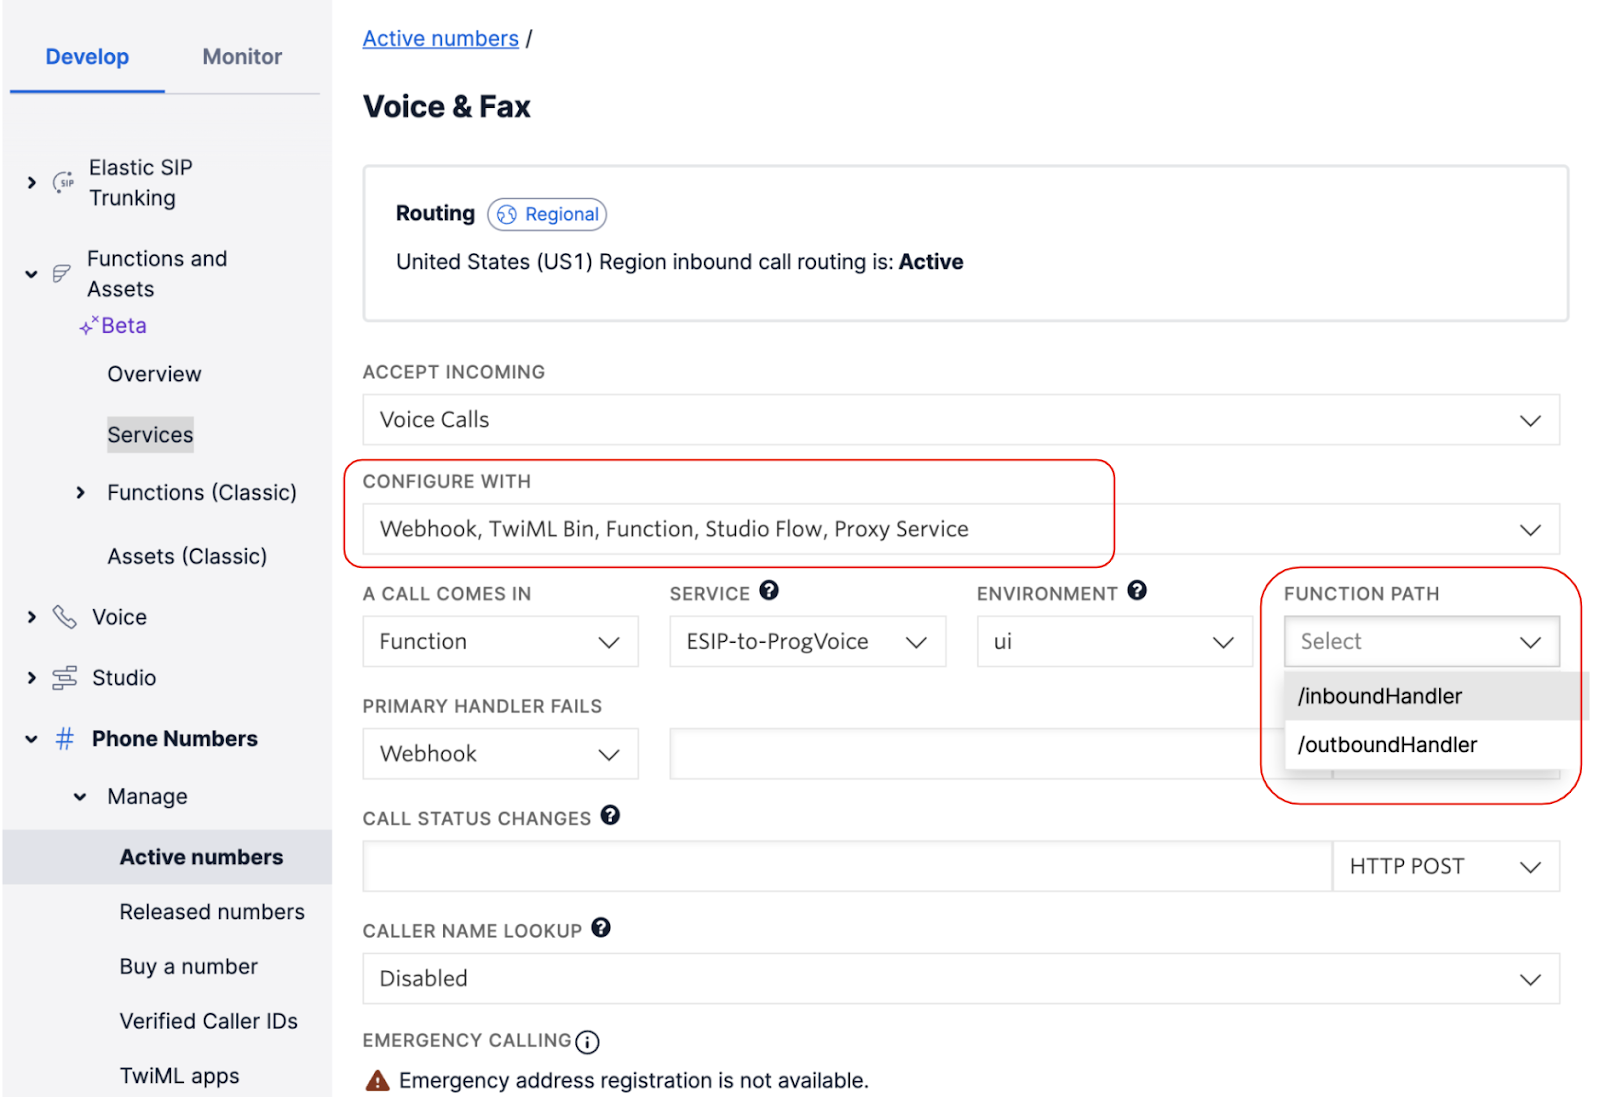
Now that we have the outbound Function component in place, we need to configure a Twilio Number to use the /outboundHandler Function for calls coming in from the Public Switched Telephone Network (PSTN).
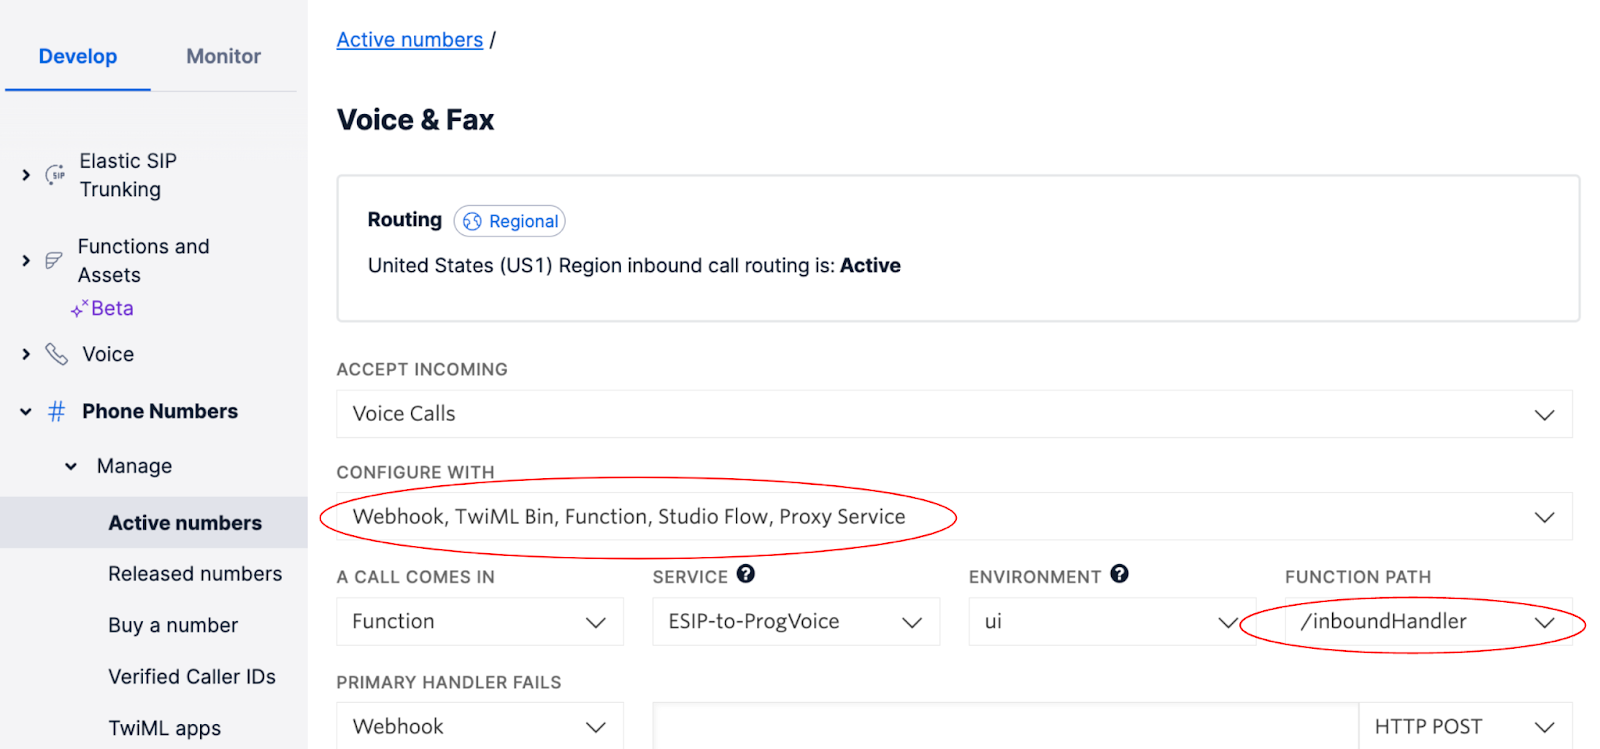
- Go to Phone Numbers -> Manage -> Active Numbers
- Select a new (or unused number)
- Configure the Voice & Fax section to use “Webhook, TwiML Bin, Function, Studio Flow, Proxy Service” under Configure With.
- Now under “A Call Comes In” select Function, which will give you the Service to select from.
- Select the Function service you created earlier
- Finally select the new /outboundHandler Function as shown below.
Save the config and make a call to the Twilio number from the PSTN. This should now establish a call to the new PBX SIP trunk and land the call on the PBX.
Congratulations, you just made your second Programmable Voice call!!
Of course if this does not work, check the Twilio and PBX logs to ensure the SIP signaling is correct, specifically the domain. Each call will have two call legs now as shown below for an Inbound (+612 → +614) and an Outbound call (+614 → +612)
You are now ready to start the migration of inbound and outbound calls and move the production traffic across, but before we do that, there some additional optional configuration options you may want to consider:
Optional Secure SIP
You may want to secure your SIP communications for all calls to your PBX by adding secure signaling and media.
For inbound calls,
Go back to Voice > Manage > SIP Domain and scroll down and enable Secure Media.
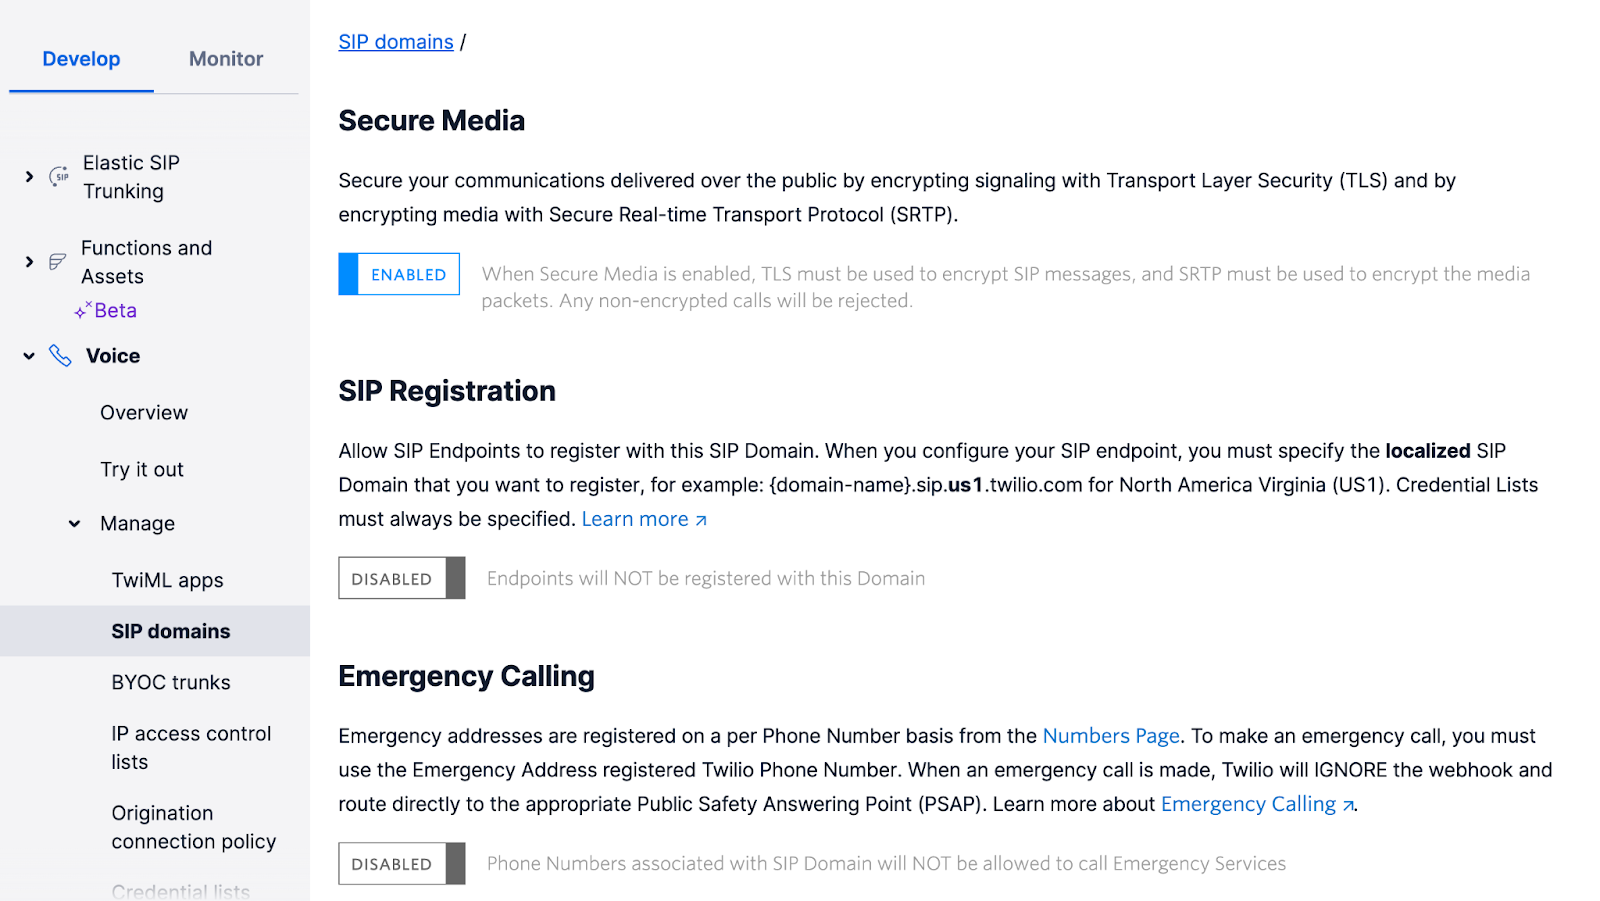
Note: When enabled, TLS must be used to encrypt SIP messages and SRTP must be used for the media packets. Any non-encrypted calls from the PBX to Twilio will be rejected as outlined here.
To enable TLS, ensure that you have imported Twilio's Root CA Certificate. There is no further configuration required for TLS and you can start sending over port 5061 straight away. TLS Functionality/Port 5061 is always active and does not require a manual toggle like Secure Media. To stop using TLS, simply send SIP to Port 5060.
As with the inbound calls, outbound calls can also be secured as outlined here. This is however done directly in the /outboundHandler function code as shown below by adding an additional parameter “secure=true” to the sip method. Note the “;” separator.
Optional Localized SIP URIs
Next we look at using localized “edge” URIs to send SIP calls to. By default calls to the Twilio SIP domains will be directed to the Twilio environment in the US as discussed here. Twilio does offer specific geographic Edge locations that are closer to the location of your communications infrastructure. This ensures you enter the Twilio network at the closest local point to avoid unnecessary global network traversal.
To utilize these new URI’s, for inbound calls simply change the configured SIP Domain URI in your PBX to use the edge location URI when sending calls to Twilio as shown in the example below for a Sydney based service:
Note: if you change the domain in the configuration, remember to change and add the edge location in the PBX configuration.
Outbound calls can also be localized by selecting the edge location from which to send calls to the PBX. This is done using the same parameter approach as with securing the SIP trunk and shown in the code below:
Optional Custom Parameters
In fact the same parameter approach can be used to add any customer parameters to a SIP call. This can be especially useful when wanting to convey information about the call to the PBX via SIP parameters. This does of course require the SIP PBX to support the use of these parameters of course.
A common example is to use the SIP parameter; User-to-User to pass a Call SID to the PBX that can then be used by the PBX extension workbench software to further interact with a Twilio call. An example is shown below:
Step 3 - Migrate all Inbound calls
Once you have done all the configuration above and satisfied with test calls in both directions, it is time to migrate the rest of the infrastructure.
Start with the inbound calls by changing the PBX configuration to use the new SIP trunk that directs calls to the Twilio Programmable Voice SIP trunk.
Place Inbound calls from the PBX and ensure the calls utilize the new Programmable Voice SIP trunk. This can be seen in the call logs as previously discussed with all calls now showing two call legs per call.
Step 4 - Migrate all Outbound calls
Last step is to now migrate all the Twilio Phone Numbers to use Programmable Voice. Each number has to be configured to use the /outboundHandler Function as shown previously.
Remember the change consists of changing “SIP Trunk” to “Webhook, TwiML Bin, Function, Studio Flow, Proxy Service” and configuring the /outboundHandler Function as shown below.
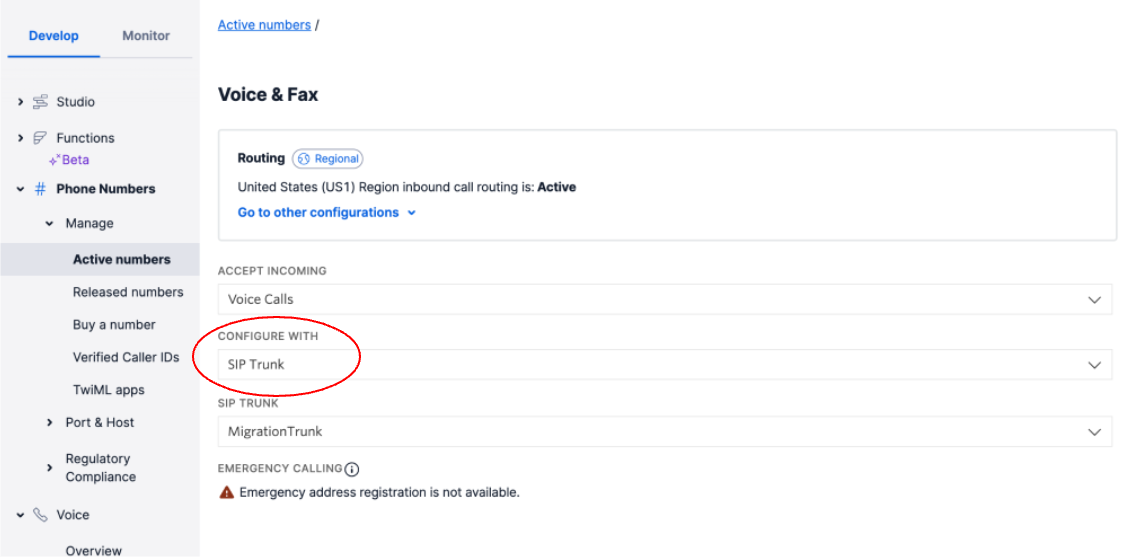
This approach allows you to migrate numbers at a pace that suits and if anything goes wrong, the config can be changed back to SIP Trunk
That’s it! You have moved across from SIP Trunking to Programmable Voice and can now implement a whole lot of extra programmable features on the Twilio platform.
Bulk Migration
The above approach works well if you only have a few numbers to migrate. If you need to migrate numbers in bulk it is better to use the Twilio API to programmatically configure the numbers.
There are a few steps involved in migrating numbers:
- Elastic SIP Trunk API Request to get all Numbers
- Filter numbers list to the numbers to be migrated
- Programmable Voice API call to add the Voice URL (/outboundHandler)
- Elastic SIP Trunk API call to remove the number from the SIP trunk
Adding the voice URL does not impact the current call handling for SIP Trunks so can be done at any time. Only when the number is removed from the SIP Trunk, will the call handling switch to the URL pointing to /outboundHandler.
Below are the API calls used and these can be incorporated into any platform to step through.
Note: The serverless code will need to be executed in batches to avoid Functions timeout of 10 seconds.
This returns an Array of Numbers based on the trunkSid parameter passed into the URL of the Function.
Next step is to add the Voice URL to each number in turn by calling the below Function with the Phone number SID as a parameter phoneSid. A good idea is to have the Voice URL as an environment variable (VOICE_URL) since it is used for each number.
Last step is to remove the number from the SIP Trunk configuration and since we already have a voice URL in place, the number will now default to using the Voice URL and thus programmable voice. The below function takes the phoneSid as a parameter and uses an environment variable for the SIP Trunk SID.
That’s it! All that’s left now is to remove the SIP Trunk if you want if needed.
Conclusion
In this blog post, we have gone through the steps to set up Programmable Voice with a new SIP trunk, added Twilio Functions for call control and migrated numbers to now use Programmable Voice. It showed some key concepts and configuration to build a new Programmable Voice implementation, as well as the steps needed to move the existing Elastic SIP Trunk configuration.
Your next step would be to test this configuration within your environment to ensure you are familiar with the various configuration steps.
Programmable Voice also opens a world of possibilities by providing you full control of the incoming call, before passing it on to a SIP trunk. Additional Twilio products like Studio offers a powerful visual call flow builder and Twilio Sync is a great way to temporarily hold data that can be accessed cross-platform; from API, Web, iOS and Android via Twilio Voice SDKs. In addition you can move into large scale contact centers and AI with Flex and AutoPilot allowing you to build more complex interactions for your voice services.
- IVRs using our visual builder in Studio
- AI Bots using AutoPilot or external AI products like Google DialogFlow CX
- Utilize Sync to hold state between different applications
- Use the Twilio SDKs to build WebRTC based browser and mobile voice clients.
- Implement a full fledged Contact center using Twilio Flex.
We cannot wait to see what you build!
Des is a concept hacker, looking to push tech to align with user expectations. Working as a Twilio Solution Engineer in Sydney, Australia, you can almost always catch him discussing how there should be a simpler way to do something with a cup of coffee for inspiration. Reach him at dhartman [at] twilio.com.


Related Resources
Twilio Docs
From APIs to SDKs to sample apps
API reference documentation, SDKs, helper libraries, quickstarts, and tutorials for your language and platform.
Resource Center
The latest ebooks, industry reports, and webinars
Learn from customer engagement experts to improve your own communication.
Ahoy
Twilio's developer community hub
Best practices, code samples, and inspiration to build communications and digital engagement experiences.