MoEngage Destination
Destination Info
- Accepts Identify and Track calls.
- Refer to it as MoEngage in the Integrations object
MoEngage is an intelligent customer engagement platform. MoEngage allows brands to personalize every customer interaction and drive better engagement, retention, loyalty and lifetime value.
The MoEngage and Segment integration allows you to send the users you have tracked on Segment, along with their route data, to MoEngage for further targeting and campaigning. This destination enables you to:
- Import data from Segment to MoEngage: Moengage offers a side-by-side (device-mode) SDK integration for your Android, iOS, and web applications and a server-to-server integration for your backend services.
- Sync Twilio Engage (cohorts): Send Segment Cohorts to MoEngage for use in MoEngage Segments and campaigns.
The MoEngage Destination source code for the iOS, Android, and Web connection modes is open-sourced and freely available on GitHub for anyone to view:
| Connection Mode | Maintained by | GitHub Link |
|---|---|---|
| iOS | MoEngage | MoEngage-Segment-Swift |
| Android | MoEngage | moengage-segment-integration |
| Web | Segment | analytics.js-integrations |
| Server | MoEngage | Private repository |
Once you add the Segment-MoEngage library to your app, you can enable MoEngage from the Segment App. These new settings can take up to an hour to propagate to your existing users. For new users, the settings are propagated instantly.
The Segment-MoEngage Integration is a bundled integration, meaning it requires that you add a client-side integration to your app.
To setup MoEngage, complete the following:
- First get your key(AppID) from the MoEngage dashboard. Navigate to Dashboard > Settings > App > General.
- In your Segment workspace, go to Destinations and select MoEngage.
- Enable the MoEngage Destination.
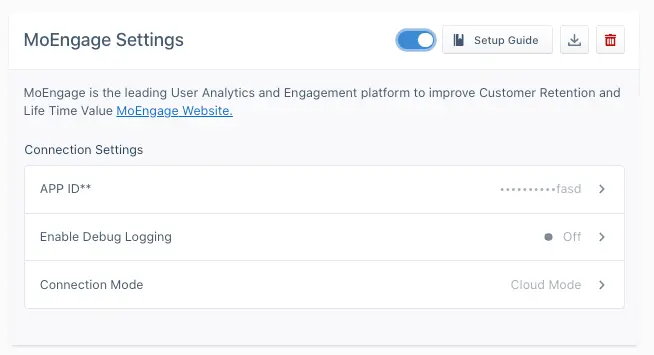
- Go to the MoEngage Settings and enter the MoEngage AppID, obtained in Step 1.
- Save the changes.
- Make sure you set the Connection Mode to
Device Mode. MoEngage requires this setting to use features like push notifications and any in-app features of the MoEngage SDK.
Use Identify to track user-specific attributes. This is the same as tracking user attributes on MoEngage. MoEngage supports traits supported by Segment as well as custom traits. If you set traits.id, MoEngage sets that as the Unique ID for that user.
Info
MoEngage supports anonymous identifiers in device-mode only. If you use the MoEngage destination in cloud-mode, use a known user identifier.
The Identify method follows the format below:
1analytics.identify('12090000-00001992', {2name: 'John Doe',3email: 'john.doe@example.com'4});
Use Track to track events and user behavior in your app.
1analytics.track('Article Completed', {2title: 'How to Create a Tracking Plan',3course: 'Intro to Analytics',4});
This sends the event to MoEngage with the associated properties. Tracking events is essential and helps you create segments for engaging users.
If your app or website supports the ability for a user to logout and login with a new identity, then you need to call the Reset method in analytics.js.
analytics.reset();
To get started with MoEngage on iOS, first integrate your app with the MoEngage-Segment-Swift library. You can integrate MoEngage and Segment with Swift Package Manager.
Info
This document covers the integration with analytics-swift. If you've integrated with analytics-ios refer MoEngage's documentation for details on how to integrate.
To install with SPM use the MoEngage-Segment-Swift library and set the branch as master or version as 1.0.0 and above.
Head to the App Delegate file, and setup the Segment SDK by:
- Importing
Segment,Segment_MoEngageandMoEngageSDK. - Initialize
MoEngageSDKConfigobject and callinitializeDefaultInstancemethod ofMoEngageInitializer. - Initialize
MoEngageDestination:
Under your Analytics-Swift library setup, add the MoEngage plugin using the analytics.add(plugin: ...) method. The MoEngage dashboard then tracks all of your events.
1let analytics = Analytics(configuration: Configuration(writeKey: "<YOUR WRITE KEY>")2.flushAt(3)3.trackApplicationLifecycleEvents(true))4analytics.add(plugin: MoEngageDestination())
1import Segment_MoEngage2import MoEngageSDK3...4func application(_ application: UIApplication, didFinishLaunchingWithOptions launchOptions: [UIApplicationLaunchOptionsKey: Any]?) -> Bool {5...67let sdkConfig = MoEngageSDKConfig(withAppID: "YOUR APP ID")8MoEngageInitializer.shared.initializeDefaultInstance(sdkConfig: sdkConfig)9...10}
User attributes are specific traits of a user, like email, username, mobile, gender, and more. Identify lets you tie a user to their actions and record traits about them. It includes a unique User ID and any optional traits you know about them.
Analytics.main.identify("a user's id", traits: @["email":"a user's email address"])
Read more about Identify calls for further detail.
Segment uses event tracking to track user behavior in an app. Track calls let you record the actions your users perform. Every action triggers an "event", which can also have associated attributes.
Analytics.main.track("Item Purchased", properties: @["item":"Sword of Heracles"])
Read more about Track calls for further detail.
The Reset method clears the SDK's internal stores for the current user. This is useful for apps where users can log in and out with different identities over time.
Analytics.main.reset()
Read more about the Reset method for further detail.
Since your app might already be on the App Store, you must specify whether your app update would be an UPDATE or an INSTALL.
To differentiate between those, use one of the following methods:
1//For new Install call following2MoEngageSDKAnalytics.sharedInstance.appStatus(.install)34//For an app update call following5MoEngageSDKAnalytics.sharedInstance.appStatus(.update)
Read more on Install/Update differentiation on MoEngage website.
By default, the data center setting in the SDK is set to data_center_01. Follow the steps in the MoEngage - Data Center to update the data center value. If not set correctly, several features of the MoEngage SDK won't function.
Along with tracking your user's activities, you can use the MoEngage iOS SDK for more effective user engagement:
Push notifications are a useful way to keep your users engaged and informed about your app. You have following options while implementing push notifications in your app:
Segment push implementation:
- In your application's application:didRegisterForRemoteNotificationsWithDeviceToken: method, add the following:
Analytics.main.registeredForRemoteNotifications(deviceToken: deviceToken)
- In your application's application:didReceiveRemoteNotification: method, add the following:
Analytics.main.receivedRemoteNotification(userInfo: userInfo)
- If you integrated the application:didReceiveRemoteNotification:fetchCompletionHandler: in your app, add the following to that method:
Analytics.main.receivedRemoteNotification(userInfo: userInfo)
- If you implemented handleActionWithIdentifier:forRemoteNotification:, add the following to that method:
Analytics.main.handleAction(identifier: identifier, userInfo: userInfo)
MoEngage push implementation: For information about the MoEngage push implementation, see Push Notifications in the MoEngage documentation.
In-app messages are custom views which you can send to a set of users to show custom messages, give new offers, or direct to a specific page. For more information about in-app messaging, see MoEngage - In-App NATIV.
Create targeted or automated App Inbox/NewsFeed messages that can be grouped into various categories, and target your users with different updates or offers that can stay in the Inbox/Feed over a designated period of time. For more information about cards, see MoEngage - Cards.
To make the app compliant with policies (such as GDPR) while using MoEngage's SDK, follow the instructions in MoEngage's documentation.
For more info on using Segment for iOS, refer to the Developer docs provided by Segment.
To use MoEngage in an Android app, you must perform the following steps to set up your environment.
To enable the full functionality of MoEngage (like push notifications, in-app messaging), complete the following steps in your Android app.
Info
This document covers the integration with analytics-kotlin. If you have integrated with analytics-android refer MoEngage's documentation for details on how to integrate.
Along with the Segment dependency, add the following dependency in your build.gradle file.
1implementation("com.moengage:moengage-segment-kotlin-destination:$sdkVersion") {2transitive = true3}
with $sdkVersion replaced by the latest version of the MoEngage SDK.
The MoEngage SDK depends on the following Jetpack libraries provided by Google for its functioning, make sure you add them if not done already.
1implementation("androidx.core:core:1.6.0")2implementation("androidx.appcompat:appcompat:1.3.1")3implementation("androidx.lifecycle:lifecycle-process:2.4.0")
Refer to the SDK Configuration documentation to learn more about the build config and other libraries used by the SDK.
After adding the dependency, you must register the integration with Segment SDK. To do this, import the MoEngage integration:
import com.segment.analytics.kotlin.destinations.moengage.MoEngageDestination
Add the following line:
1Analytics("<YOUR WRITE KEY>", context)2.add(MoEngageDestination(application))
Copy the APP ID from the Settings page Dashboard > Settings > App > General and initialize the MoEngage SDK in the onCreate method of the Application class
Info
MoEngage recommends that you initialize the SDK on the main thread inside onCreate() and not create a worker thread and initialize the SDK on that thread.
1// This is the instance of the application class and "YOUR_APP_ID" is the APP ID from the dashboard.2val moEngage = MoEngage.Builder(this, "YOUR_APP_ID")3.enablePartnerIntegration(IntegrationPartner.SEGMENT)4.build()5MoEngage.initialiseDefaultInstance(moEngage)
The auto-backup service of Android periodically backs up the Shared Preference file, Database files, and so on.
For more information, refer to the Auto-Backup documentation.
As a result of the backup, MoEngage SDK identifiers are backed up and restored after re-install. The restoration of the identifier results in your data being corrupted and the user not being reachable using push notifications.
To ensure data isn't corrupted after a backup is restored, opt-out of MoEngage SDK storage files.
Refer to the MoEngage documentation for further details.
This is required for migrations to the MoEngage Platform so the SDK can determine whether the user is a new user on your app, or an existing user who updated to the latest version.
If the user was already using your application and has just updated to a new version which has the MoEngage SDK. An example call:
MoEAnalyticsHelper.setAppStatus(context, AppStatus.UPDATE)
If this is a fresh install:
MoEAnalyticsHelper.setAppStatus(context, AppStatus.INSTALL)
Copy the Server Key from the FCM console and add it to the MoEngage Dashboard. To upload it, go to the Settings page, Dashboard > Settings > Channel > Push > Mobile Push > Android and add the Server Key and package name. Ensure that you add the keys both in Test and Live environment.
To display push notifications, some metadata regarding the notification is required. For example, the small icon and large icon drawables are mandatory.
Refer to the MoEngage - NotificationConfig API reference for all the possible options.
Use the configureNotificationMetaData() to pass on the configuration to the SDK.
1val moEngage = MoEngage.Builder(this, "YOUR_APP_ID")2.enablePartnerIntegration(IntegrationPartner.SEGMENT)3.configureNotificationMetaData(NotificationConfig(4smallIcon = R.drawable.small_icon,5largeIcon = R.drawable.large_icon6))7.build()8MoEngage.initialiseDefaultInstance(moEngage)
To show push notifications there are two important steps:
- Registration for Push, for example generating push token.
- Receiving the Push payload from Firebase Cloud Messaging(FCM) service and showing the notification on the device.
To opt-out of MoEngage token registration mechanism disable token registration while configuring FCM in the MoEngage.Builder:
1val moEngage = MoEngage.Builder(this, "YOUR_APP_ID")2.enablePartnerIntegration(IntegrationPartner.SEGMENT)3.configureNotificationMetaData(NotificationConfig(4smallIcon = R.drawable.small_icon,5largeIcon = R.drawable.large_icon6))7.configureFcm(FcmConfig(false))8.build()9MoEngage.initialiseDefaultInstance(moEngage)
The application must pass the Push Token received from FCM to the MoEngage SDK for the MoEngage platform to send out push notifications to the device. Use the following API to pass the push token to the MoEngage SDK.
MoEFireBaseHelper.getInstance().passPushToken(applicationContext,token)
Ensure that the token is passed to MoEngage SDK whenever push token is refreshed and on application update. Passing token on application update is important for migration to the MoEngage Platform.
To pass the push payload to the MoEngage SDK call the MoEngage API from the onMessageReceived() from the Firebase receiver. Before passing the payload to the MoEngage SDK, check if the payload is from the MoEngage platform using the helper API provided by the SDK.
1if (MoEPushHelper.getInstance().isFromMoEngagePlatform(remoteMessage.data)) {2MoEFireBaseHelper.getInstance().passPushPayload(applicationContext, remoteMessage.data)3} else {4// your app's business logic to show notification5}
Add the following code in your manifest file:
1<service android:name="com.moengage.firebase.MoEFireBaseMessagingService">2<intent-filter>3<action android:name="com.google.firebase.MESSAGING_EVENT" />4</intent-filter>5</service>
When the MoEngage SDK handles push registration, it optionally provides a callback to the Application whenever a new token is registered or the token is refreshed.
An application can get this callback by implementing FirebaseEventListener and registering for a callback in the Application class onCreate() using MoEFireBaseHelper.getInstance().addEventListener().
Refer to the MoEngage - API reference for more details on the listener.
Segment recommends that you add the callbacks in the onCreate() of the application class since these callbacks can be triggered even when the application is in the background.
When MoEngage SDK handles push registration, it optionally provides a callback to the application whenever a new token is registered or the token is refreshed. To get the token callback implement the TokenAvailableListener and register for the callback using MoEFireBaseHelper.getInstance().addTokenListener().
If you're using the receiver provided by the SDK in your application's manifest file, SDK provides a callback in case a push payload is received for any other server apart from MoEngage Platform. To get a callback implement the NonMoEngagePushListener and register for the callback using MoEFireBaseHelper.getInstance().addNonMoEngagePushListener().
A rich landing page can be used to open a web URL inside the app through a push campaign.
The following configuration is only required if you want to add a parent activity to the Rich landing page. If not, you can move to the next section. To use a rich landing page you need to add the below code in the AndroidManifest.xml
Add the following snippet and replace [PARENT_ACTIVITY_NAME] with the name of the parent
activity; [ACTIVITY_NAME] with the activity name which should be the parent of the Rich Landing Page
1<activity2android:name="com.moe.pushlibrary.activities.MoEActivity"3android:label="[ACTIVITY_NAME]"4android:parentActivityName="[PARENT_ACTIVITY_NAME]" >5</activity>
You are now all set up to receive push notifications from MoEngage. For more information on features provided in MoEngage Android SDK refer to the following links:
Use Identify to track user-specific attributes. This is the same as tracking user attributes on MoEngage. MoEngage supports traits supported by Segment as well as custom traits. If you set traits.id, MoEngage sets that as the Unique ID for that user.
Info
MoEngage supports anonymous identifiers in Device-mode only. If you use the MoEngage destination in Cloud-mode, use a known user identifier.
Use Track to track events and user behavior in your app. This sends the event to MoEngage with the associated properties. Tracking events is essential and helps you create segments for engaging users.
If your app supports the ability for a user to logout and login with a new identity, then you need to call reset for the Analytics client.
Refer to MoEngage's GitHub repository for sample implementation.
The MoEngage WebSDK offers the ability to send push notifications to Google Chrome, Opera and Firefox browsers. Complete the following steps after you've configured Segment's analytics.js.
Configure the web settings on the MoEngage dashboard to start using MoEngage <> Segment integration.
If you have selected HTTPS mode of integration in the settings, complete the following steps:
For HTTPS Web Push to work, you need to host two files in the root directory of your web server. These two files are available for you to download at the web settings page.
manifest.jsonserviceworker.js
Serviceworker file naming convention
The name of the serviceworker file must be serviceworker.js. Please contact MoEngage support if you want to give your serviceworker file a different name.
Add the following line in the <head> tag of your page.
1<head>2...3<link rel="manifest" href="/manifest.json">4...5</head>
If you already have these files,
- Manifest - Add the sender ID you saved on MoEngage dashboard as the
gcm_sender_id. If you've usedMoEngage Shared Projectwhile setting up, your sender ID is540868316921. Edit yourmanifest.jsonas follows:
1{2...3"gcm_sender_id": "GCM_SENDER_ID",4...5}
- Service Worker - Add the following line to the top of your
serviceworker.jsfile.
1importScripts("//cdn.moengage.com/webpush/releases/serviceworker_cdn.min.latest.js?date="+2new Date().getUTCFullYear()+""+new Date().getUTCMonth()+""+new Date().getUTCDate());
Use Identify to track user specific attributes. This is equal to tracking user attributes on MoEngage. MoEngage supports traits supported by Segment as well as custom traits.
Info
MoEngage supports anonymous identifiers in device-mode only. If you use the MoEngage destination in cloud-mode, use a known user identifier.
Use Track to track events and user behavior in your app. This sends the event to MoEngage with the associated properties. Tracking events is essential and helps you create segments for engaging users.
If your website supports the ability for a user to logout and login with a new identity, then you need to call reset method in analytics.js.
While updating the MoEngage settings on the Segment Dashboard, you can enable the logging functionality of the MoEngage SDK to see the SDK logs on the browser console. Just set Enable Debug Logging to On and the SDK loads in debug mode.
Success!
When you enable debug mode, Segment sends the events and user attributes to the TEST environment of your MoEngage App.
For information about optional features, see the documentation below:
On-site messaging campaigns allow you to show personalized pop-ups and non-intrusive banners on your website.
Web SDK integration for On-site Messaging automatically starts working on all the pages where the web SDK is integrated.
For more information, refer to Configure and Integrate On-site Messaging.
Web personalization is used to personalize the website experience for each user. A few popular use cases for web personalization include the home page banner personalization basis user behavior, localizing the website content basis user geography, testing the performance of new page layouts for improved performance, modifying the content shown on any webpage as per the user behavior.
For more information, refer to MoEngage's documentation on how to configure and integrate web personalization.
You can send Computed traits and Audiences to MoEngage as custom attributes or custom events.
- Traits and audiences sent using the Identify call appear in MoEngage as Tracked Custom Attributes with value as True.
- Traits and audiences sent using the Track call appear in MoEngage as Tracked User Events.
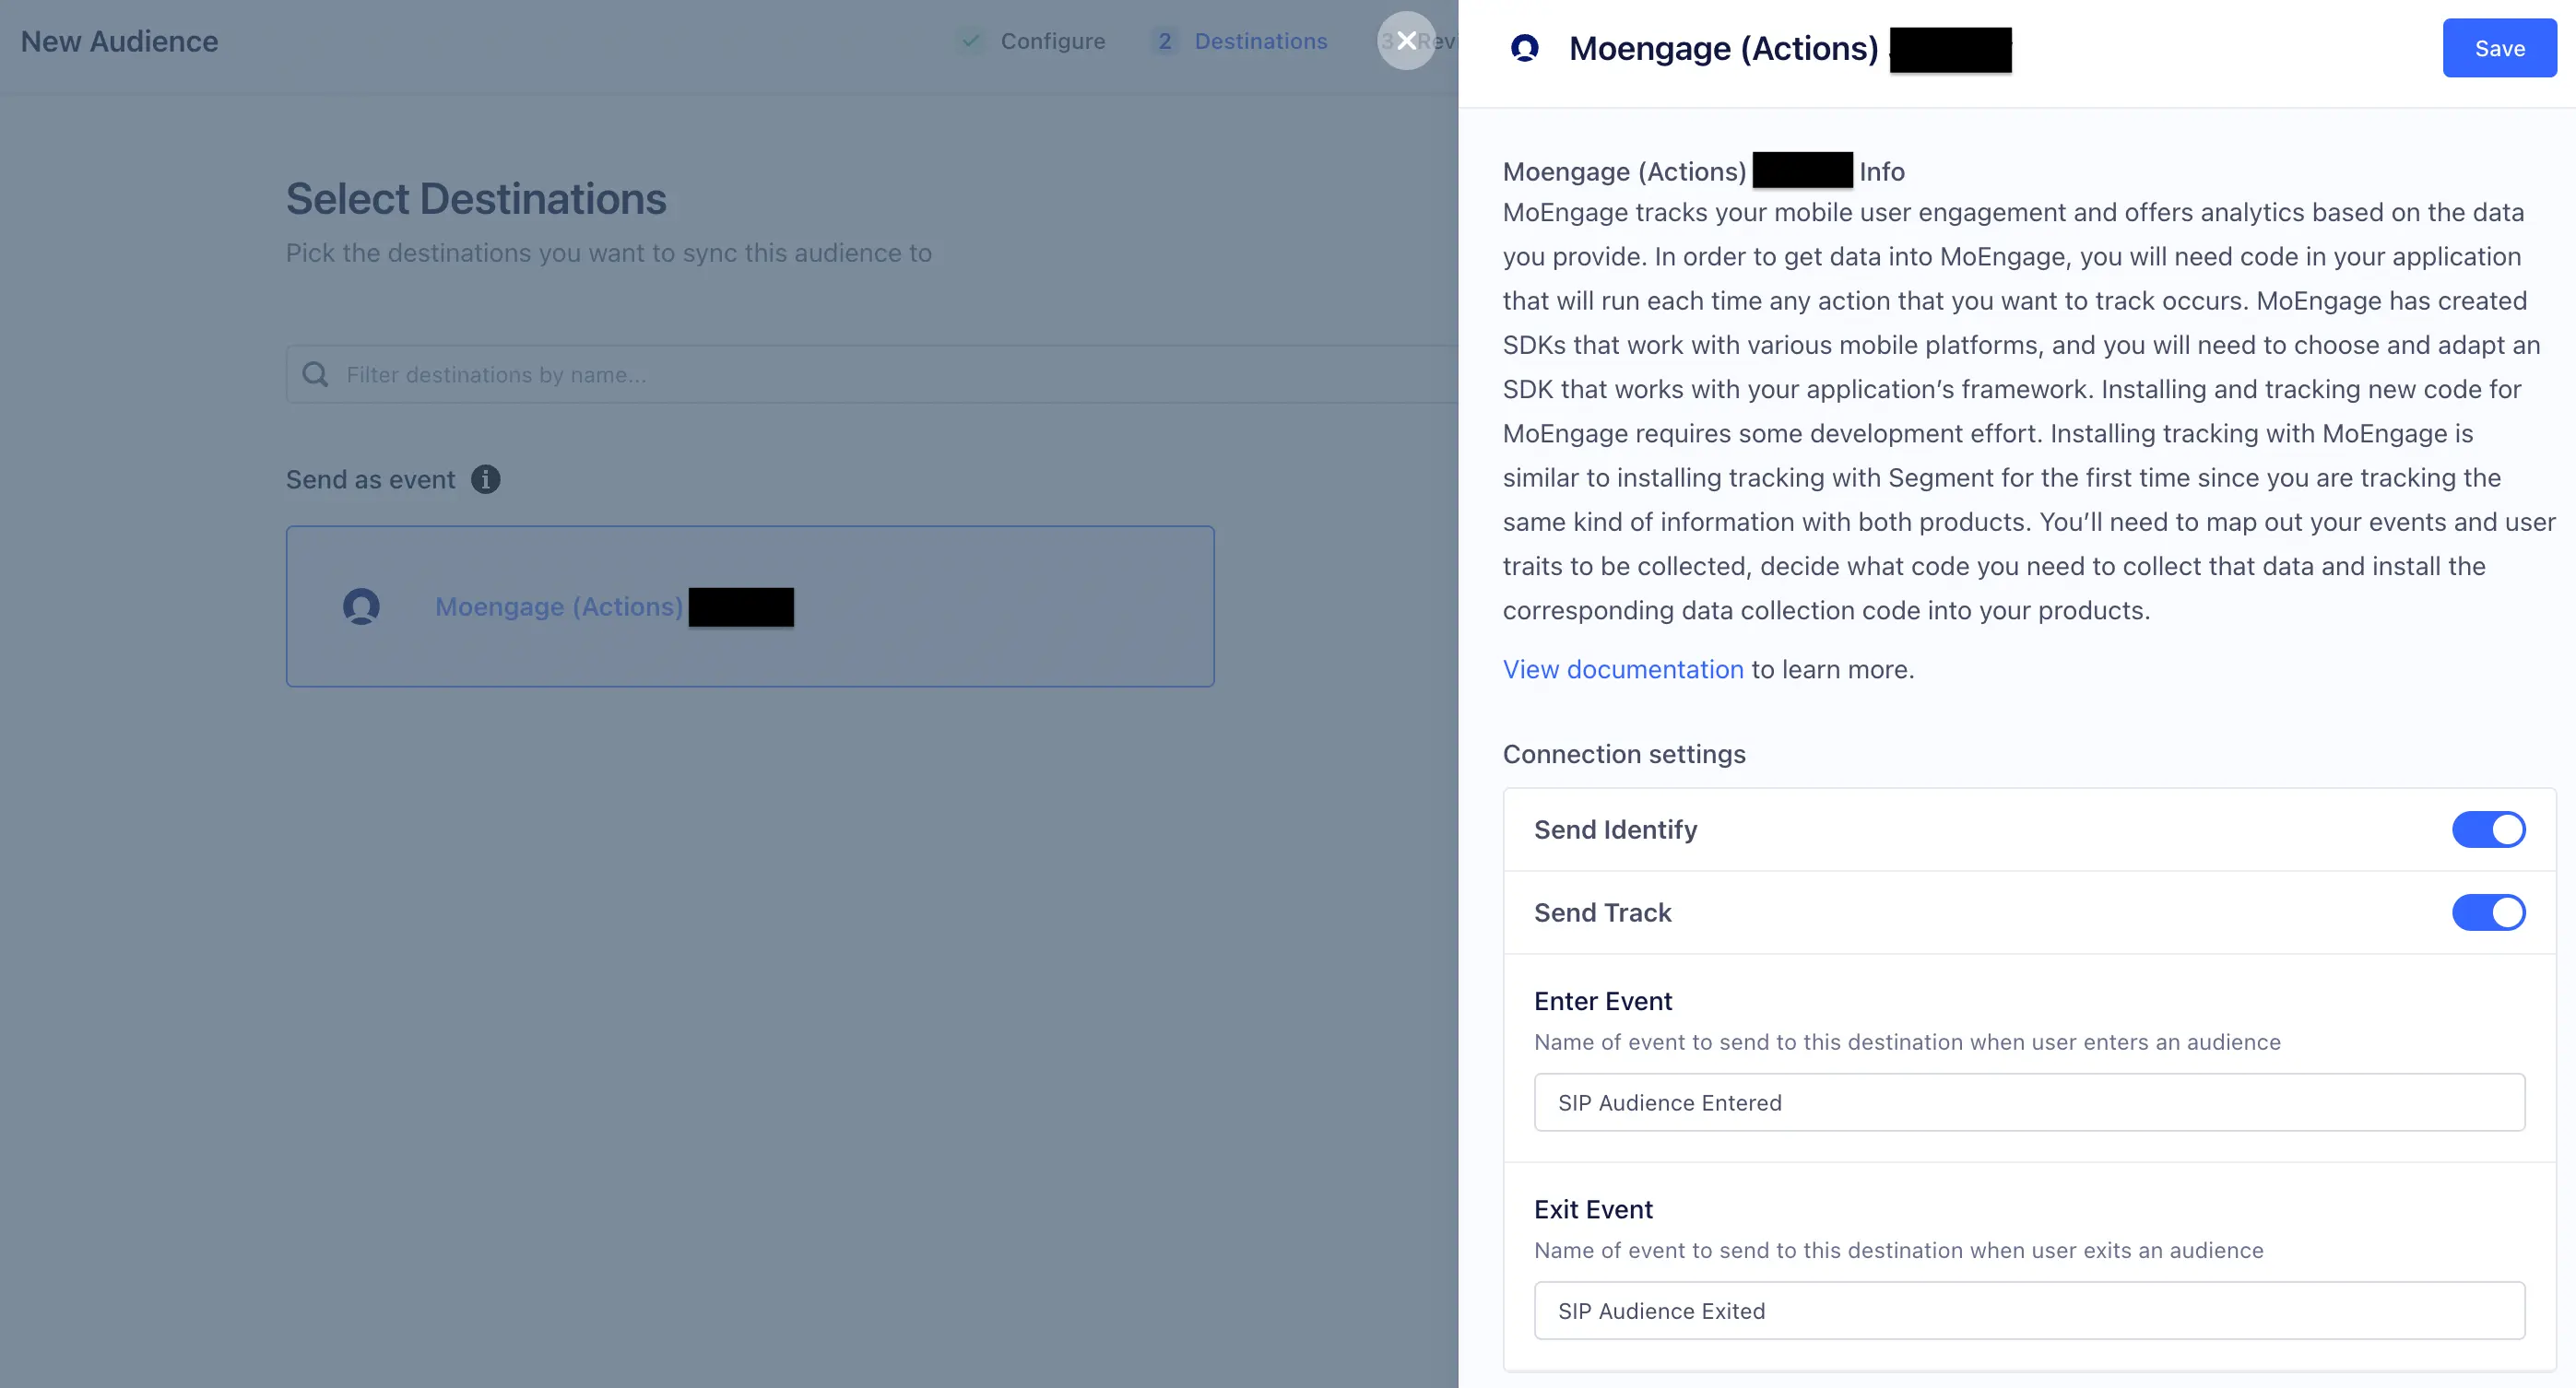
When connecting the calculated trait or audience to the MoEngage destination, you can select the method of your choice (or opt to use both).
The default integration for MoEngage <> Twilio Engage connection is Real Time. But there are some filters that disqualify the persona from syncing in real-time, including some time-based filters which restrict your audience's size at the time of message send.
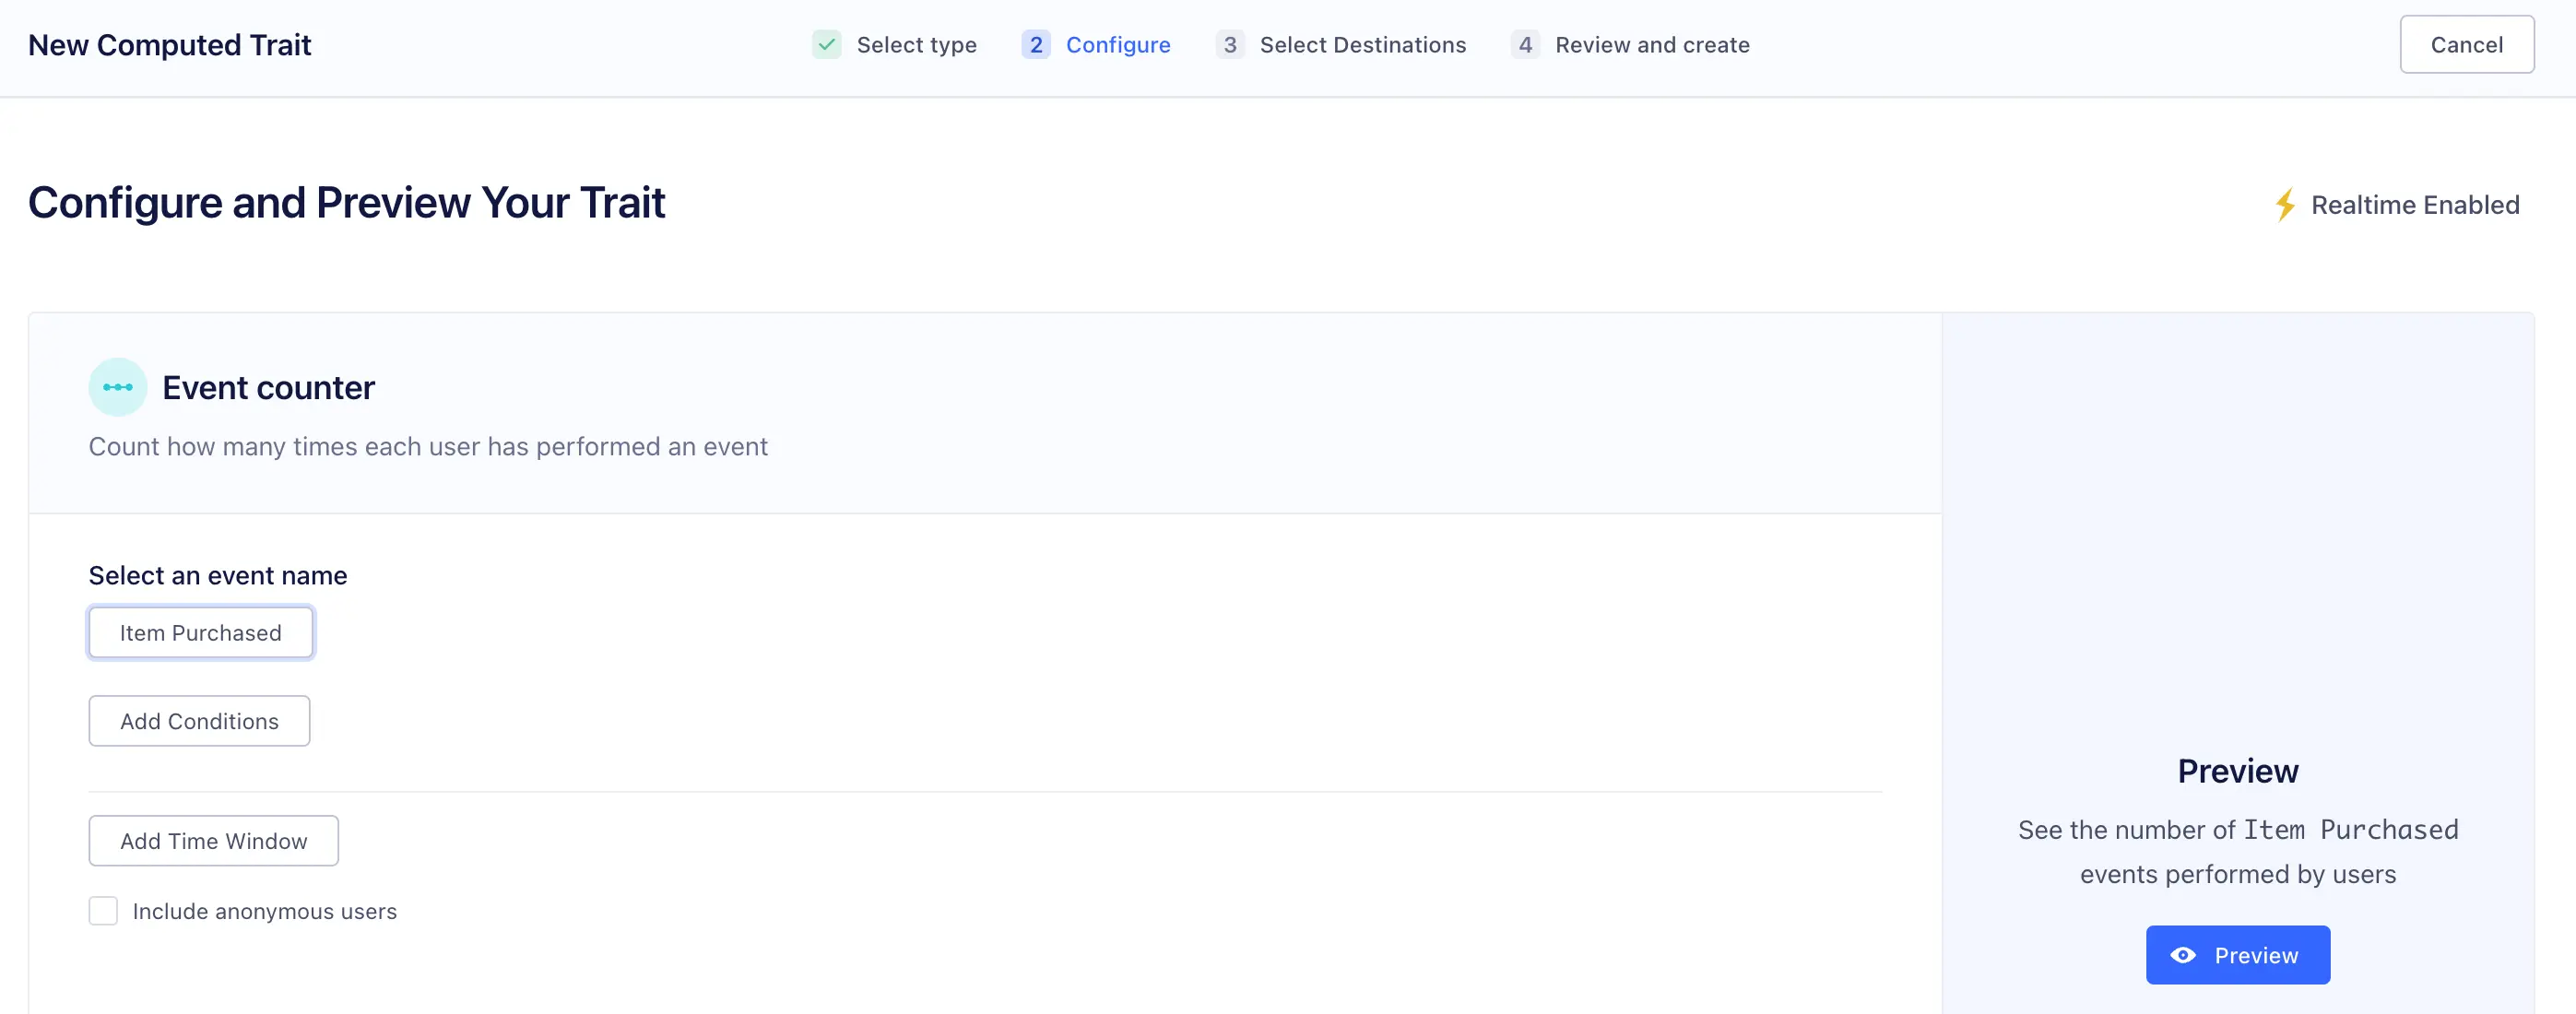
To generate custom attributes in MoEngage, you may provide Computed Traits defined in Engage as Identify calls. The computed trait's value is used to set the custom attribute.
-
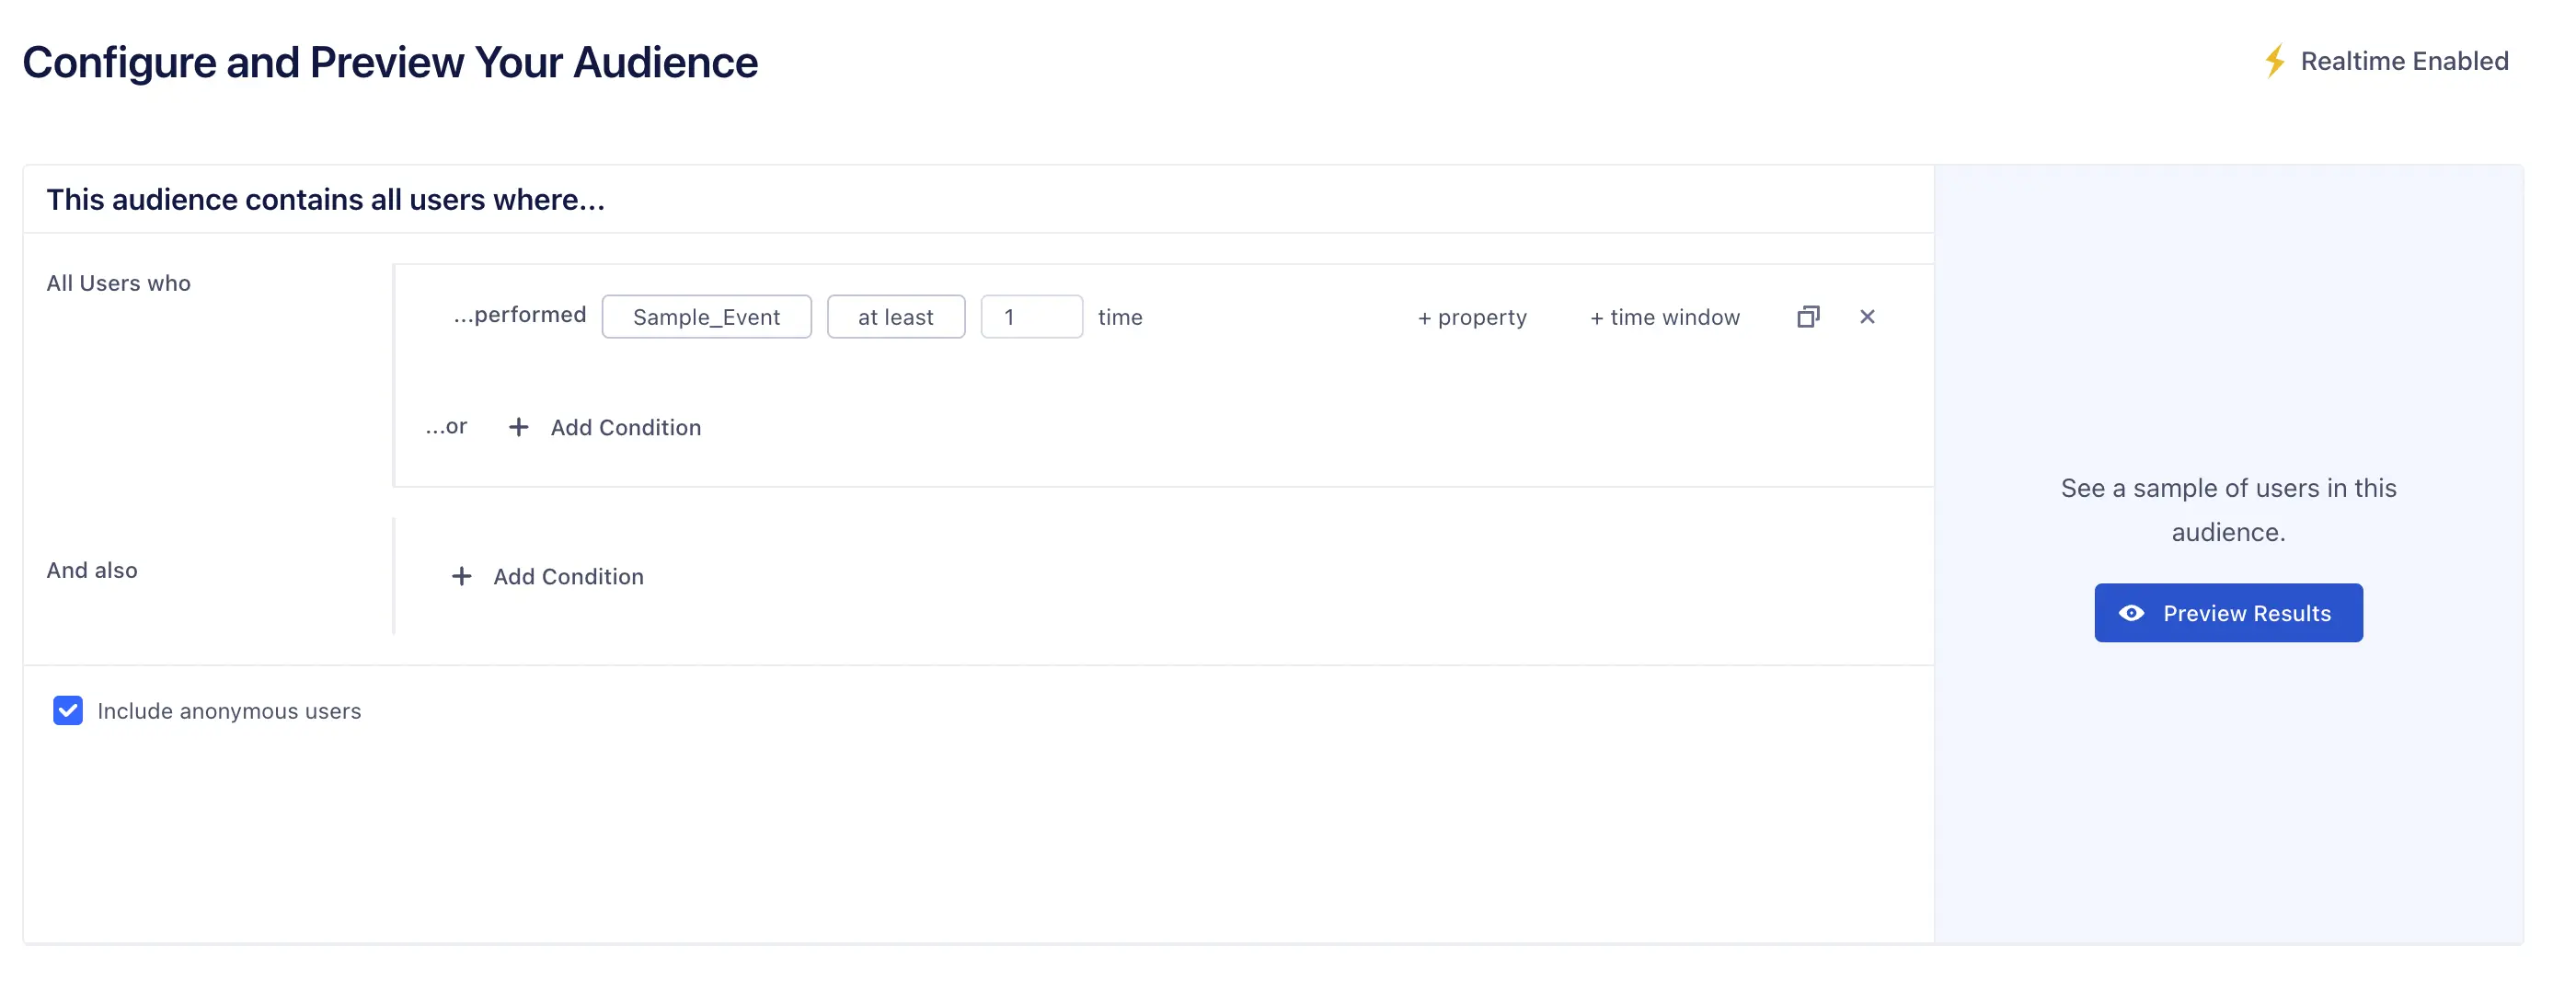
In Segment, navigate to the Computed Traits in Engage.
-
Click New Computed Trait.
-
Create your computed trait. A lightning bolt in the top corner of the page will indicate if the computation updates in real-time.
-
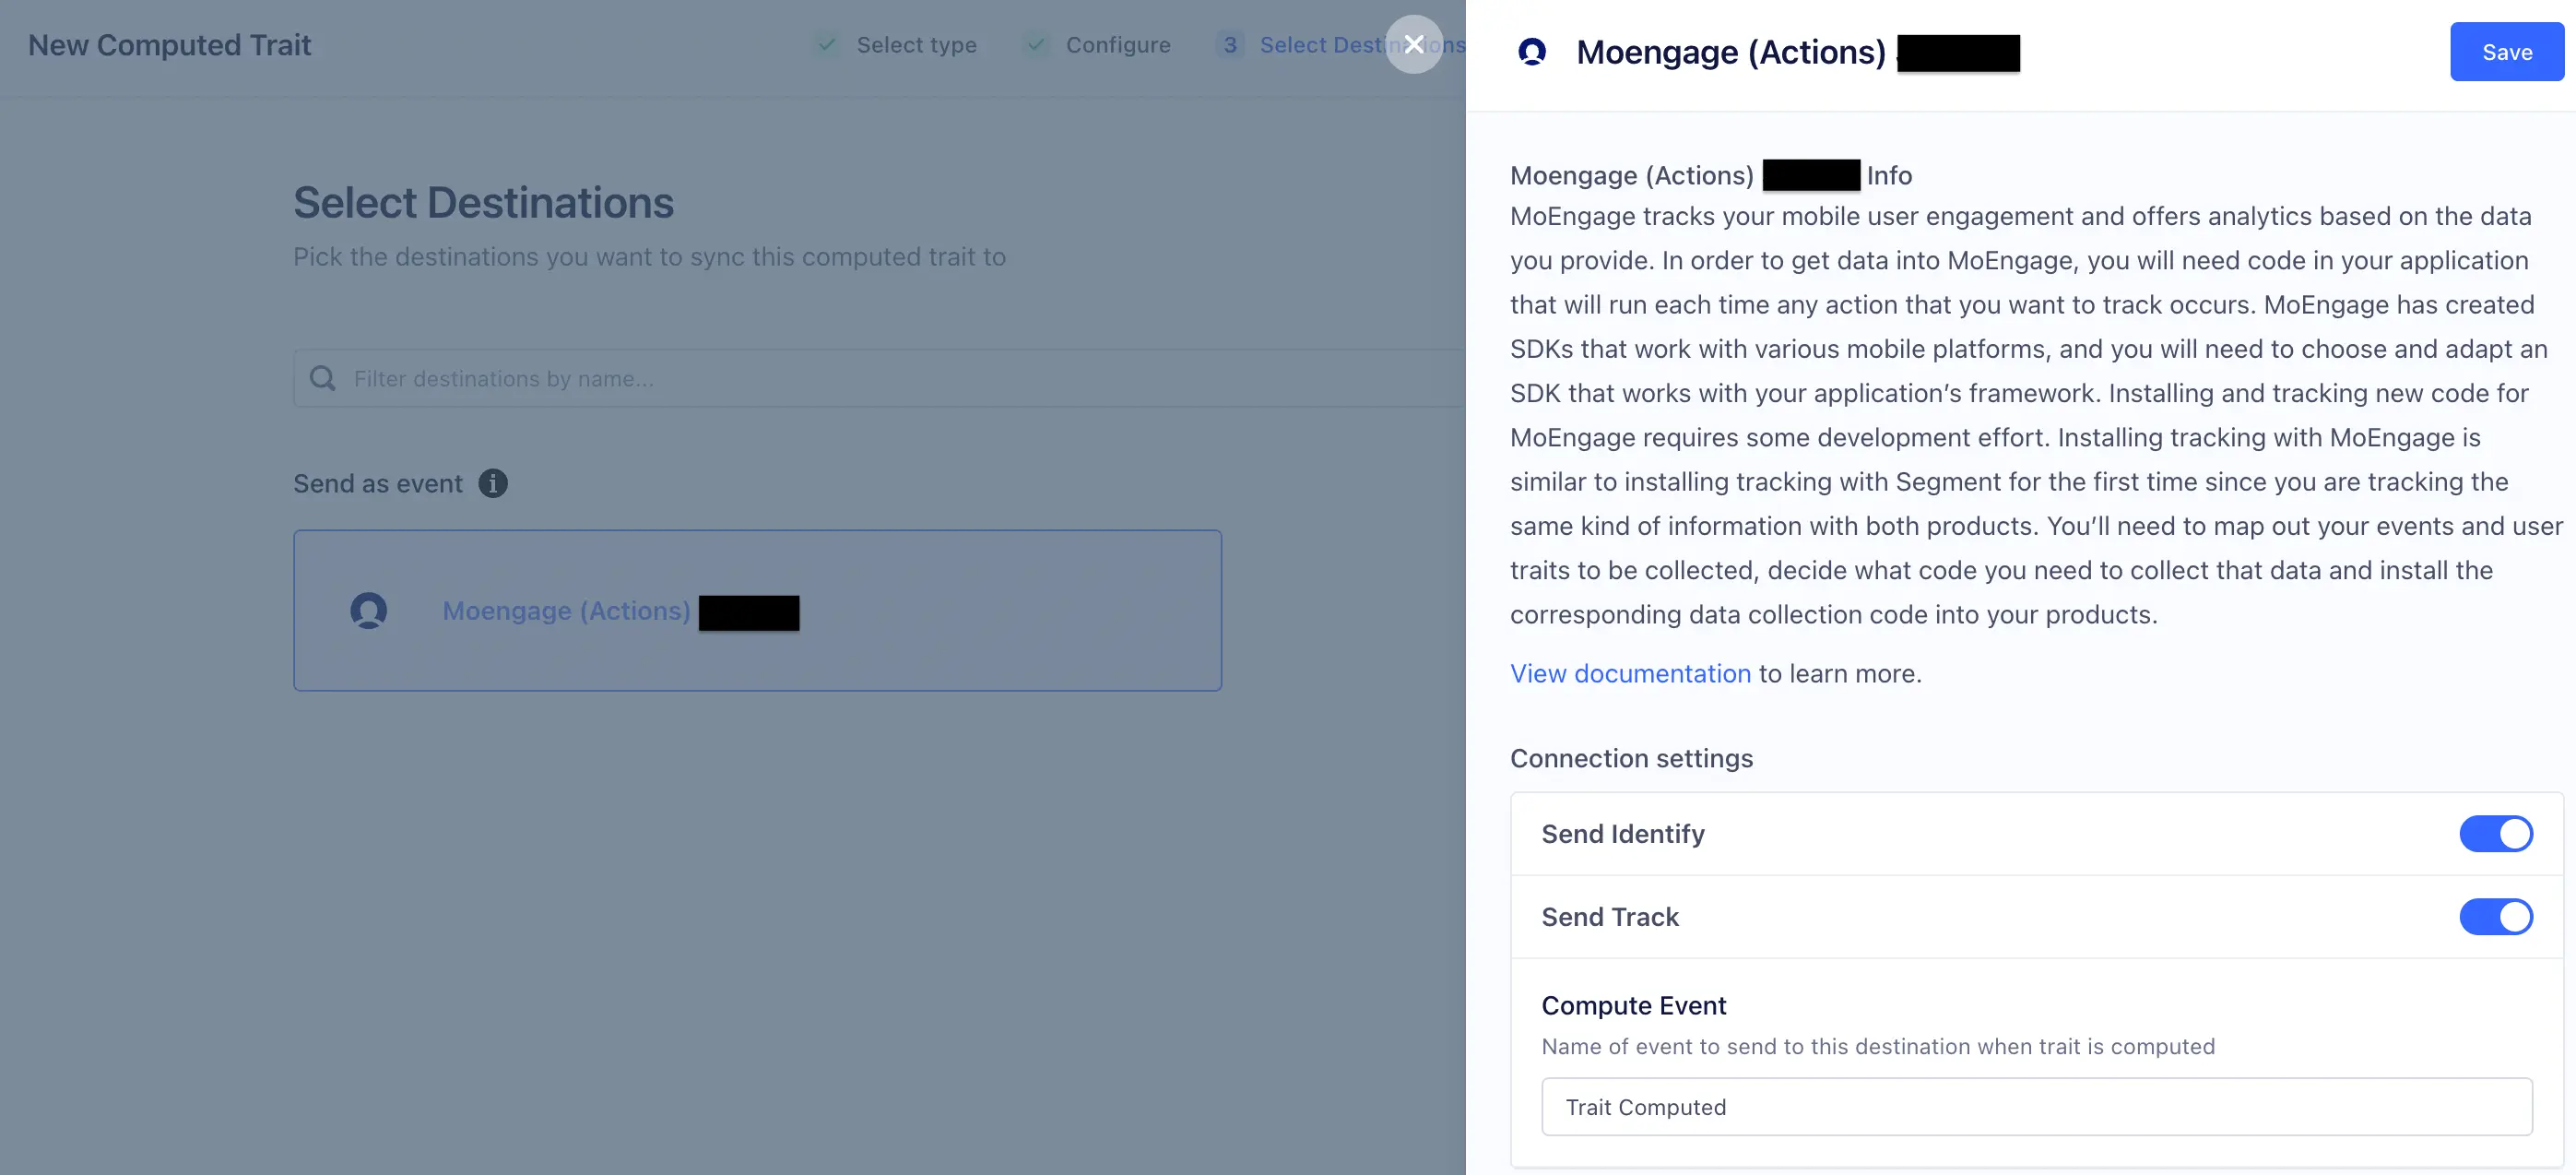
Next, select MoEngage as your destination.
-
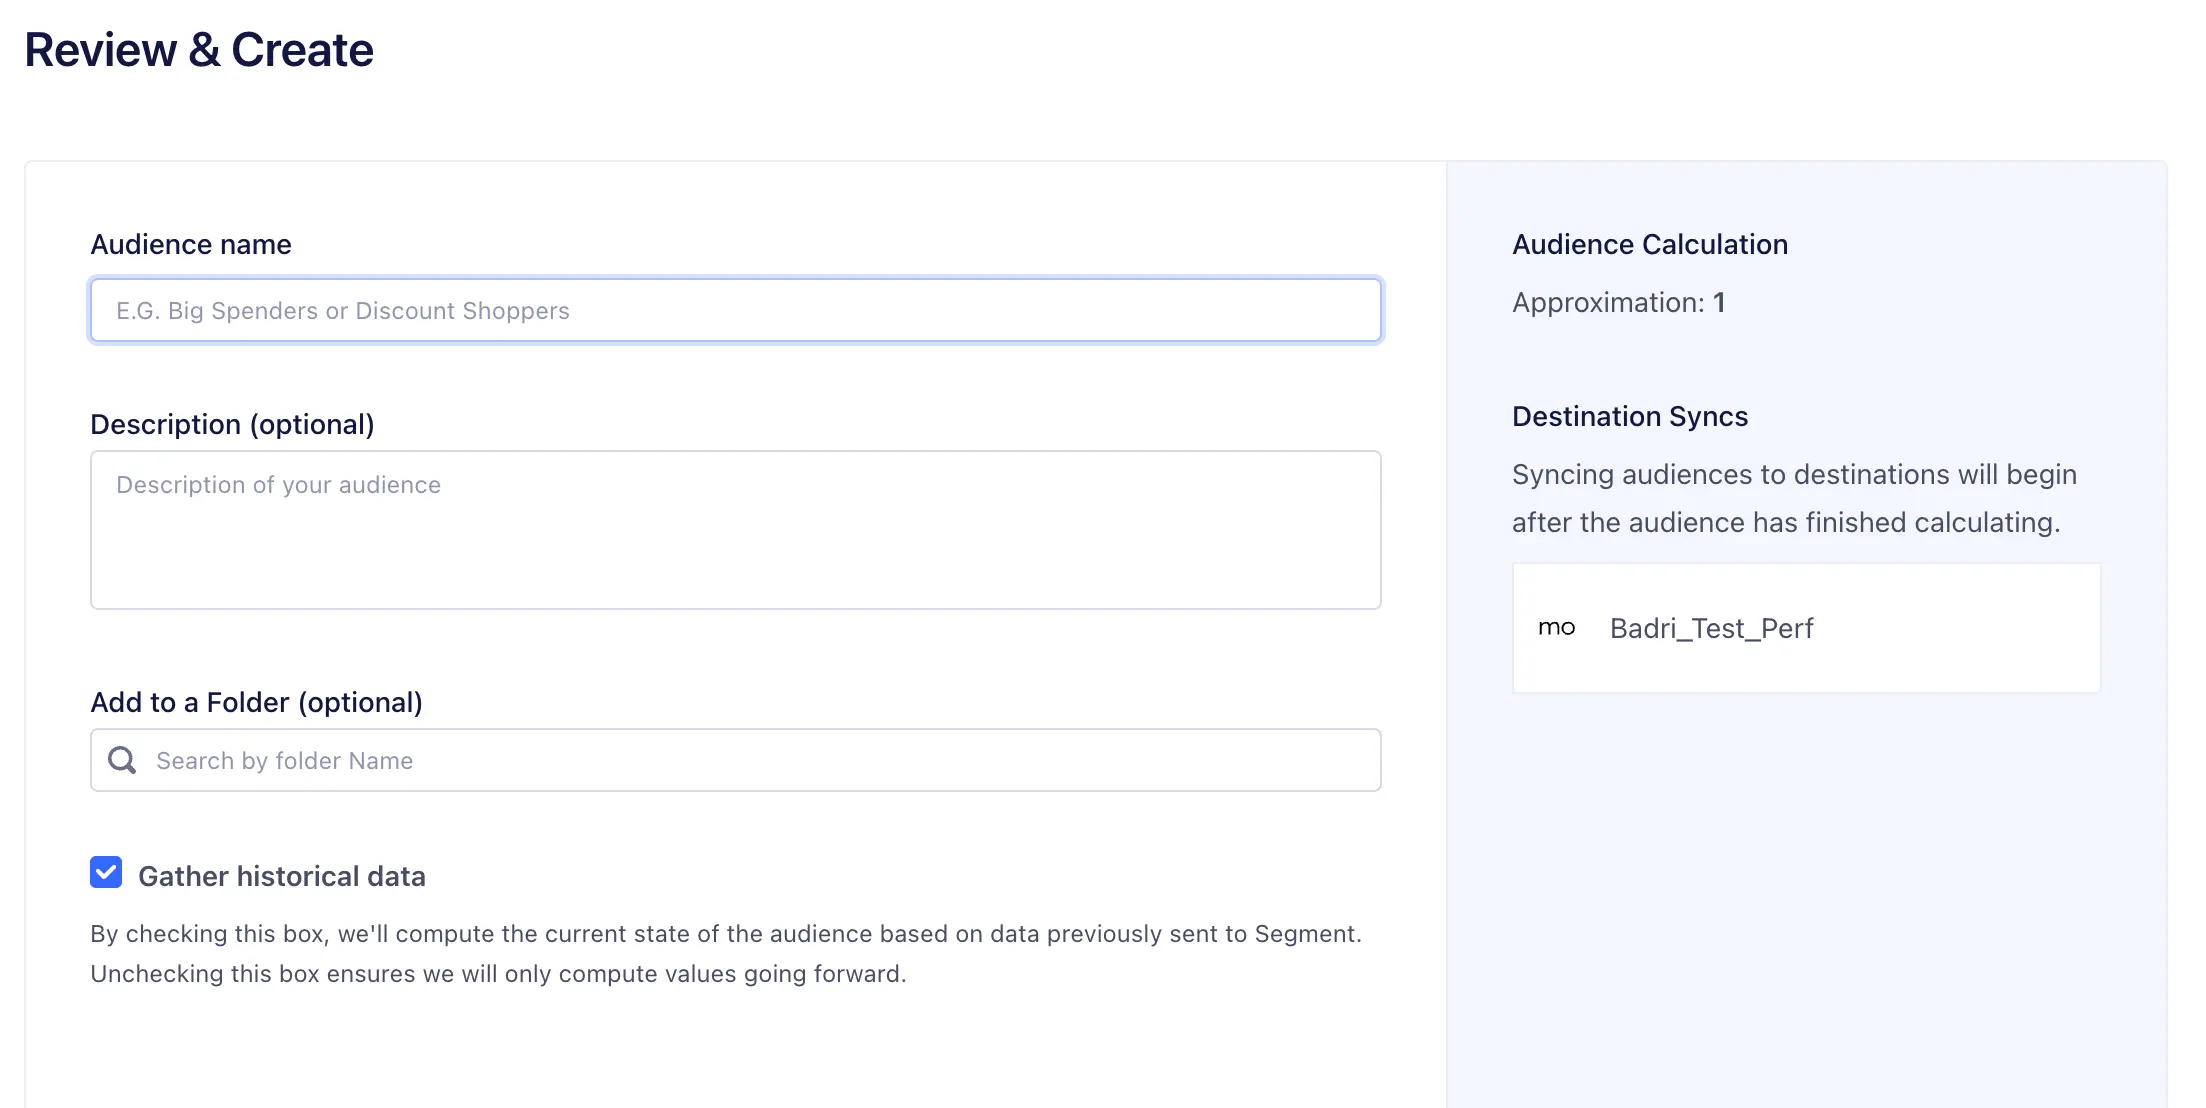
Preview by clicking Review & Create.
By default, Segment queries all historical data to set the current value of the computed trait and audience. To omit this data, uncheck Historical Backfill.
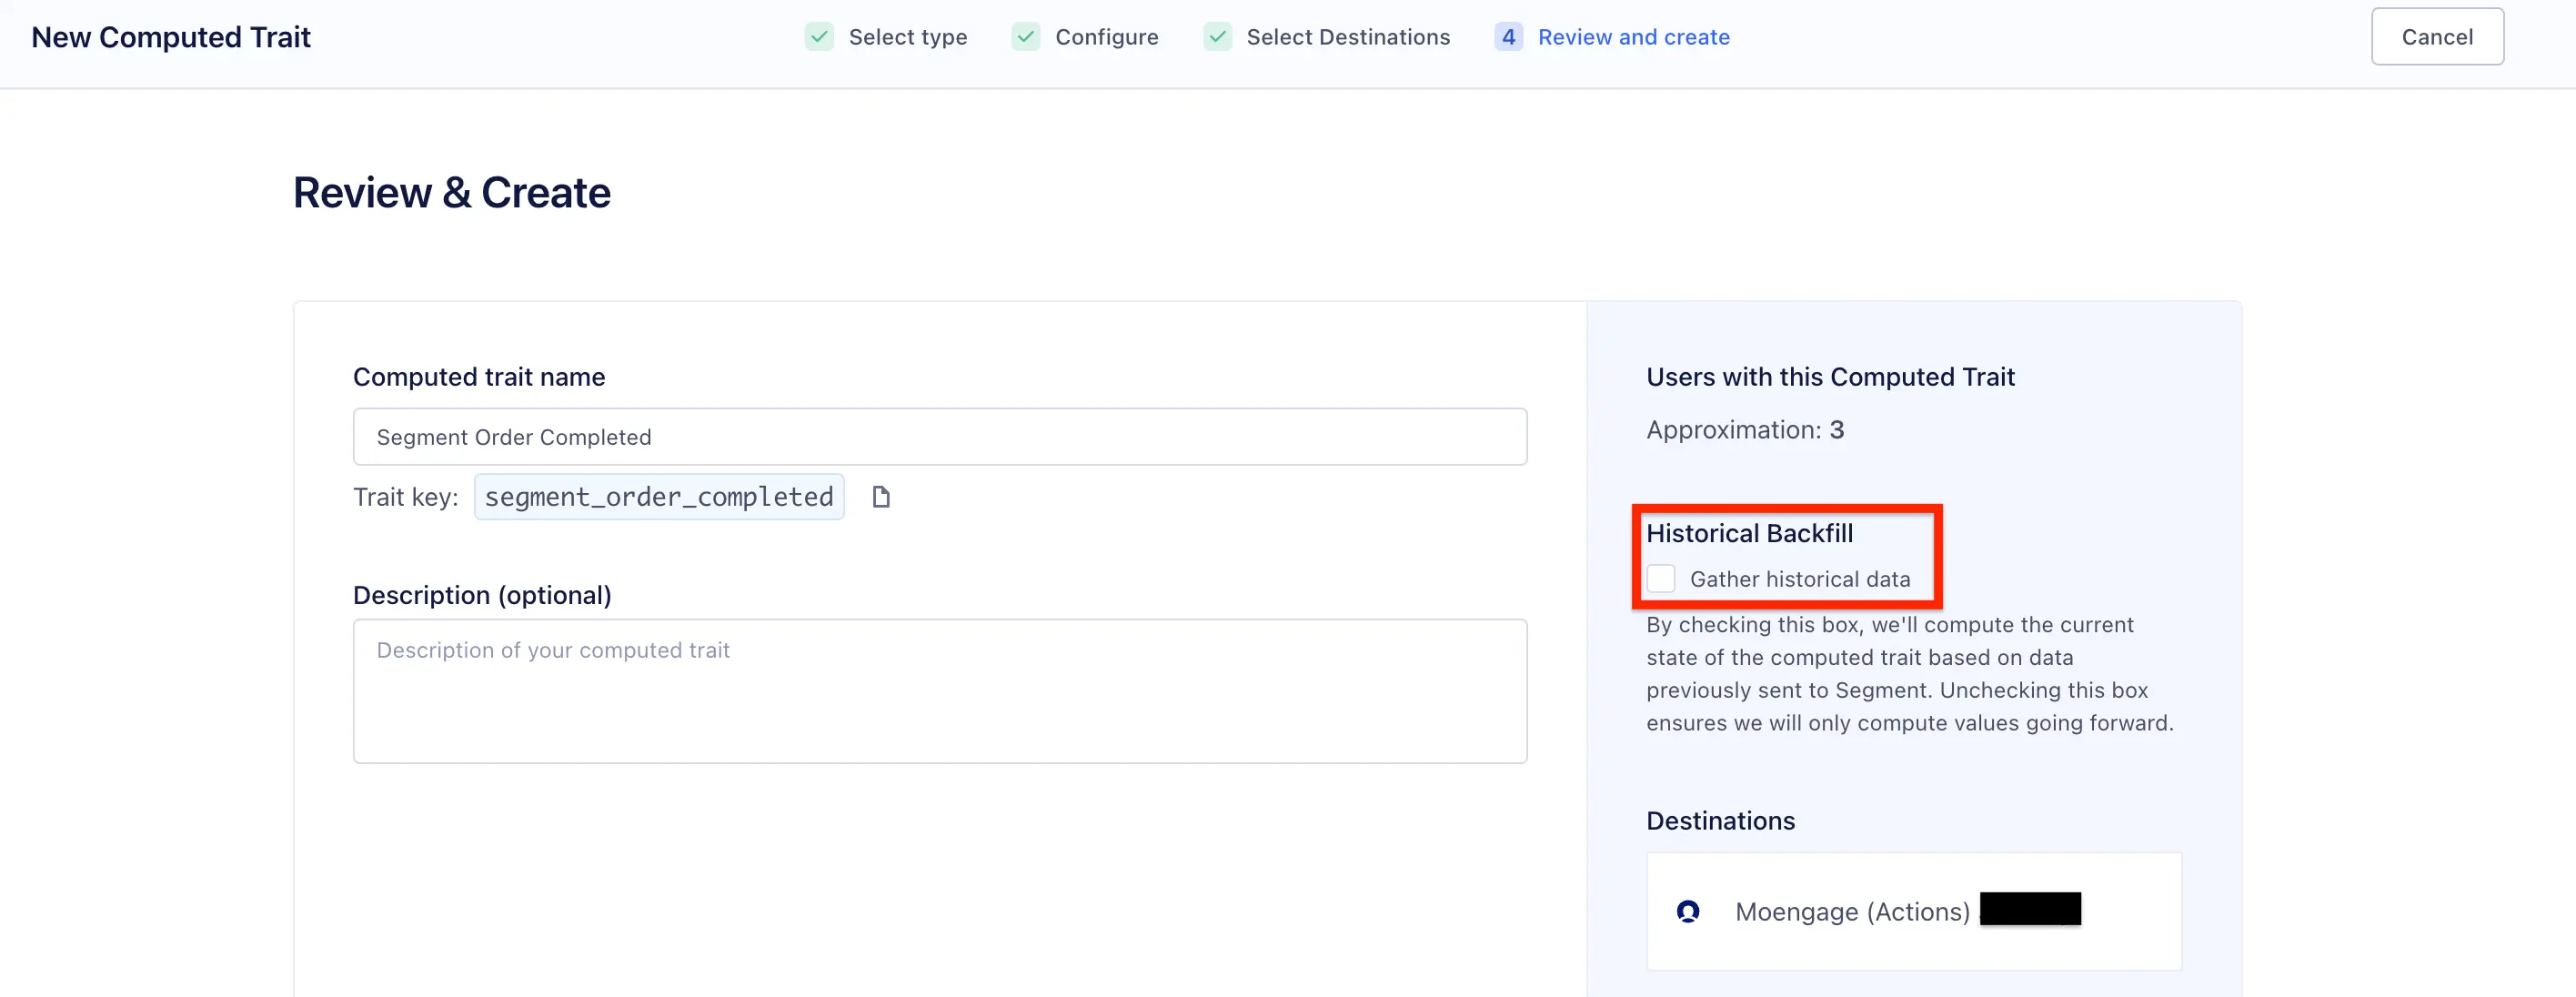
-
In the computed trait, adjust the connection settings based on how you would like your data sent to MoEngage.
-
In Segment, navigate to the Audience in Engage.
-
Click New.
-
Create your audience. A lightning bolt indicates if the computation updates in real-time.
-
Next, select MoEngage as your destination.
-
Preview your audience by clicking Review & Create.
By default, Segment queries all historical data to set the current value of the audience. To omit this data, uncheck Historical Backfill.
-
In the computed trait or audience settings, adjust the connection settings based on how you would like your data sent to MoEngage.
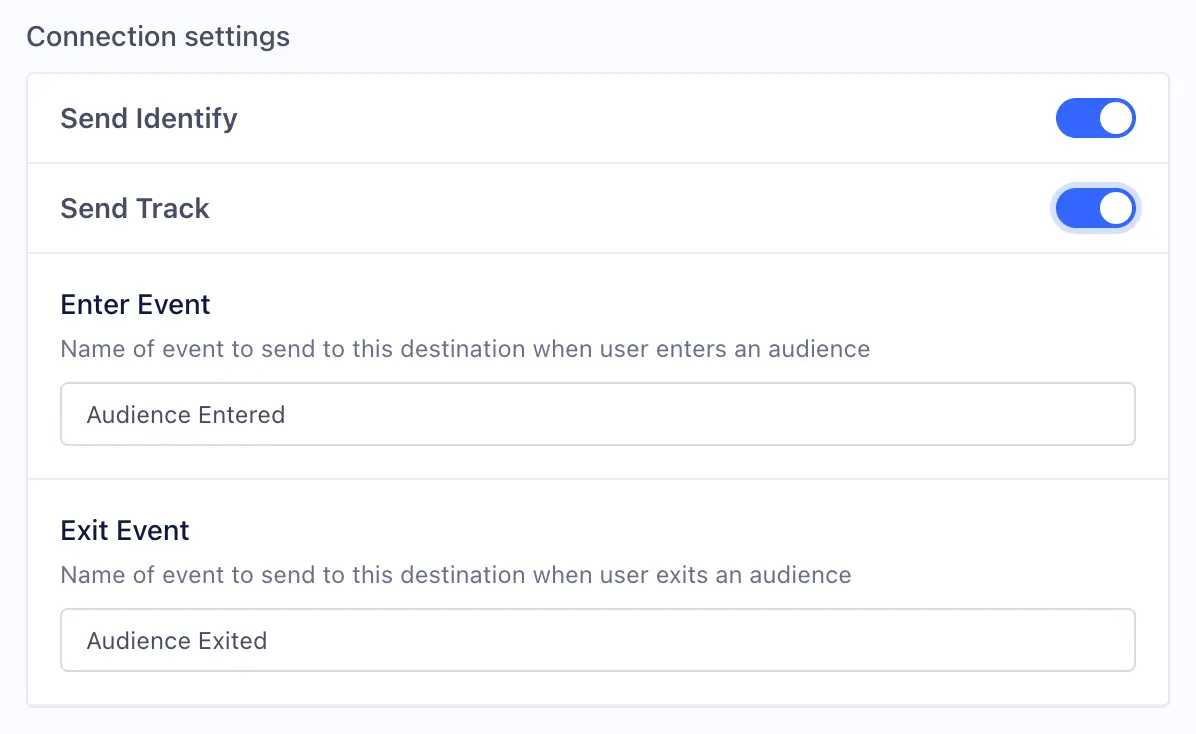
First, link MoEngage to Twilio Engage to send Computed Traits or Audiences. The first time you generate new Computed Trait or Audience, you can choose MoEngage as the destination for the Engage data.
- Go to the Destinations tab in your space.
- Search for MoEngage and add the MoEngage Destination to your Space.
- On the set up screen, enter your
App Id,App Key, and yourEndpoint Region.
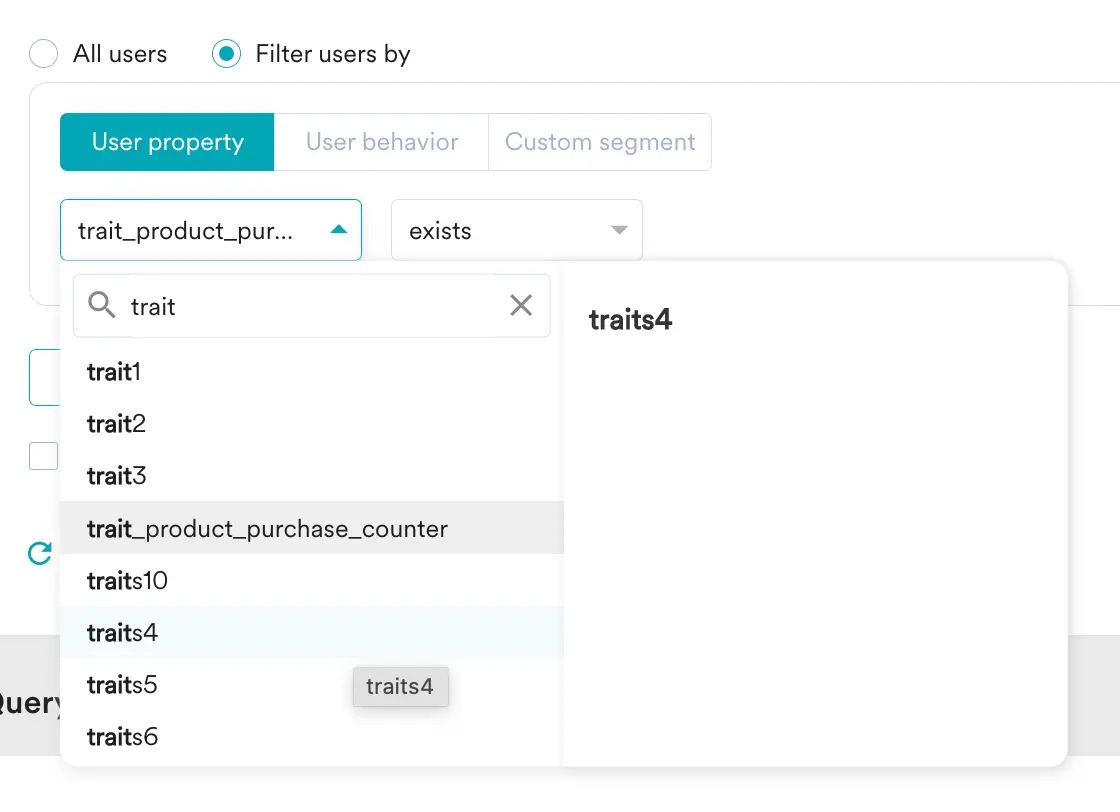
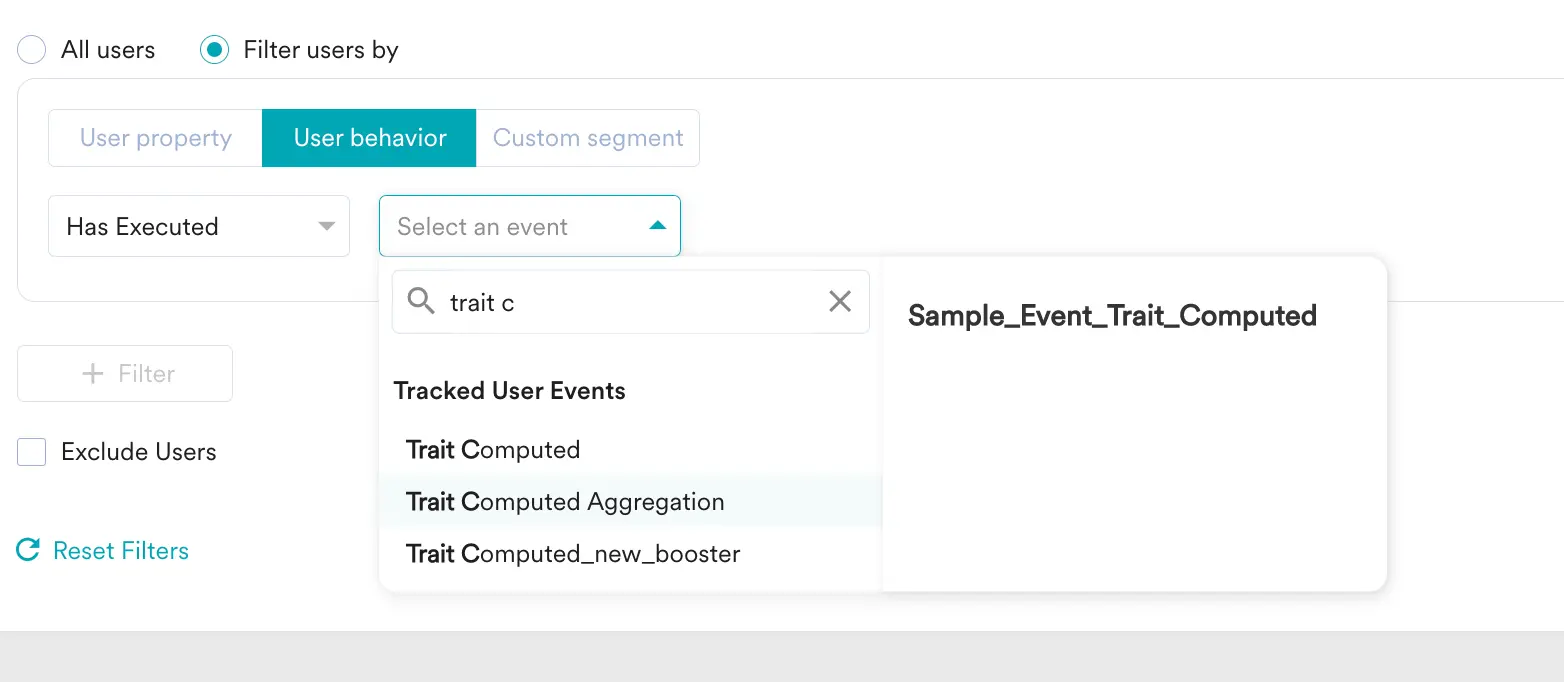
To create a segment of these users, navigate to Segments > Create Segment. Next, based on which call you used:
-
Identify: Select User Property and select the specific attribute.
-
Track: Select User Behaviour and select the specific event.
Segment lets you change these destination settings from the Segment app without having to touch any code.
You can find the APP_ID key under App Settings on the MoEngage dashboard. Please make sure you have uploaded the pem file for sending push on iOS and GCM Key for Android.
Optional
If you are in TEST mode and would like debug logs in your browser console, enable this setting. You should not have this option enabled for your production sources.
false