Braze Destination
Destination Info
- Accepts Page, Group, Identify and Track calls.
- In Cloud-mode, refer to it as Appboy, or Braze in the Integrations object
- In Device-mode, refer to it as Appboy in the Integrations object
Warning
Future updates to this destination are limited to security updates and bug fixes. New versions of this destination are available. See Braze Cloud Mode (Actions) for a server-side integration and Braze Web Mode (Actions) for a device-mode integration with access to Braze SDK features.
If you use a Braze mobile device-mode connection, for example to use Braze Content Cards or In-App Messaging, use the Braze (Classic) Destination. Segment will continue to make updates to the Segment Braze mobile device-mode SDK.
Braze, formerly Appboy, is an engagement platform that empowers growth by helping marketing teams to build customer loyalty through mobile, omni-channel customer experiences.
The Braze Destination is open-sourced on GitHub. Source code for the following integrations is available:
- iOS (maintained by Braze)
- Android (maintained by Braze)
- Swift (maintained by Braze)
- Kotlin (maintained by Braze)
- Web (maintained by Segment)
- Server (maintained by Segment)
- React Native (maintained by Segment)
For issues with mobile platforms (iOS, Android, Swift, or Kotlin), contact Braze support. For issues with Web or Server platforms, contact Segment support.
The Braze SDK contains three major versions
If you are migrating from version 1 to version 2, see information about migration from Version 1 to Version 2 below.
- From the Segment web app, click Catalog.
- Search for "Braze" in the Catalog, select it, and choose which of your sources to connect the destination to.
- In the Destination Settings, add the API Key, found in the Braze Dashboard in Settings > Manage API Keys.
- Set up a new workspace REST API Key in the Braze Dashboard in Settings > API Keys. For more information, see Creating and Managing REST API Keys in the Braze documentation.
- Select the
users.trackendpoint in the User Data section.
- Select the
- If you're adding Braze using Analytics.js, Segment automatically loads the Braze Web SDK. Otherwise, depending on the source you've selected, include Braze's library by adding the following lines to your dependency configuration.
-
Add the Braze Segment Pod to your
Podfile:pod 'Segment-Appboy'Use the latest version of the Braze Segment Pod available on CocoaPods to ensure you have the must up-to-date features and bug fixes.
-
Next, declare Braze's destination in your app delegate instance:
1SEGAnalyticsConfiguration *config = [SEGAnalyticsConfiguration configurationWithWriteKey:@"YOUR_WRITE_KEY_HERE"];2[config use:[SEGAppboyIntegrationFactory instance]];3[SEGAnalytics setupWithConfiguration:config];You can find a sample project in the @Appboy/appboy-segment-ios repository that shows how to integrate the previous snippet.
Braze created a sample iOS application that integrates Braze using Segment. See the Braze GitHub repository for more information.
Braze updated the Braze iOS Segment SDK to 3.26.1 to prepare for iOS 14. As of version 3.27.0, Braze removed the ABK_ENABLE_IDFA_COLLECTION macro. To configure sending ISFA to Braze, see Braze's Implementing IDFA Collection
documentation.
To use the latest Braze SDK to collect IDFAs you must do the following:
- Upgrade to use Xcode12.
- Update the Braze iOS Segment SDK to version 3.3.0 or greater.
- Import and add the AppTrackingTransparency (ATT) Framework.
- Navigate to your project
Info.plistand add a "Privacy - Tracking Usage Description". This description appears in a popup when the application initializes in iOS 14. Applications prompt users to select if they want to allow tracking.
- Navigate to your project
- Add Braze's
ABKIDFADelegate. For more information on how to add this see Braze's IDFA Collection documentation . - Follow Segment's guide for collecting IDFA
-
In the top-level project
build.gradleadd the following as a repository in all projects > repositories.1maven { url "http://appboy.github.io/appboy-android-sdk/sdk" }2maven { url "http://appboy.github.io/appboy-segment-android/sdk" } -
Add the Braze Segment destination dependency to your app
build.gradle:compile 'com.appboy:appboy-segment-integration:+'To ensure you have the most up-to-date features and bug fixes, use the latest version available on Maven.
Note: The
groupIdiscom.appboyand notcom.segment.analytics.android.integrations. -
Next, declare Braze's destination in your
Analyticsinstance:
1Analytics analytics = new Analytics.Builder(context, "YOUR_WRITE_KEY_HERE")2.use(AppboyIntegration.FACTORY)3...4.build();
If you're not familiar with the Segment Specs, take a look to understand what the Page method does. An example call would look like:
analytics.page();
Segment sends Page calls to Braze as custom events if you have enabled either Track All Pages or Track Only Named Pages in the Segment Settings.
Tip
Add Segment's open-source Middleware tool to optimize your integration. This tool limits Data Point use by debouncing duplicate identify() calls from Segment. For more information, see the project's README.
If you're not familiar with the Segment Specs, take a look to understand what the Identify method does. An example call would look like:
1analytics.identify('ze8rt1u89', {2firstName: 'Jane',3lastName: 'Kim',4email: 'jane.kim@example.com'5});
When you Identify a user, Segment passes that user's information to Braze with userId as Braze's External User ID.
If you're using a device-mode connection, Braze's SDK assigns a device_id and a backend identifier, braze_id, to every user. This allows Braze to capture anonymous activity from the device by matching on those identifiers instead of userId. This applies to device-mode connections.
To send anonymous user data in cloud-mode, you must manually include the user's braze_id in all your Segment API calls in the integrations.Braze.braze_id or context.integrations.Braze.braze_id object.
Pass one of the many identifiers that may exist on an anonymous user profile to the Braze's User by Identifier REST endpoint to capture and export the braze_id. These identifiers include:
- email address
- phone number
- device_id
Choose an identifier that is available on the user profile at that point in the user lifecycle.
For example, if you pass device_id to the User by Identifier endpoint:
1{2"device_id": "{{device_id}}",3"fields_to_export": ["braze_id"]4}
The endpoint returns:
1{2"users": [3{4"braze_id": "{{braze_id}}"5}6],7"message": "success"8}
Tip
If you decide to use the braze_id, consider contacting Segment Success Engineering or a Solutions Architect to verify your Braze implementation.
Segment's special traits recognized as Braze's standard user profile fields (in parentheses) are:
| Segment Event | Braze Event |
|---|---|
firstName | first_name |
lastName | last_name |
birthday | dob |
avatar | image_url |
address.city | home_city |
address.country | country |
gender | gender |
Segment sends all other traits (except Braze's reserved user profile fields) to Braze as custom attributes. You can send an array of strings as trait values but not nested objects.
Tip
To lower Data Point use, limit the events you send to Braze to those that are relevant for campaigns and segmentation to the Braze destination. For more information, see Schema Controls.
If you're not familiar with the Segment Specs, take a look to understand what the Track method does. An example call looks like:
1analytics.track('Purchased Item', {2product_id: '1234',3name: 'bag'4})
When you track an event, Segment sends that event to Braze as a custom event. If you're sending Track events in Cloud Mode, Braze requires that you include a userId or braze_id. Segment sends a braze_id if userId is missing. When you use a device-mode connection, Braze automatically tracks anonymous activity using the braze_id if a userId is missing.
Segment removes the following custom properties reserved by Braze when sending data in Cloud mode:
timequantityevent_namepricecurrency
When you track an event with the name Order Completed using the e-commerce tracking API, Segment sends the products you've listed to Braze as purchases.
When you pass ecommerce events, the name of the event becomes the productId in Braze. An example of a purchase event looks like:
1analytics.track('Purchased Item', {2revenue: '2000',3currency: 'USD'4})
The previous example would have "Purchased Item" as its productId and includes two required properties that you must pass in:
revenuecurrency
Braze supports currency codes as specified in their Purchase Object Specification. Be aware that any currency reported other than USD displays in the Braze UI in USD based on the exchange rate on the date it was reported.
You can add more product details in the form of key-value pairs to the properties object. The following reserved keys are not passed to Braze if included in your Track call's properties object:
timeproduct_idquantityevent_nameprice
If you're not familiar with the Segment Specs, take a look to understand what the Group method does. An example call would look like:
1analytics.group("1234", {2name: "Initech",3industry: "Technology",4employees: 329,5plan: "enterprise",6totalBilled: 8307});
When you call group, Segment sends a custom attribute to Braze with the name ab_segment_group_<groupId>, where <groupId> is the group's ID in the method's parameters. For example, if the group's ID is 1234, then the custom attribute name is ab_segment_group_1234. The value of the custom attribute is true.
In-app messages are registered for and requested by default. Disable this feature by disabling the Enable Automatic In-App Message Registration setting. This feature is available for users of the Braze Mobile SDKs.
Once configured, you can trigger in-app message display as a result of several different event types. By default, all In-App Messages that a user is eligible for are automatically delivered to the user upon a session start event. A new session automatically starts when a user loads your site. If you'd like to force a new session for a user, simply make an identify call with the corresponding userId for that user.
If you don't want your site to immediately display new In-App Messages when they're received, you can disable automatic display and register your own display subscribers. To do this:
-
Disable your Automatically Send In-App Messages Destinations setting. By default, it is enabled when you enable the Braze destination.
-
Create your subscriber by calling:
1analytics.ready(function() {2window.appboy.subscribeToNewInAppMessages(function(inAppMessages) {3// Display the first in-app message. You could defer display here by pushing this message to code within in your own application.4// If you don't want to use Appboy's built-in display capabilities, you could alternatively pass the in-app message to your own display code here.5window.appboy.display.showInAppMessage(inAppMessages[0]);67// Return an array with any remaining, unhandled messages to appboy's internal queue.8// These will be part of the inAppMessages param the next time this subscriber is invoked.9return inAppMessages.slice(1);10});11});
The inAppMessages parameter will be an array of appboy.ab.InAppMessage subclass or appboy.ab.ControlMessage objects, each of which has various lifecycle event subscription methods.
-
Follow the directions to register for push at in Segment's iOS library docs.
-
Add the following to your application:didFinishLaunchingWithOptions
[[SEGAppboyIntegrationFactory instance] saveLaunchOptions:launchOptions]; -
In your application's application:didReceiveRemoteNotification: method, add the following:
[[SEGAnalytics sharedAnalytics] receivedRemoteNotification:userInfo]; -
If you integrated the application:didReceiveRemoteNotification:fetchCompletionHandler: in your app, add the following to that method:
1if ([Appboy sharedInstance] == nil) {2[[SEGAppboyIntegrationFactory instance] saveRemoteNotification:userInfo];3} -
If you implemented handleActionWithIdentifier:forRemoteNotification:, add the following to that method:
1if ([Appboy sharedInstance] == nil) {2[[SEGAppboyIntegrationFactory instance] saveRemoteNotification:userInfo];3} -
If you are using the
UserNotificationframework, follow Braze's documentation to register push notifications using theUserNotificationframework. Then in your application'suserNotificationCenter:didReceiveNotificationResponse:withCompletionHandlermethod, add the following:1if ([Appboy sharedInstance] == nil) {2[[SEGAppboyIntegrationFactory instance].appboyHelper saveUserNotificationCenter:center3notificationResponse:response];4}5[[SEGAppboyIntegrationFactory instance].appboyHelper userNotificationCenter:center6receivedNotificationResponse:response];7if (completionHandler) {8completionHandler();9}
-
Follow the directions in Braze's push notification docs.
-
If you don't have Braze automatically register for push (for example, you pass the push token from an FCM or manual GCM registration) you need to ensure you call
registerAppboyPushMessagesafter Braze is initialized. You can do this by checking if Braze is initialized before trying to pass the push token, and waiting for initializing to set if not.You can do this in an
onIntegrationReadymethod:1String appboyPushToken;2bool appboyInitialized = false;3…4// When you get the push token5String receivedToken;67appboyPushToken = receivedToken;8if (appboyInitialized) {9Appboy.getInstance(getContext()).registerAppboyPushMessages(appboyPushToken);10}1112….1314Analytics.with(this).onIntegrationReady(Appboy, new Callback() {15@Override public void onIntegrationReady(Object integration) {16appboyInitialized = true;17if(appboyPushToken != null) {18Appboy.getInstance(getContext()).registerAppboyPushMessages(appboyPushToken);19}20}21});
-
To support push notifications on Chrome, you'll need to enable FCM/GCM as well as configure your site. Check out steps one and two here for detailed instructions on both.
-
Browser Registration. In order for a browser to receive push notifications, you must register it for push by calling:
1analytics.ready(function() {2window.appboy.registerAppboyPushMessages();3});Note: Place this snippet outside of your Segment Snippet within your
scripttag.Note: This will immediately request push permission from the user.
To show your own push-related UI to the user before requesting push permission (known as a soft push prompt), you can test to see if push is supported in the user's browser by calling:
1analytics.ready(function() {2if (window.appboy.isPushSupported()) {3// Add your push logic4}5});
Braze recommends checking to see if this returns true since not all browsers can receive push notifications. See below for instructions on setting up a soft push prompt using Braze In-App Messages.
To unsubscribe a user, call:
1analytics.ready(function() {2window.appboy.unregisterAppboyPushMessages();3});
- Set your GCM/FCM server API key and SenderID on the Braze dashboard. You can find more details for this in Braze's Standard Android push integration documentation.
- To support push notifications on Safari, add your Website Push ID into your Segment Settings UI and Segment sends it when the Braze Web SDK initializes. To get your Website Push ID, follow the first two bullet points in these instructions.
- Follow step one to create a "Prime for Push" in-app messaging Campaign on the Braze dashboard.
- Disable your Automatically Send In-App Messages Destination setting. By default, it is enabled when you enable the Braze destination.
- Add the following snippet to your site:
1analytics.ready(function() {2window.appboy.subscribeToNewInAppMessages(function(inAppMessages) {3var message = inAppMessages[0];4if (message != null) {5var shouldDisplay = true;67if (message instanceof appboy.ab.inAppMessage) {8// Read the key/value pair for msg-id9var msgId = message.extras["msg-id"];1011// If this is our push primer message12if (msgId == "push-primer") {13// We don't want to display the soft push prompt to users on browsers that don't support push, or if the user14// has already granted/blocked permission15if (!appboy.isPushSupported() || appboy.isPushPermissionGranted() || appboy.isPushBlocked()) {16shouldDisplay = false;17}18// Prompt the user when the first button is clicked19message.buttons[0].subscribeToClickedEvent(function() {20appboy.registerAppboyPushMessages();21});22}23}2425// Display the message26if (shouldDisplay) {27appboy.display.showInAppMessage(message);28}29}3031// Remove this message from the array of IAMs and return whatever's left32return inAppMessages.slice(1);33});34});
For more details on this snippet, check out Braze's Soft push prompt docs.
Note: Place this snippet outside of your Segment Snippet within your script tag.
- When you'd like to display the Soft Push to a user, call:
1analytics.ready(function() {2window.appboy.logCustomEvent("prime-for-push")3});
To enable IDFA collection in Braze, add following lines to your Podfile:
1post_install do |installer|2installer.pods_project.targets.each do |target|3target.build_configurations.each do |config|4if target.name == "Appboy-iOS-SDK"5target.build_configurations.each do |config|6config.build_settings['GCC_PREPROCESSOR_DEFINITIONS'] ||= [7'$(inherited)', 'ABK_ENABLE_IDFA_COLLECTION']8end9end10end11end12end
There are three major versions of this SDK: 1, 2, and 3. Segment currently supports both as migrating to Version 2+ requires some important changes to your website.
If you have never implemented Braze on your site, either using Segment or natively, you can ignore this section. If you have had Braze running before and want to migrate to Version 2+ you must ensure you remove all references to appboy.min.css from your site. This is very important as it will cause issues with Version 2+ of their SDK. Once you have done this you can select Version 2+ using the "Braze Web SDK Version" with your Segment Settings UI.
You can send computed traits and audiences created in Engage to Braze, and use them to run personalization campaigns or power messages to users.
Engage sends event data about your users to Braze using an Identify call and/or Track call.
You can send computed traits to Braze as custom attributes or as custom events.
- If you send a computed trait using the Identify call, they appear in Braze as custom attributes.
- If you send a computed trait using the Track call, they appear in Braze as custom events.
You can choose which method to use (or choose to use both) when you connect the computed trait to the Braze destination.
You can send computed traits created in Engage as Identify calls to create custom attributes in Braze. The custom attribute is set to the value of the computed trait. The custom attribute name appears as the snake_cased version of the computed trait name you provide.
For example, if you have a computed trait for "Last Product Viewed Item," that would be named last_product_viewed_item in the user's Engage profile.
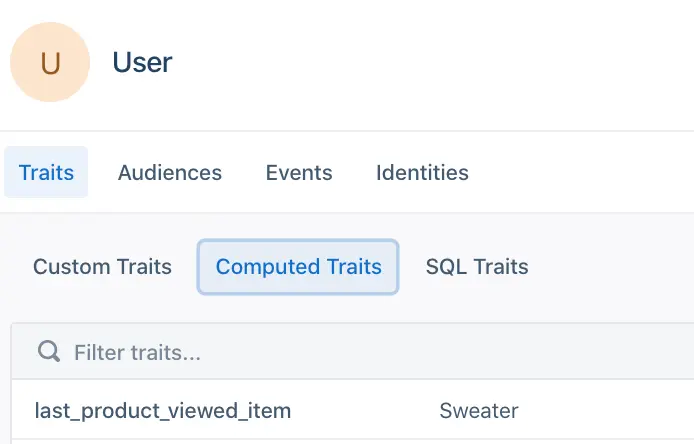
If the "Last Product Viewed Item" trait is connected to Braze to send Identify calls, as in this example:
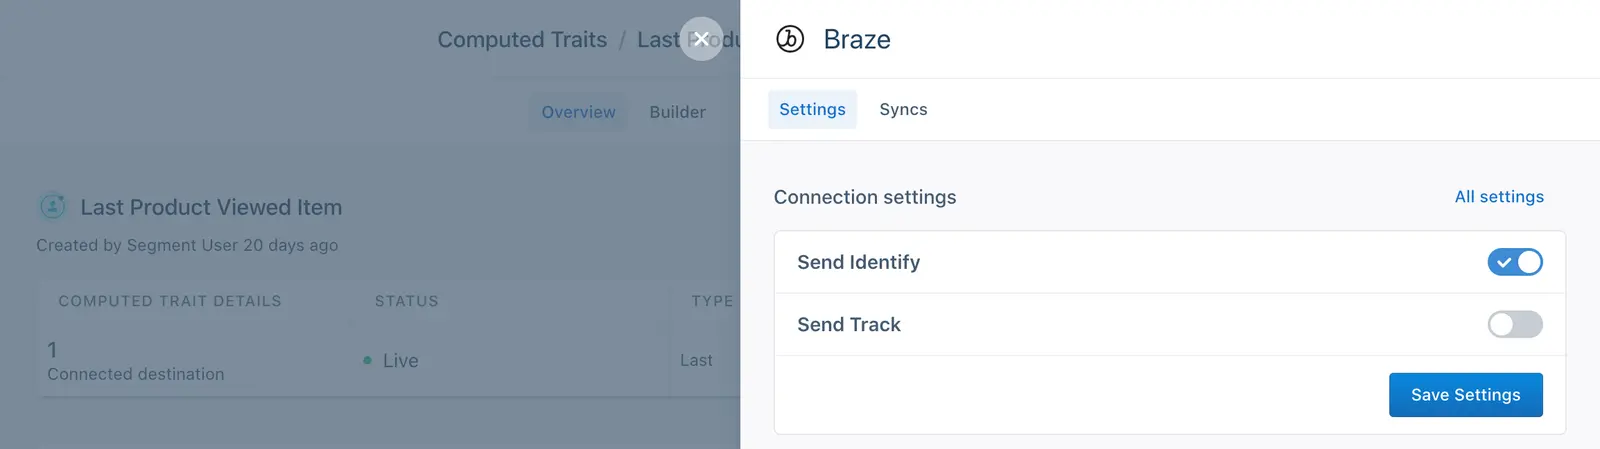
The following custom attribute, "last_product_viewed_item" appears in Braze on the user's profile:

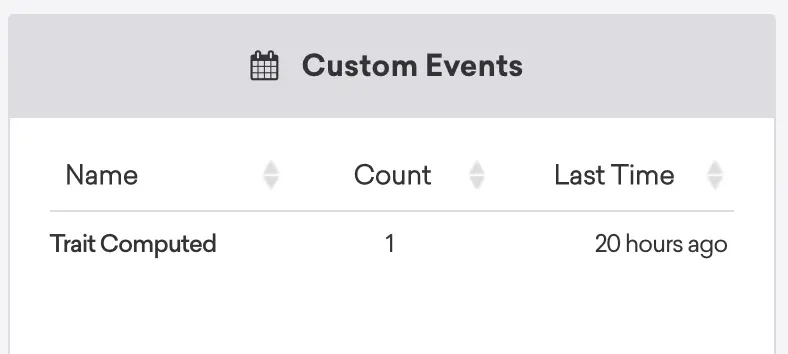
You can also send computed traits created in Engage as Track calls to create custom events in Braze. When Engage calculates a computed trait for a user, it sends a Trait Computed event to Braze.
Using the same example as above, if a user has a computed trait for "Last Product Viewed Item" and the trait is connected to Braze and configured to send Track calls:
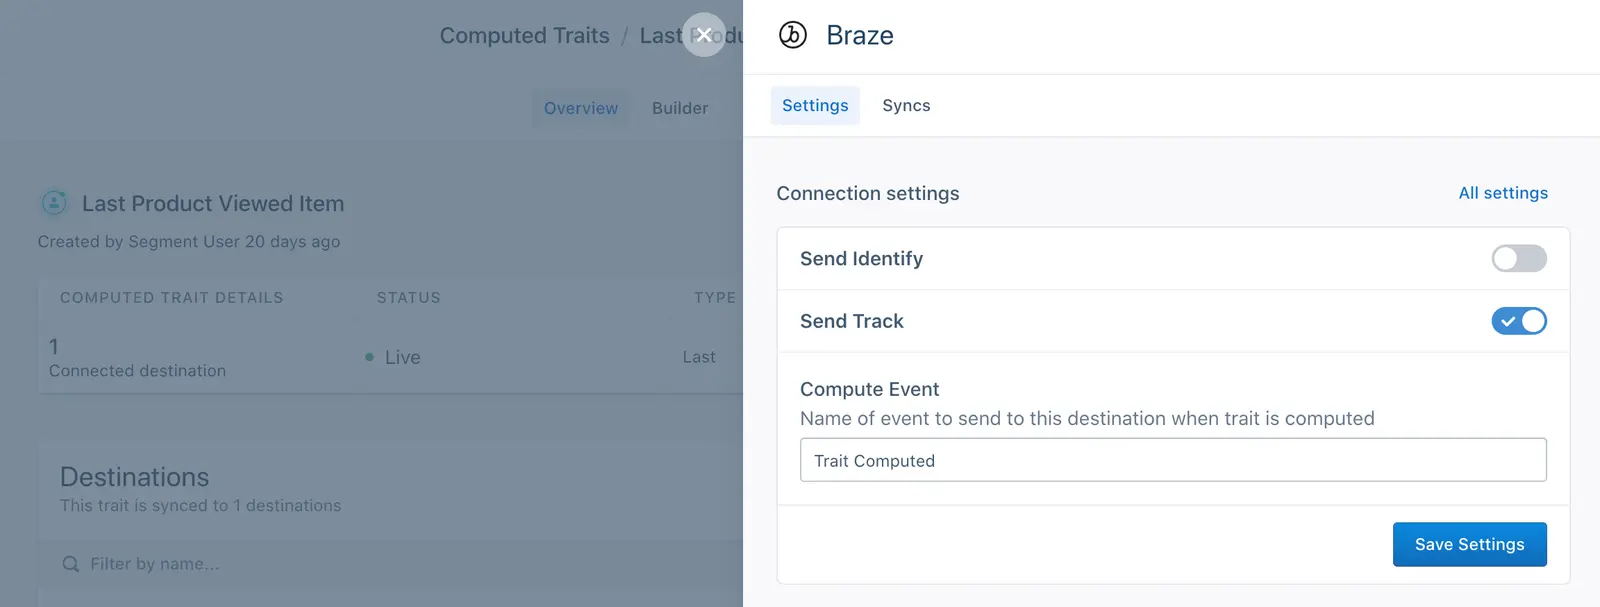
The following custom event appears in Braze on the user's profile:
Tip
You can change the name of the "computed trait" event that Braze receives in the Destination Settings accessed through Engage.
You can send Audiences to Braze as custom attributes or custom events.
- When you send an Audience using the Identify call, it appears in Braze as a custom attribute.
- When you send an Audience using the Track call, it appears in Braze as a custom event.
You can choose which method to use (or choose both) when you connect the audience to the Braze destination.
You can send audiences created in Engage as Identify calls to create custom attributes in Braze. If a user is added to an audience, Engage sends a custom attribute to Braze with a value of true. The custom attribute name is be the snake_cased version of the audience name in Engage.
For example, if a user is in a "Dormant Shoppers" audience:
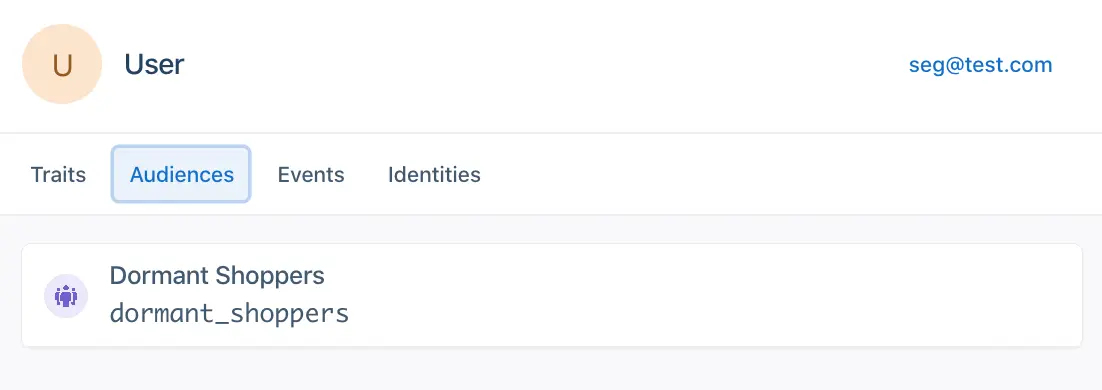
And the "Dormant Shoppers" audience is connected to Braze to send Identify calls:
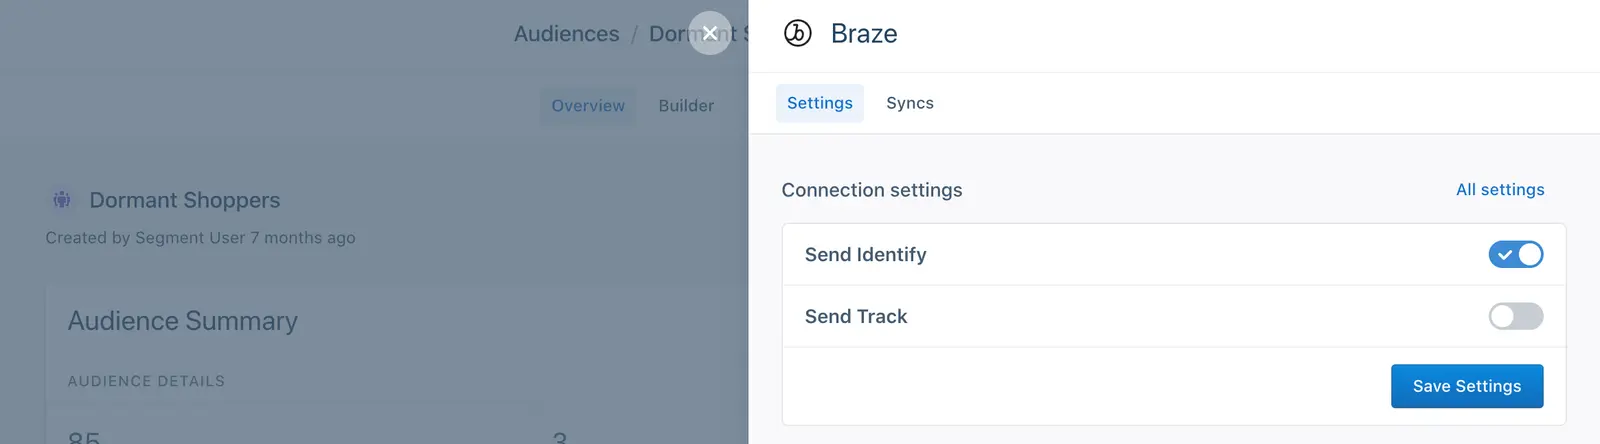
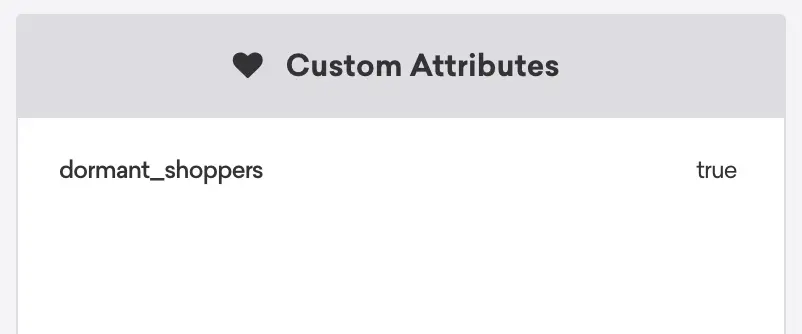
The "dormant_shoppers" custom attribute appears in Braze on the user's profile:
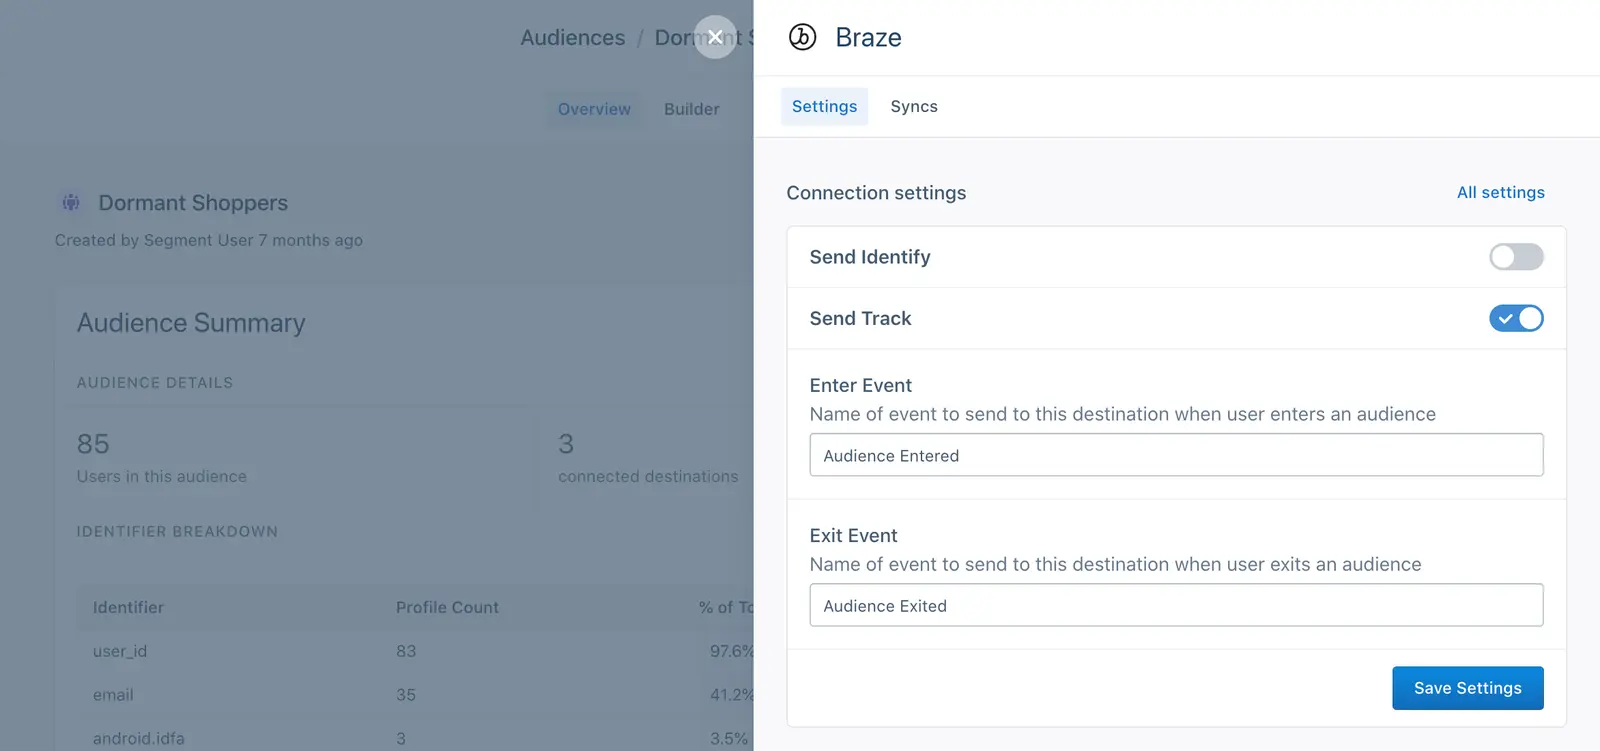
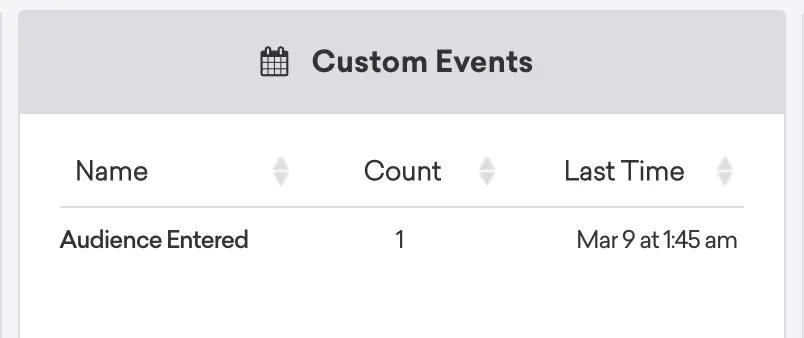
You can also send audiences created in Engage as Track calls to create custom events in Braze. If a user is added to an audience, Engage sends an Audience Entered event to Braze. If a user leaves the audience (because they no longer satisfy the criteria) Engage sends an Audience Exited event to Braze.
Using the same example as above, if a user is in a "Dormant Shoppers" audience and the audience is connected to Braze to send Track calls, Engage sends the following "Audience Entered" and "Audience Exited" events. (You can edit the names of these events from this screen.)
The following custom event appears in Braze on the user's profile when they enter the audience:
Tip
You can change the name of the "Audience Entered" event that Braze receives in the Destination Settings accessed through Engage.
To send computed traits or audiences to Braze, you first must connect it to Engage. Once it's set up, you can select Braze as a destination for Engage data each time you create new computed traits or audiences.
- Navigate to the Destinations tab in Engage Settings.
- Search for Braze and add the destination to your Engage.
- On the set up screen, enter in your App Identifier, REST API Key and Data center for Braze.
- Engage Destination type: Event - data is delivered to this Destination one-by-one on a real-time basis
- Support for Track and Identify?: Yes, both are supported.
- Traits and Audiences created by: Computed traits and audiences are added as custom attributes using Identify calls. You can also send computed traits and audiences as custom events using Track calls.
- Must create audience_name field before Engage can update those values?: No. If sent as an Identify call, Engage creates the computed trait or audience name as a custom attribute in Braze. If sent as a Track call, Engage creates a custom event in Braze.
- Computed trait appears as: A snake cased version of the computed trait name (for example,
last_product_viewed: 'Sweater') with a string for the value of the computed trait. - Audience appears as: A snake cased version of the audience name (for example,
order_completed_last_30days: true) with a boolean value oftrueindicates that a user is in the audience. - Destination rate limit: 100 requests per second (this is at the Space-level, for example shared across all Audiences & Computed Traits syncing from 1 Space to Braze. This rate limit would not be shared by multiple Spaces.)
- Lookback window allowed: Yes, unlimited.
- Identifiers required :
userIdorbraze_id - Identifiers accepted :
userIdorbraze_id - Client or Server-Side Connection: Server-side connection for Engage
If you use the Braze destination in either cloud or device mode you can save Braze costs by "debouncing" duplicate identify() calls from Segment by adding the open-source Middleware tool to your implementation. More information about this tool and how it works is available in the project's README.
By default, Engage data is sent to Braze by matching the userId. The Segment userId maps to Braze's External ID. If the user is anonymous and does not have a userId, you can also choose to send data using the braze_id auto-generated by Braze. To use braze_id, you must pass the braze_id to Segment as a Segment externalId in the context.integrations.Braze.braze_id object. If braze_id is sent as an externalId and userId is missing, Engage matches on braze_id when sending to Braze. You can check the Identities tab on a user's Engage profile to confirm that braze_id was successfully picked up as an externalId.
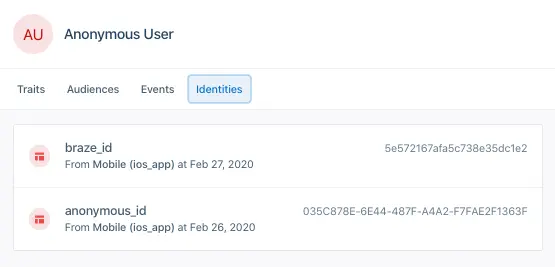
You can find the braze_id in the Braze UI or by using Braze's Users by Identifier API Endpoint.
Do Engage audiences sync with Braze Segments?
No. Audiences are sent to Braze as either custom attributes or custom events. You can use these events and attributes when building your Braze Segments and Campaigns.
All Braze user profile data (including custom events, custom attributes) is stored for as long as those profiles are active.
When you delete an audience or trait in Segment they are not deleted from Braze. Data sent to Braze is immutable and cannot be deleted or modified once they receive it. However, you can blocklist custom attributes and events in Braze.
Segment lets you change these destination settings from the Segment app without having to touch any code.
Optional
Web Only: By default, the Braze Web SDK ignores activity from known spiders or web crawlers, such as Google, based on the user agent string. This saves datapoints, makes analytics more accurate, and may improve page rank. However, if you want Braze to log activity from these crawlers instead, you may set this option to true.
falseOptional
The API key found in your Braze dashboard, used to identify your application as the app identifier. (Formerly 'API Key')
This can be found in your Braze dashboard under Settings > API Keys. (Formerly 'App Group Identifier')
Optional
Mobile Only: Every activity in your app must be registered with Braze to allow it to add in-app message views to the view hierarchy. By default, Braze's Segment integration automatically registers every activity. However, if you would like to manually register activities, you may do so by disabling this setting. For more information, see the Braze documentation.
trueOptional
Web Only: When this is enabled, all In-App Messages that a user is eligible for are automatically delivered to the user. If you'd like to register your own display subscribers or send soft push notifications to your users, make sure to disable this option.
trueOptional
If you've been assigned an API endpoint by the Braze team specifically for use with their Mobile or Javascript SDKs, please input that here. It should look something like: sdk.api.appboy.eu. Otherwise, leave this blank.
Select where you want Braze to receive, process, and store data from this destination. Choose your Appboy Gateway (ie. US 01, US 02, EU 01, etc.).
Optional
Web Only: Braze uses FontAwesome for in-app message icons. By default, Braze will automatically load FontAwesome from https://maxcdn.bootstrapcdn.com/font-awesome/4.3.0/css/font-awesome.min.css. To disable this behavior (e.g. because your site uses a customized version of FontAwesome), set this option to true. Note that if you do this, you are responsible for ensuring that FontAwesome is loaded on your site - otherwise in-app messages may not render correctly. This setting is only applicable if you are using version 2 of the Braze Web SDK.
falseOptional
Web only: Enabling this option will allow Braze dashboard users to write HTML In-App messages. Check out Braze Documentation for more information on this setting. This setting is only applicable if you are using version 2 of the Braze Web SDK.
falseOptional
Web Only: Set to true to enable logging by default. Note that this will cause Braze to log to the javascript console, which is visible to all users! You should probably remove this or provide an alternate logger with appboy.setLogger() before you release your page to production. This setting is only applicable if you are using version 2 of the Braze Web SDK.
falseOptional
Web Only: When this option is enabled, all Track calls with a property called revenue will trigger Braze's LogRevenue event.
falseOptional
Web Only: By default, a trigger action will only fire if at least 30 seconds have elapsed since the last trigger action. Provide a value for this configuration option to override that default with a value of your own. We do not recommend making this value any smaller than 10 to avoid spamming the user with notifications. This setting is only applicable if you are using version 2 of the Braze Web SDK.
30Optional
Web Only If enabled, this new setting delays calling of window.appboy.initialize until there is an identify call that includes a valid userId. When enabled, events for anonymous users will no longer be sent to Braze.
falseOptional
By default, links from in-app message clicks load in the current tab or a new tab as specified in the dashboard on a message-by-message basis. Set this option to true to force all links from in-app message clicks open in a new tab or window. This setting is only applicable if you are using version 2 of the Braze Web SDK.
falseOptional
By default, links from news feed cards load in the current tab or window. Set this option to true to make links from news feed cards open in a new tab or window. This setting is only applicable if you are using version 2 of the Braze Web SDK.
falseOptional
If you've been assigned an API endpoint by the Braze team specifically for use with their REST API, please input that here. It should look something like "https://foo.bar.braze.com". Otherwise, leave this blank.
Optional
Web Only: To send push notifications on Safari, Braze needs your Website Push Id. To get your Website Push ID, check out the first two bullet points here.
Optional
Specify your serviceWorkerLocation as defined in the Braze Web SDK documentation: https://js.appboycdn.com/web-sdk/latest/doc/module-appboy.html
Optional
Web Only: By default, sessions time out after 30 seconds of inactivity. Input a value for this configuration option to override that default with a value of your own. For example, to override the setting from 30 seconds to 30 minutes, input the value 1800. This setting is only applicable if you are using version 2 of the Braze Web SDK.
30Optional
This will send all page calls to Braze as a Loaded/Viewed a Page event. This option is disabled by default since Braze isn't generally used for page view tracking.
falseOptional
This will send only page calls to Braze that have a name associated with them. For example, page('Signup') would translate to Viewed Signup Page in Braze.
falseOptional
Server Side only: A flag to determine whether to update existing users only, defaults to false
false